How to Turn Windows Features On or Off via Command Line
The Windows operating system has hundreds of functions and features available to use. While the vast majority of these Windows features are available or enabled and ready to go from install, some are not and need to be switched on manually. Most of these extras are of no major use to ordinary users, but can be valuable to advanced and business users. There is an easy way to access and view what these features are by going to Control Panel.
Going to Programs and Features and selecting “Turn Windows features on or off” or typing OptionalFeatures into Start will show what features are currently installed and what is available to install. From this window you can enable or disable features like .NET Framework, Internet Explorer, Games, XPS components, Hyper-V, Telnet and even Windows Media Player or Media Center.
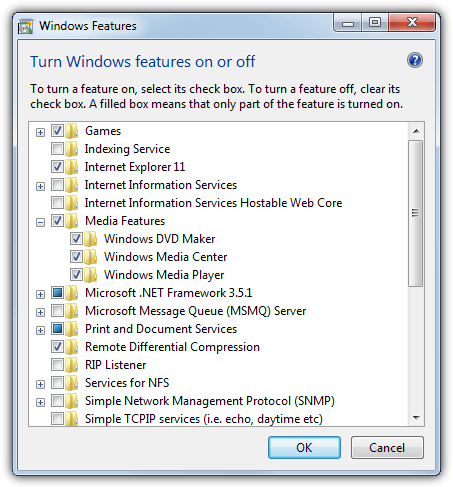
If there’s a feature you want to install simply check the box and click OK, unchecking will remove the feature from the system. Although it won’t make much difference to the performance or running of your computer, it does make sense to turn things off you know will never be used. Fewer features installed reduces the chance of things going wrong.
This method works fine but if you want more advanced control to manipulate the features remotely or from batches or scripts, you need another way. Thankfully Windows offer two solutions to do this, by using either the command line or from PowerShell. Here we show you how.
View, Add or Remove Windows Features Via Command Prompt
It’s easily achievable to get information about, as well as install or remove features from the command line. This is possible by using the DISM (Deployment Image Servicing and Management) tool. It’s is often used for changing or injecting drivers or Windows updates into WIM images. The DISM tool is found in Windows 7, 8.1 and 10 so the following commands can be used in any of those operating systems.
Make sure to open a Command Prompt with administrative privileges. To do that go to Start, type cmd and press Ctrl+Shift+Enter or right click start and select Command Prompt (Admin). If you receive an “Error: 740” running DISM, it means your Command Prompt is not in admin mode.
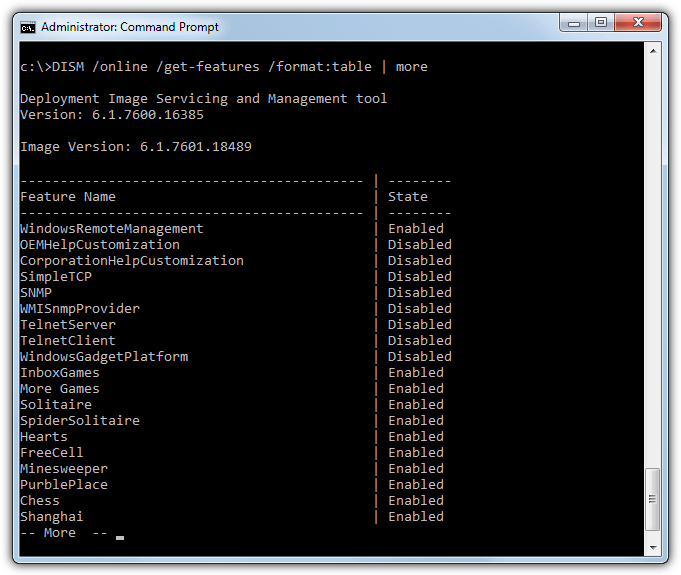
To get a full list of available features that can be, or are are currently installed on the system:
DISM /online /get-features /format:table | more
The online argument tells DISM that the local system is the target. Format:table is optional and displays the list in a more readable table format. The more at the end is also optional and splits the list into pages. Press Space to show each subsequent page. To output the list directly to a text file you can append something like “>C:\dism_Features.txt” to the end of the line.
If you want to filter the list to show just enabled or disabled features, change the DISM command slightly. Note the Enabled and Disabled words are case sensitive and need to start with a capital letter or nothing will show.
DISM /online /get-features /format:table | find “Enabled” | more
DISM /online /get-features /format:table | find “Disabled” | more
It’s possible to get more detailed information about a selected feature.
DISM /online /get-featureinfo /featurename:[feature name]
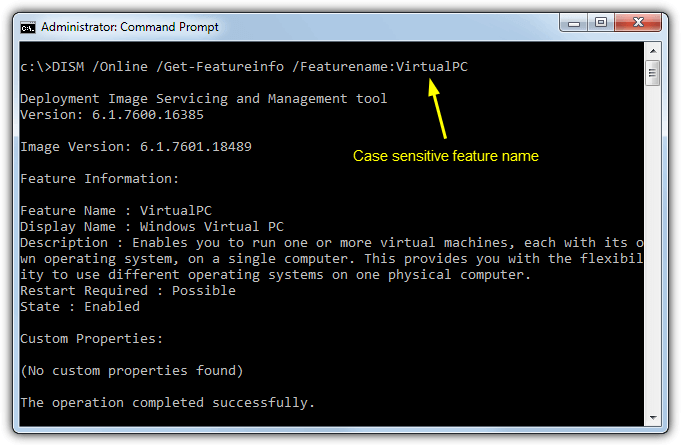
The name of the feature is case sensitive and you have to type it in exactly as listed, including any spaces. The information will show a description of the feature and whether a reboot might be needed. Custom Properties might also display a Microsoft support page URL where you can find more details.
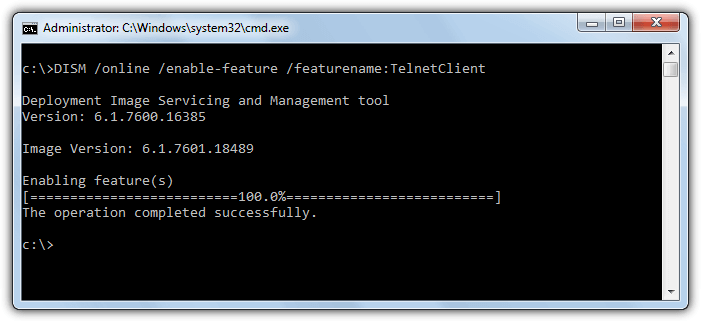
Enabling or disabling a feature is pretty simple, the feature name is again case and space sensitive.
DISM /online /disable-feature /featurename:[feature name]
DISM /online /enable-feature /featurename:[feature name]
Performing several operations at once on the same line is possible. This is done by appending /FeatureName:[feature name] one or more times to the command. DISM is a powerful tool, for some more technical reading about what it can do, there is a reference document at Microsoft Technet.
View, Add or Remove Windows Features Via PowerShell
PowerShell is Microsoft’s scripting language based around the .NET Framework. It’s mainly used for administering and configuring local and remote systems and you can also use it for the same task of viewing, adding or removing optional Windows features. It’s possible to use the DISM tool directly in Powershell but there’s also a set of integrated commands that work in a similar way.
PowerShell Optional Features in Windows 8.1 and 10
Newer versions of Windows have the function to view optional features built in. Make sure to run PowerShell as administrator or the commands won’t work. To view the list of features available on the system.
get-windowsoptionalfeature -online | ft | more
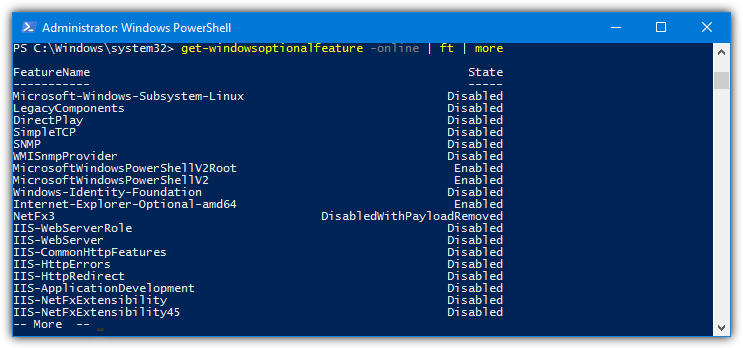
Like DISM, the online argument tells the command to work on the local system while the optional ft displays the results in a table and more breaks the list into pages. To filter the list into enabled or disabled features.
get-windowsoptionalfeature -online | where state -like disabled* | ft | more
get-windowsoptionalfeature -online | where state -like enabled* | ft | more
The where statement checks the state of the feature and filters the list accordingly. The reason to use -like and the * wildcard is some features don’t match the words exactly. For example, NetFx3 has a default state of DisabledWithPayloadRemoved which means the feature is disabled and its files are not on the system. As a result only “-like disabled” won’t show it in the list.
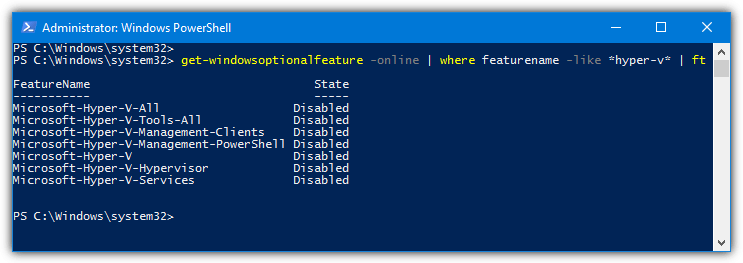
With PowerShell it’s no problem to use a similar command for filtering the list with specific keywords. The below example will show only the features that have the word “hyper-v” in their name.
get-windowsoptionalfeature -online | where featurename -like *hyper-v* | ft
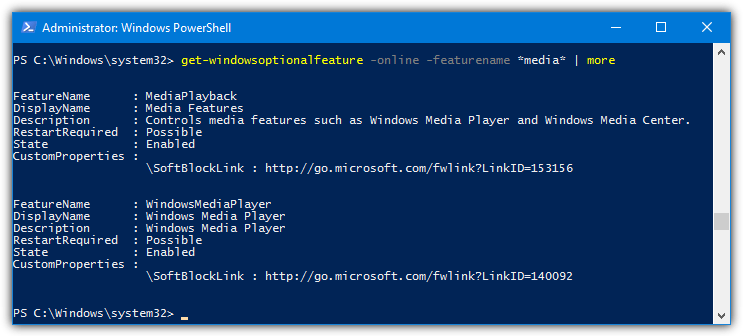
To get more detailed information about a specific feature:
get-windowsoptionalfeature -online -featurename [feature name]
This is very similar to DISM’s get-featureinfo argument although feature names are not case sensitive here. You can also use wildcards to list several features at once. The following command will get information on all features with “media” in the name.
get-windowsoptionalfeature -online -featurename *media*
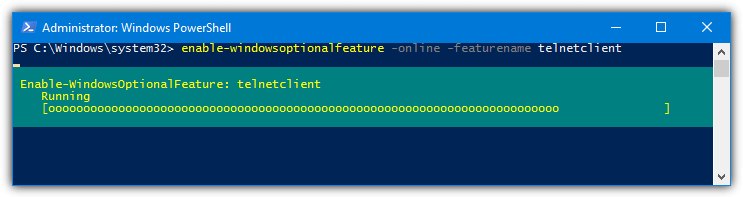
Adding or removing a feature is a pretty simple process:
enable-windowsoptionalfeature -online -featureName [feature name] -all
disable-windowsoptionalfeature -online -featureName [feature name]
The optional -all argument automatically adds any other features that are required for the feature you specified to work. By using two commands on the same line you can enable or disable multiple features at once
get-windowsoptionalfeature -online -featurename *hyper-v* | enable-windowsoptionalfeature -online -norestart
The above command first filters all features with “Hyper-V” in their name. Then those feature names are piped to the enable command to be enabled one after the other without rebooting. This causes seven Hyper-V features to be enabled in Windows 10 with a single line.
Like other Powershell commands, feature names for enabling or disabling are not case sensitive.
PowerShell Optional Features in Windows 7
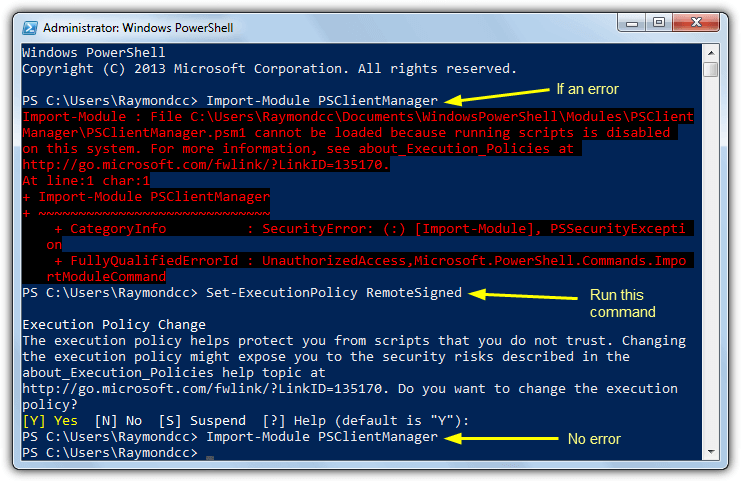
Besides standard DISM commands, Windows 7’s PowerShell does not have the ability to change the optional features. For that you will need to download a third party module which adds the function.
1. Download PSClientManager from Codeplex and install it. Then open PowerShell with administrative privileges, make sure to use the correct 32-bit/64-bit version for your system.
2. Run the following commands. Note the first command is only needed if you receive an error about running scripts is disabled while trying to run the second command.
Set-ExecutionPolicy RemoteSigned (press Enter at the prompt)
Import-Module PSClientManager
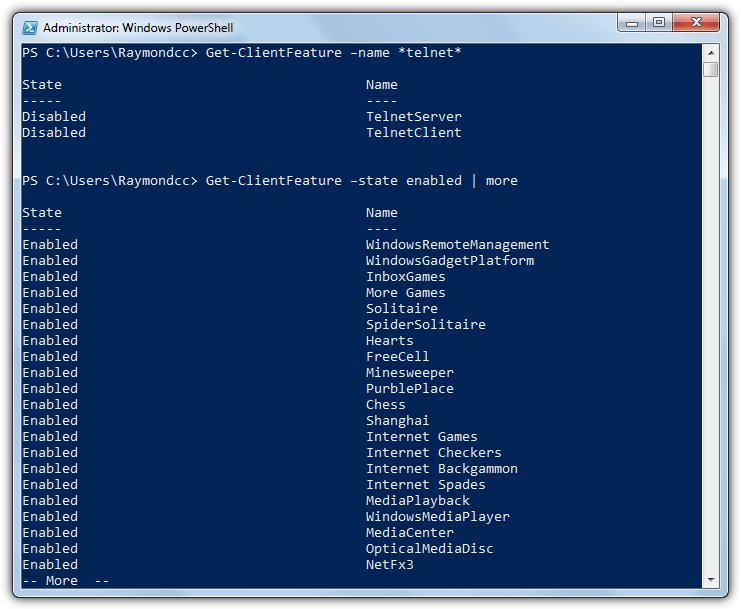
PowerShell is now able to process feature commands, they are broadly similar to the commands found in newer operating systems. To get a list of all features:
Get-ClientFeature | more
To filter a name string or only show enabled/disabled features, use the following:
Get-ClientFeature -name *string*
Get-ClientFeature -state [disabled/enabled] | more
Adding and removing features using the PSClientManager module is again quite easy:
Add-ClientFeature -Name [feature name]
Remove-ClientFeature -Name [feature name]
While the Get-ClientFeature is not case sensitive to view the features, adding and removing features is. Make sure you have the casing and spacing correct.
PSClientManager does also has another command Get-ClientFeatureInfo which shows the details of a selected feature. Sadly we couldn’t get it to work and it kept showing a blank result.
any one help me ..
if i want to enable Windows feature Feature name is print and Document services and in that I want to enable Internet printing Client only ..
how can I ???
Wow! You saved my butt! I spent hours setting up WinServer2x19, couldn’t get ASP.NET working, decided to unintall .NET… Bad idea! Only this advice got PowerShell and Server Manager running again. Thank you so much!
Thank you,
Your sharing makes my work easier.
Excellent article, thanks for the detailed description.
I had the same issue on Windows 10. I found some articles that said to place a copy of Windows 10 on my local drive and then use command line to reinstall .NET 3.5. Here is the command I used below. You will have to change the a path if you place your Windows 10 folder somewhere else other than C:\
C:\WINDOWS\system32>DISM.EXE /Online /Add-Capability /CapabilityName:NetFx3~~~~ /Source:C:\Windows10\sources\sxs
Deployment Image Servicing and Management tool
Version: 10.0.15063.0
Image Version: 10.0.15063.0
[==========================100.0%==========================]
The operation completed successfully.
C:\WINDOWS\system32>
Good article
If the following command does work
DISM /online /get-features /format:table | find “Enabled” | more
Please use:
DISM /online /get-features /format:table | findstr “Enabled” | more
Instead.
Thank you.
Good writing and pretty formatting. Well designed. thanks for knowledge sharing.
This post informs the advanced windows user to use windows like Linux i.e. Power of Command Line!
pkgmgr d/n work under XP SP3
Thanks for share
also you can use pkgmgr for command line add and remove system packages