5 Ways to Extract Frames from Video: Best Extractors in 2023
Every video or animation you see on your television, computer, phone, tablet or even at the movie theater is made up from a succession of still images. These images are then played one after the other several times a second which fools your eye into thinking the object is moving. The quicker the images are played, the smoother and more fluid the movement looks.
Most movies and TV programs are filmed at around 24-30 images per second, each individual image is called a frame which is where you see the term frames per second (FPS). A video file on a computer simply stores all the frames together and plays them in order, and the total frames stored for a typical movie reaches into the hundreds of thousands. If you want to capture an image of one or two frames it’s quite easy and you simply pause the video and press the Print Screen key.
If you want to extract a succession or range of frames or even all frames from a short video clip, capturing the images one at a time is incredibly inefficient and time consuming. For that purpose, you need a program that can extract however many video frames you want and save them to image files automatically, like jpg or png. Here are 5 ways to do it.
Best Video Frame Extractor Tools
1. Free Video to JPG Converter
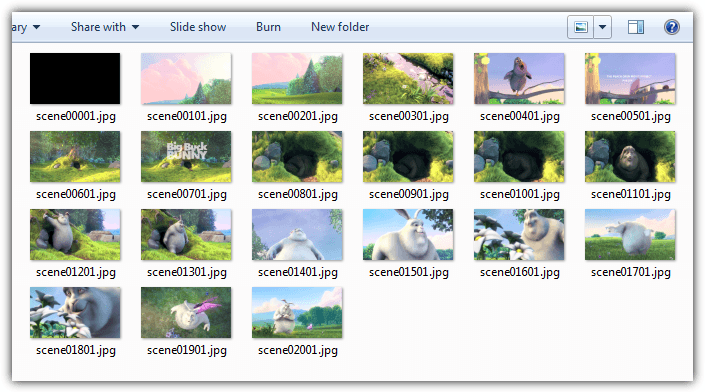
The program itself will save frames from a video file to a sequence of JPG images. There are four extraction methods to choose from, extract an image every number of frames, extract an image every number of seconds, take a total number of frames from the video or extract every single frame.
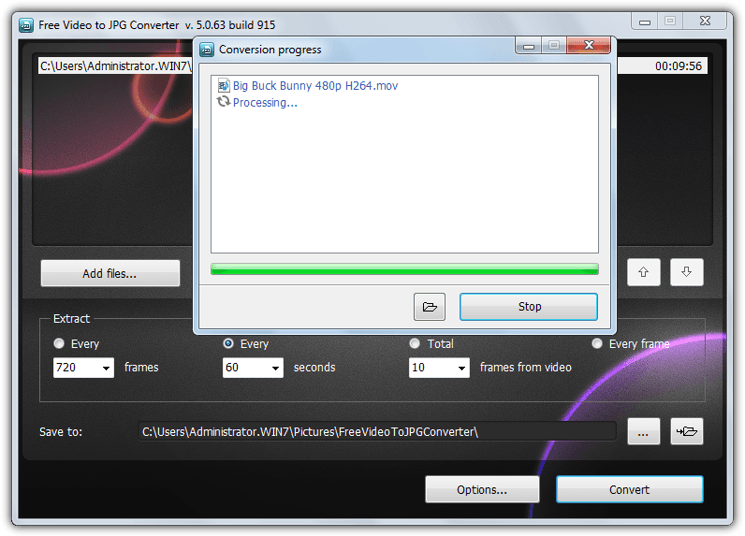
Add any number of video files by using the Add files button or drag and drop, most video formats are supported like MP4, MKV, AVI, VOB, WMV, MOV, FLV and etc. Set your extract criteria and optionally a different save location to the default, then start the process. Extraction times are reasonable and will differ depending on video length and how many frames are being extracted.
There are a few issues with one or two of the preset values or if you enter a custom value in the frame boxes. For instance, the total frames from a video setting of 10 doesn’t produce an expected equal split of 10 frames across the whole video. It’s still a useful tool though and worth checking out because Free Video to JPG Converter is still faster than extracting images in real time.
If you have Windows 10 but not .NET Framework 2/3.5 then it will be offered on install.
Download Free Video to JPG Converter
Note: Like all DvdVideoSoft products, Free Video to JPG Converter always comes bundled with something you don’t really want. At the moment it’s just a DVDVideoSoft product hub which you can delete the shortcut for on your desktop and a stats option on install which is opt in. That could change to anything else at any time though so you just need to pay attention during setup.
2. VLC Media Player
VLC is a popular open source media player that can save sequences of images from any video you choose to play. This can be achieved through the main user interface while more advanced users can use Command Prompt. First we’ll deal with the user interface method.
1. If you haven’t already, Download VLC media player and install or Download Portable VLC media player and extract to a folder of your choice.
2. Open VLC, go to Preferences (Ctrl+P) and click on Show All Settings at the bottom left.
3. Expand Video > Filters in the tree and click on Scene Filter. Set the image format (png/bmp/jpg etc), the path to save the files (leave blank to save to your Pictures folder) and the recording ratio. The ratio will save an image every xx number of frames, so if your video is 30 frames per second, a value of 150 will save an image every 5 seconds.
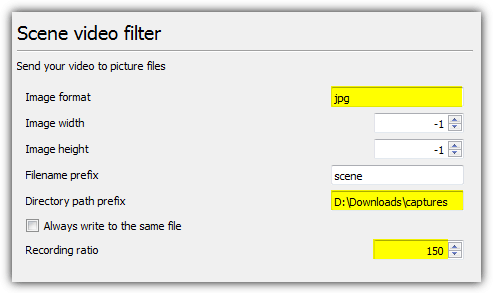
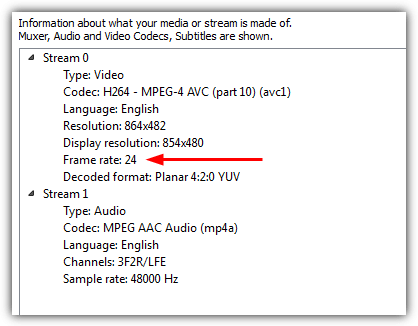
Tip: If you’re not 100% sure of the video’s frame rate, play it in VLC, press Ctrl+J and look for the frame rate number. Using multiples of that value will give you a recording ratio in seconds.
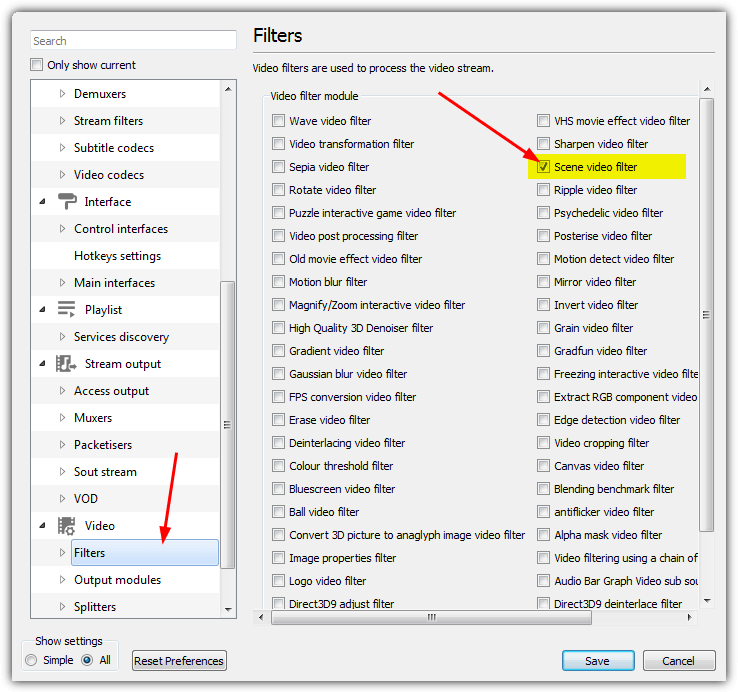
4. Click on Filters in the Advanced Preferences tree (don’t expand it) and tick the Scene video filter box near the top right, press Save.
5. Play the video file and the images will automatically start saving. They will continue to save until you press stop, even if you pause or skip through the video.
Note: If after following these steps images are not being created, close VLC after step 4 and re-open it, then play the video. For some reason more recent versions of VLC do not recognize the scene filter is enabled until you close and re-open the program.
Once you are done saving frames the option needs to be turned off again or it will do the same with every video you play. Follow steps 1 and 3 above then untick the Scene video filter box. The biggest drawback with VLC is that you have to leave the video running while taking the images, for this reason we recommend VLC for shorter clips only unless you plan to watch the video anyway.
3. Extract Images with VLC from the Command Line
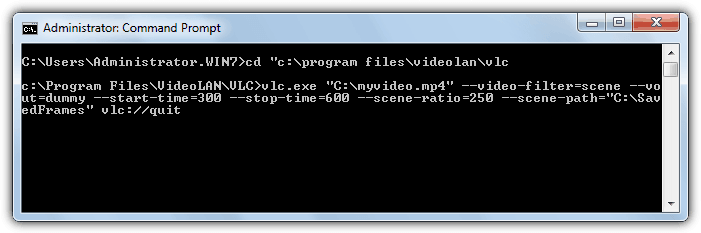
Using the Command line to extract image frames with VLC is similar to the GUI method which will save the specified number of frames. Open a Command Prompt and change the directory to where vlc.exe is located, then type in the command below:
vlc.exe “pathtovideo” –video-filter=scene –vout=dummy –start-time=300 –stop-time=600 –scene-ratio=250 –scene-path=”pathtosaveimages” vlc://quit
Pathtovideo is the name and path of the video file, –scene-path is the target folder for the images while –scene-ratio is the frame save interval. An advantage over the GUI method is the ability to use –start-time and –stop-time to start and stop saving frames at specific times (in seconds). Leave those switches out if you want to play the whole video. Refer to the complete list of commands at the Videolan website.
VLC will run and start the playback but without the screen. Once finished, it will automatically exit.
4. VirtualDub
VirtualDub is a video processing tool that seems to have been around for ever, but it’s still a popular and useful program. The main issue with VirtualDub is lack of support out of the box for opening video files like MKV, MP4 and MOV, but this problem can be rectified by installing the FFMpeg plugin pack. Here’s how to extract video frames to images with VirtualDub.
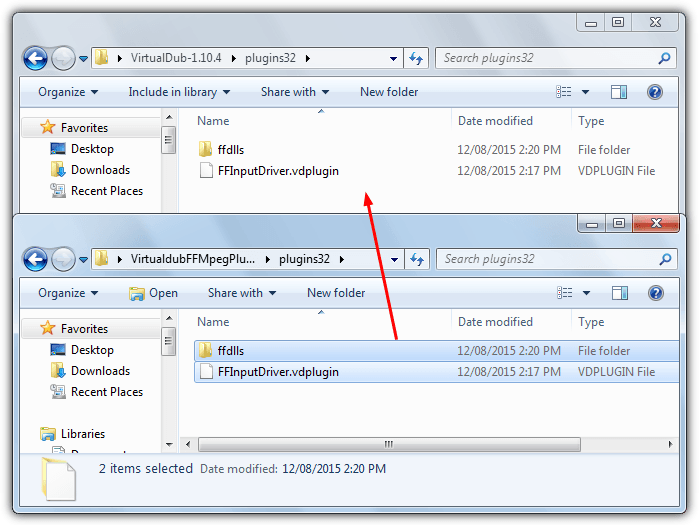
1. Download VirtualDub 32-bit version and also the VirtualDub FFMpeg Input Plugin from Sourceforge. Extract both zip archives.
2. Go to the VirtualdubFFMpegPlugin\Plugins32 folder, copy FFInputDriver.vdplugin and the ffdlls folder, then paste both into the VirtualDub\Plugins32 folder.
3. Run Virtualdub.exe and open the video file by using File > Open or drag and drop. If you wish to save every frame of a small video file to images, skip to step 5.
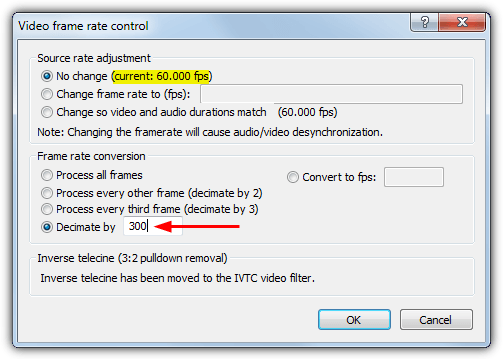
4. Go to Video > Frame rate (Ctrl+R) and select Decimate by, then enter a number to save an image every xx number of frames. The No change option at the top will tell you how many frames per second the current video uses. Click OK.
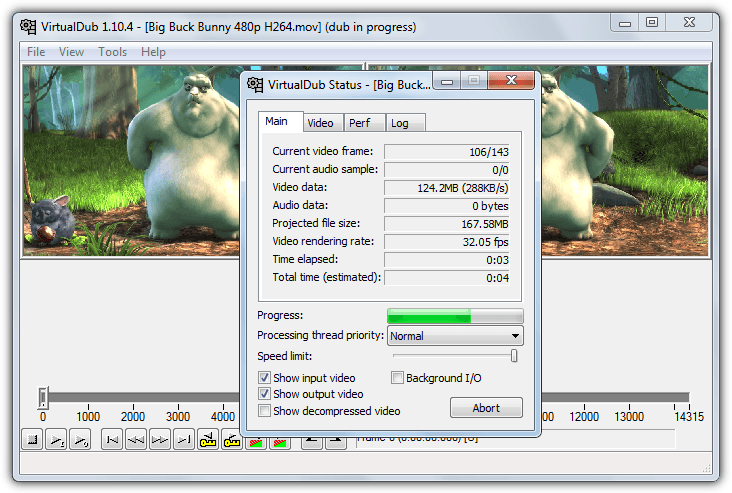
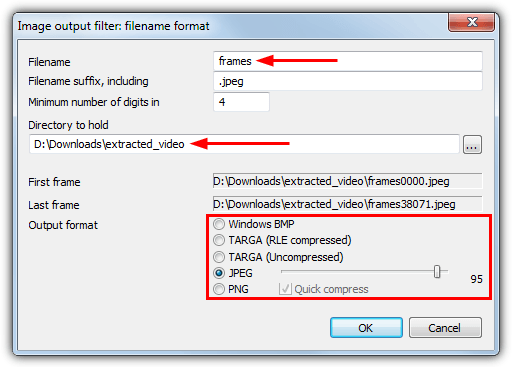
5. Click on the File menu > Export > Image sequence. Enter the filename to save as, the folder to save into and the output format of BMP, TGA, JPEG or PNG. Then click OK and VirtualDub will begin to process the video.
If the method of extracting every set number of frames is what you are looking for, VirtualDub is by far the best tool to use because it’s incredibly fast to extract the images and much faster than VLC and Free Video to JPG Converter.
An additional option in VirtualDub is setting a specific range inside the video itself so only images between the two points are saved.
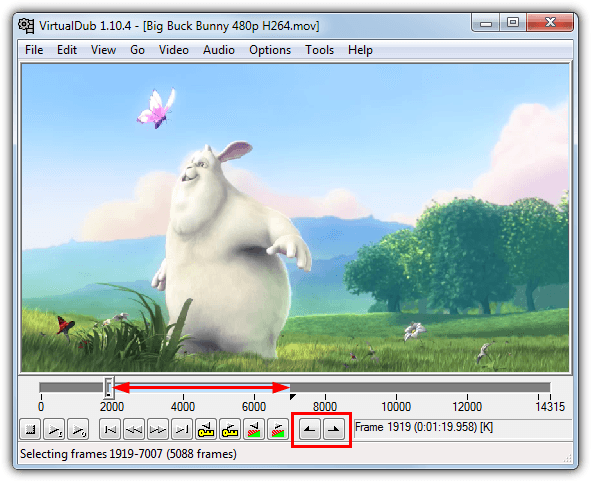
Before saving at step 5, use the slider and frame controls to set the start range and press the Home key or selection start button (in the red box above), move the slider to the end of the range and press the selection end button or the End key. Now when you save the images, only the selected frames will be saved between the start and end selection points.
5. FFMpeg
FFMpeg is a framework for encoding, muxing, transcoding, streaming and playing video files, and is the backbone of a vast array of video converters and players. It runs only from the command line so is better suited to experienced users. FFMpeg should handle just about any video file you throw at it. Here’s a simple command line argument.
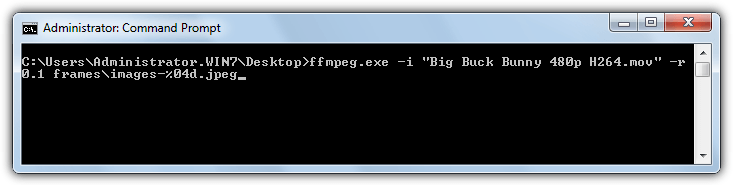
ffmpeg -i videofile.mpg -r 1 image-%04d.jpeg
The -i is the input video file with path and the jpeg filename simply saves jpegs (you can also use png, bmp, tiff etc) with the name and 4 place holding numbers, e.g. image-0001. The -r command is the frames to capture and the reverse of how you would expect it to work. 1 will save a frame every second while 0.5 will save every 2 seconds, 0.2 every 5 seconds, 0.1 every 10 seconds, 0.0167 for 60 seconds and etc. Use 1/seconds in Windows Calculator to get the ratio you need.
More advanced usage can add a starting point in the video file with the -ss command before -i, while -t can also be used to add a duration. Both use an [hours:]minutes:seconds argument.
ffmpeg -ss 04:00 -t 03:00 -i videofile.mpg -r 0.033 image-%04d.jpeg
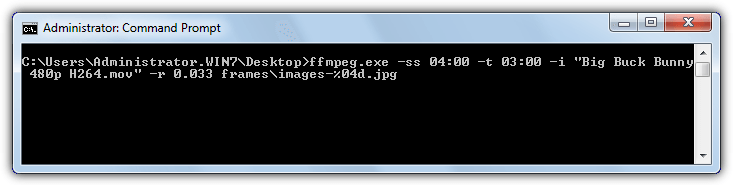
The above command will start at 4 minutes in, then save a .jpg at 30 second intervals for 3 minutes.
The are hundreds of commands and you really need to read the FFMpeg documentation to understand how it can be fully utilized from the command line and in scripts.
Final Note: There are obviously other tools around that can do a similar task, Batch Video to image Extractor would have been included but it’s quite unstable and has been discontinued by the developer. Daum PotPlayer and GOM Player are media players that work in a similar way to VLC, meaning you have to play the video in real time to get the selected frames.

I tried the VLC method, however, it dropped lots of frames. I realize it’s hardware-dependent this way.
For my application, I need to extract _every_ frame. It is unimportant to extract frames at playback rate. Videos range from about 5 seconds up to about 1min, 15sec., from 640p to 2160p, and are MP4 or MOV. I have hundreds of them so batch capability would be ideal or I’d have to figure out how to automate the process with Microsoft Power Automate.
Any ideas anyone? I would think there would be some off-the-shelf solution. Windows strongly preferred but I could go Linux if necessary. The alternative is to create something in MATLAB, which would be a PITA and likely dog-slow.
Thank for the article and vlc method.
I want to extract all frames.Ultimate aim is to get a 3d model via sfm -structure from motion.
With vlc get all frames reliably is not that straightforward.
all frames = recording ratio at 1
– first off, the number of frames saved depends on the speed of saving the images themselves.
saving the images onto an usb stick will result in many dropped frames compared to saving them on an SSD disk
– slowing down the playback speed of the video will allow more time to save and thus more frames are saved
a short clip 7sec 30fps at 0.5 playback yielded 280 frames, with about 80 duplicates saved on ssd
I vaguely remember there is an option for dropped frames in vlc, perhaps this has an impact too.
If you’re using Windows, I’ve recently found Frame Extractor and it works well for basic needs. furnacecreek.org/frameextractor/
Wonderful walk through. Just FYI, for VLC conversion, if you create a directory for your images and REMOVE the directory when you don’t need it, no images will be filtered, so you can leave the settings permanently on in VLC and it will only pull images when you recreate the target directory.
With VLC, can I remove one frame from a video and replace it with a completely different frame?
Is it possible that two frames after each other, in a recorded video can be identical?
I need to save a frame from a video every time there is a sound starting. Any ideas on a tool to do that? The videos are over giga size and could have hundreds of sound events that I would like to extract into images when they happen.
After ‘marking’ a sound track with Adobe Audition, it delivers a text file (CSV extension) with the time code of each sound start and end, typically a kind of text format to write subtitles for a video.
Each line of the CSV file starts with the start timing of a sound.
Next you need a software that will extract a frame on each timing obtained; that can import the CSV file or any text subtitle format, since CSV to any text only subtitles format conversion is not too difficult.
Thank you for this – I used VLC to create my images
Thank you! I was getting crazy with VLC until I saw your comment about the newer versions and that we have to re-start it after step 4. Worked perfectly.
Why is the best method not the first? I’ll put ffmpeg as the first and best/only option tbh…
Because it’s your opinion it’s the best method, many others will disagree and think something else is the best. And btw, this is not a “countdown” or “top 5” list, the options are put in no particular order.
I seem to remember FFMpeg is not completely reliable as it doesn’t extract at the exact times all the way through a video.
It works for me, but “Recording ratio” value 1 does not actually extract every frame, it takes what seems to be every other frame. The strange thing is that when I did this earlier, I got every frame. I have that extract saved so I could compare this.
I suspect this might have something to do with each individual system and how fast it can save frames every second. This could be why you get a different result because the system possibly just tries to save the frames it can and if some are missed, so be it.
Genial, Super! Thank you for this help.
Blender does a perfect job writing a movie file to .png or .jpg
First time I write a comment on the internet : thanks a lot for giving us all those tools and advises ! Seems like VLC had troubles on my computer, so I tried on VirtualDub, it went very well !
Thanks for the compliment. :)
What sort of troubles were you having with VLC? I’ve been thinking about creating a little tool to help with extracting images through VLC, but if people are having major problems with it, I might think again…
For me, no matter what I do and what tutorial I follow, VLC never extracts any frames
I can only suggest that:
a) You are not following the tutorials correctly.
b) There is a problem with your VLC or your OS.
c) The files are saving, just not to where you expect.
In all the testing I’ve done with VLC over the years, I’ve never had it not extract any frames at all after it had been set up correctly.
I’m having the same problem, where VLC is not always making photos, and sometimes it freezes and makes a bunch of some frames and skips most of the video.
In my case, I used VLC just as directed, needing to close it and re-open it to get it to work. It worked on probably a dozen videos before I turned it off for 6 months. Now I can’t get it to work as instructed again.
It’s a little tricky, because there’s the place where you turn on the filter, where it has one name, and there’s the place where you select options for it, which has a slightly different name (something like one says video scene filter, and the other says scene filter, or something close but not the same
0.
There may be a problem with my system, but it’s a new hotrod system which I spent about $2500 on, not including the monitor.
The most important part is step #4, turning on the scene filter. At least if you do that, some images should be saved using the VLC defaults.
The fact it worked for you and then when you went back to try sometime later, it didn’t, suggests a possible VLC settings/program issue. You could always try the portable version from portableapps.com or go into settings with your current version and press the “Reset Preferences” button at the bottom.
Perhaps you could answer this question, what would you find more helpful. A separate little tool to sort these settings for you without opening VLC or a dedicated video on how to use the settings in VLC itself?
Thank you heaps for all explanation! You’re da bomb :o)
Thank you so much. I was messing around with VLC and looking at downloading other things, all the while I could just do it with FFMpeg which I’m already using to convert the very videos I want to extract to make a time lapse of!
Thank you!
Can I exract image from video with the same properties as video like from which camera the video was taken and focal length etc.
I don’t think so, there is a slim possibility FFMpeg might do something along those lines but you’d have to use a search engine or go through it’s massive amount of documentation to find out.
VLC solution worked on windows, does not work with Linux VLC
Newer versions of VLC for *nix and macOS have a bug where you have to quit VLC then relaunch for it to work. Just tested on macOS Catalina with the latest version of VLC (3.0.8) and can confirm it’s still there but that trick does work.
This worked in Linux (PopOS) for me, once you configure the settings DONT close the app. Open the video file and bang your images will appear. The one gotcha I found was it will overwrite the save images with each new video you play. So before I play my next video I rename each image file.
Is there an option to take a picture from a live video and broadcast images in Live?
Good stuff right there
VLC is complex,
Free Video to JPG Converter is slow,
VirtualDub is the best…
Really good advice, I had to convert 2 Months of CCTV footage into a time-lapse. Option one saved me lots of work on Premier! Just set the computer working and a couple of days later I had a huge folder of images. Used an astronomy program called PIPP to stitch them all together into a movie for a client. They loved it.
Perfect…so very quick and lightweight/easy to use.
Thanks for the PIPP suggestion!
You can use video-photos.com to extract frames from inside your browser (nothing is uploaded to the server). No software needs to be downloaded for this.
Thank you so much. This tool is really useful, super simple and easy to use, no need to install anything and work instantly. Kudos for you..
It only does one frame at a time. Who needs help doing that?
How do you take one frame at a time?
Thanks for the quick reminder. I had forgotten how I did it years ago.
VirtualDub is so simple to use and so quick.
:)
Yeah this is really outdated because I followed it to a t with VLC and it didn’t work because half of it is no longer there in the program.
The VLC guide is completely up to date and if I took new screenshots in the latest VLC 2.2.6, they would look exactly the same. You are not quite following the steps correctly.
Where is the default folder where it starts saving the images too? I don’t know if what I’m doing is correct or not. Also is there a way of knowing that it’s working?
That’s mentioned in step 3, the default folder is Pictures.
Thanks my friend, I missed that.
Works great. Thanks
I’m also having trouble with the VLC captures. I’ve tried restarting it after saving the settings, I’ve checked in pictures, and I’ve tried sending it to a different directory but I still don’t have any screen captures showing up. I’m pretty sure I’ve followed the steps but I must have gone wrong somewhere.
For step 4, is that just hitting save in the same Scene Filters window where you enter the file type, save directory, and ratio? Or is there some other place and I’ve just missed actually turning it on?
No, for Step #4 click ON Filters in Advanced Prefs, DON’T expand it. There will be a number of checkboxes on the right, check the Scene video filter box near the top right and press Save. Then re-open VLC and play the video.
I’ve updated the article slightly to hopefully make things easier to follow.
I also followed the VLC method to a tee and it did not work…
It looks like its writing files somewhere because of how slow its going
but when I look in the output folder…nothing
After turning on the scene filter (step #4) close VLC and reopen it before playing the video. I had to do that when testing just now or the images were not being saved.
Remember, if you don’t set a path the images will save to the (My) Pictures folder.
I made a solution to creating ‘n’ amount of screen shots in a video file.
First I had to write a bit a code and extract the duration of the video.
I converted that into seconds and divided it by the number of shots I want to get my intervals.
I also made a script that takes those intervals and takes the snap shot of the media at a fixed time.
The solution takes a lot longer than video to jpg converter.
~Linux henchman 4 life!
Amazing,
I especially like the 3rd option.
You are awesome!
VLC dropped frames but ffmpeg worked. For the newer version (from the documentation):
3.3 How do I encode movie to single pictures?# TOC
Use:
ffmpeg -i movie.mpg movie%d.jpg
anyframe is very easy to use but consumes too much data
The information you have provided for VLC must be very, very old. There are a number of items that simply don’t exist. For example the image (which I’m not able to paste here) that you have provided above, as appearing in the Scene filter, does not exist. The only option is to simply check the Scene Filter box.
There is something vaguely similar in the Video section but it’s so different that the explanation and instructions provided here are useless.
Also please be aware that Virtual Dub, which used to be very useful, is now filled with adware and malware. I had to remove it from my computer and it was hard to get rid of all the stuff they had installed without my permission.
The information is up to date and I can follow the instructions with the latest VLC without any issue. You are obviously not following correctly. The window for the scene video filter shown in the image above is in VLC 2.2.4 and where the guide says it is.
If you have a version of VirtualDub with adware, you did not download it from the SourceForge link provided. The real program contains no adware or malicious code of any kind and is open source and portable. Please recheck your sources.
Took me a while to find the typo in the command line version of the vlc.exe command above. It turns out that cutting and pasting the text provided above results in some very mysterious errors. The reason is that the quotation marks in the web page are some unicode smart quotes not unix worthy ascii quotation marks. They of course look like quote marks in your terminal so you don’t realize what the problem is.
vlc.exe “pathtovideo” –video-filter=scene –vout=dummy –start-time=300 –stop-time=600 –scene-ratio=250 –scene-path=”pathtosaveimages” vlc://quit
anyhow thank you for this. You might want to change your command line listed above to UTF-8
also I never did get the VLC gui to work as you described.
For those who are interested, I made a free to use tool which allows you to extract frames from local MP4, OGG and WEBM videos, inside your browser! It runs on Javascript, so no uploading is required.
It can be found here: video2jpeg.com
Beware that Safari does not support OGG and WEBM. A YouTube feature may be added in the future.
Hello there,
I am a cofounder of anyframe.net which is a tool to extract images from your videos. We support youtube videos and your own videos. List of supported formats is growing. Our tool runs in cloud with no installation needed.
Could you please add a review of anyframe.net ?
Just tried it. After registering, it works as claimed.
Thank you for your wonderful knowledge sharing. I just started take video shots using this technique successfully. best wishes
Hello, thank you very much for the very helpful tutorial!
I tried to do this with VirtualDub, but sadly got a problem.
When I try to export an Image sequence with VirtualDub, I always get the error:
“Output settings must be 16/24/32-bit RGB, uncompressed in order to save a TARGA, JPEG, or PNG sequence.”
I didn’t insert any compression, I even moved all newer plugins I once installed (except FFmpeg Input plugin) into a different folder, because when I googled for that error, someone said a plugin might interfere with it, and thus the error message occurs (although it doesn’t resemble what the real error is).
I want to export as PNG, I checked/unchecked the compression option, but as it wasn’t successful, I also tested JPEG in 100 and 90 quality and I tested TGA, but to no avail, nothing works to export as image sequence for me, I still get that error message.
Any idea, why?
I can without a problem export as GIF though, just not as image sequence.
Thank you in advance for any help!
Thank you very much for the great instructions. There is one typo that threw me off for a second, under 2. VLC Media Player, Step 3, it reads: “3. Expand Video > Filers” and should read: “3. Expand Video > Filters”
Fixed! Thanks…;)
Hello,
Free vid to jpg converter brings high & low res footage to same res ie 96dpi
Will any other method give a better resolution ?
Thanks
Alec