Create Full Windows Backup with Clonezilla to SAMBA or SSH Server
Clonezilla is a well known free and open source disk cloning/imaging software which is mostly used by professionals, especially in mass cloning of multiple computers using multicast. The free price tag on Clonezilla helps a company or an organization to save a lot of money instead of spending hundreds or thousands of dollars for licensing on a corporate/enterprise edition of a disk imaging or cloning software.
Although Clonezilla is text-based and does not come with a friendly graphical user interface like what you see in Acronis True Image/Macrium Reflect/AOMEI Backupper, it is not really that difficult to use. Most of the options can be selected using the keyboard while only a few steps require manual input such as providing the username, password and path. We’ll show you the step-by-step instructions on how to create a full backup using Clonezilla and save the image to another computer in a network.
Downloading Clonezilla
Downloading Clonezilla can be a bit confusing if you are not familiar with Linux OS or CPU architecture because there is a total of 10 different ISO/ZIP files to download due to the different combination between branch, version and architecture builds. There is no need to worry on running the wrong version because Clonezilla will simply inform you that it is unable to boot.

First of all, you should choose the stable branch because the testing branch is beta and is most likely to have some bugs. As for choosing between Debian or Ubuntu based, you should go for Ubuntu if you need the latest hardware support. The i386 or i586 version has the best compatibility to work on most computers but it is the slowest due to the single core, single processor support.
Installing Clonezilla
You can run Clonezilla either from a CD/DVD or USB flash drive. If your computer is unable to boot from USB, then you can use the CD/DVD medium instead.
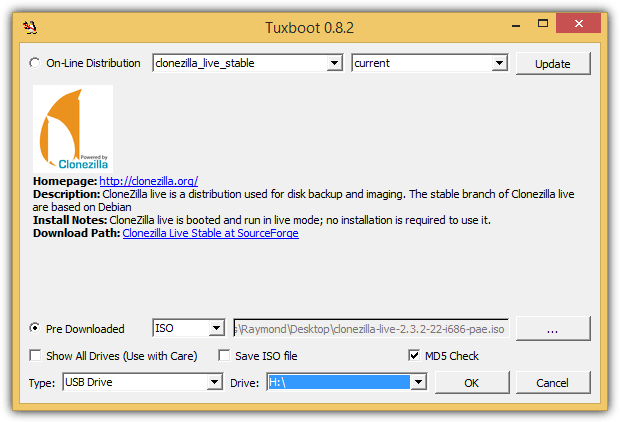
To run Clonezilla from a USB flash drive, you can use a free tool called Tuxboot to create a bootable live USB. If you haven’t download Clonezilla, Tuxboot has the ability to automatically download the current version of Clonezilla. Alternatively, you can also select the “Pre Downloaded” option and browse for the Clonezilla ISO file. Select the USB flash drive from the list and click OK which will install Clonezilla into the drive.
To install Clonezilla onto a disc, you’ll need to download the ISO file type and use any of the 10 software mentioned in this article to burn the ISO file to an empty disc.
How to Boot Up The Computer with Clonezilla
1. The first step is to boot up the computer using the CD/DVD or USB flash drive with Clonezilla installed. You can refer to the on-screen instructions when starting up your computer where it will tell you the key to press to select the boot method.
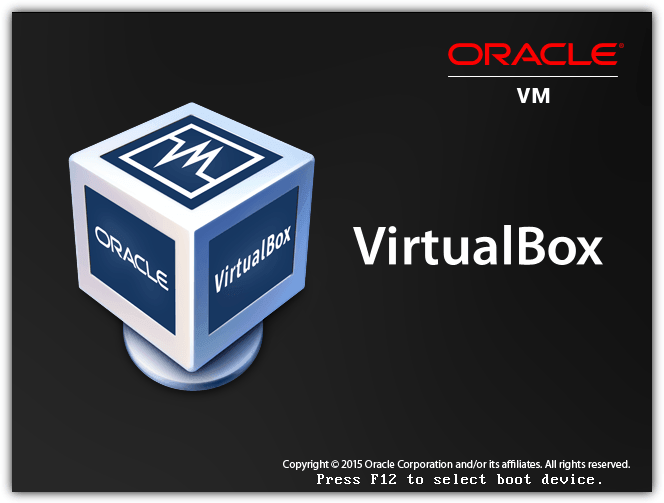
The example above tells me to press the F12 key to select the boot device. After hitting the F12 key, I get a simple menu to select which boot device such as Floppy, CD-ROM, DVD, USB that I’d like to use to boot up the computer. If you’ve installed Clonezilla onto USB, then you’ll need to choose the USB option in the boot menu.
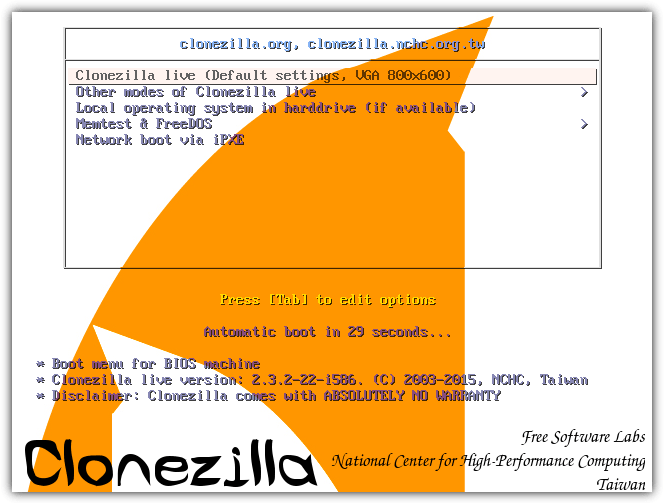
2. If you’ve done it correctly, you should see a Clonezilla menu like the screenshot below. There are a few options to choose from but the first one with default settings would normally work on most computers.
Note: If Clonezilla fails to create or restore the backup, you should use the Memtest option to check for memory problems on the computer. A bad memory can cause all sorts of weird problems on the computer.
How to Back Up the Computer with Clonezilla
The default options for the first four steps would work most of the time. Simply press the Enter key to select:
1. “English” as language
2. “Don’t touch keymap” for keyboard mappings
3. “Start_Clonezilla” to run Clonezilla instead of entering the command line promp
4. “device-image” to create a backup image of your hard drive. The second option device-device is to clone/restore disk to disk or partition to partition.
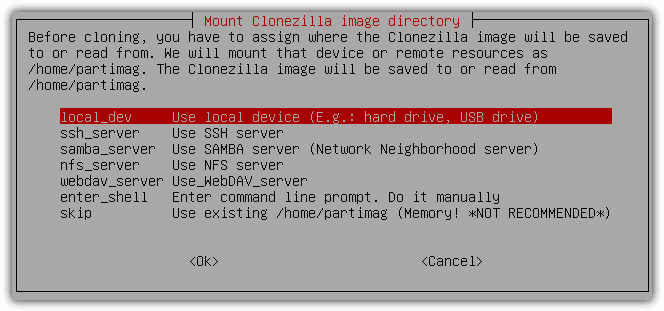
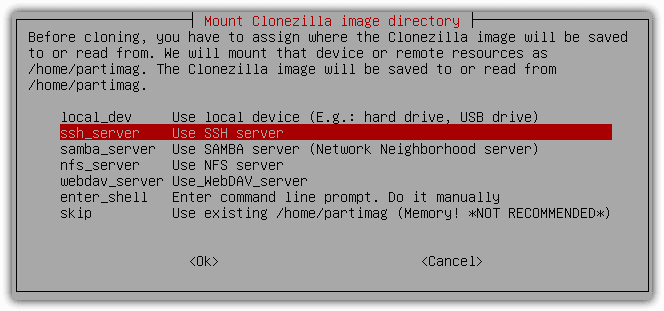
5. This step in assigning where the Clonezilla image will be saved is very important. The first option local_dev which is selected by default is to save the backup image to a hard drive that is locally connected to the computer. In this article we’ll be looking at saving the backup image to a remote computer located in the same local area network using SSH and Samba server.
Backup Image to SAMBA Server
If you’d like to save the backup image to another computer on the network running the Windows operating system, you should select the “Use SAMBA server” option. SAMBA is a networking protocol that can interoperate between Linux/Unix servers and Windows-based clients. Clonezilla runs on the Linux operating system while you want to connect to a Windows computer, making SAMBA the perfect option.
1. Select samba_server option and press Enter.
2. Most if not all home-based routers have the DHCP service enabled. This allows a computer connected to the network to automatically obtain a usable IP address. DHCP is selected by default so just press Enter to continue.
3. The next step is to enter the target IP address of the remote computer that you’ll be saving the image to.
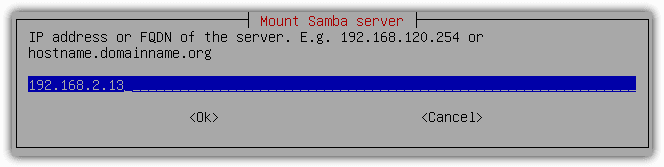
4. If the remote computer is a normal Windows workstation, you can select the Cancel button. Press the TAB key twice to select the cancel button and press Enter.
5. Now you’ll need to specify the user account name that has write permission to the shared folder where the image will be saved on the remote computer.
6. Next is to specify the path to save the image.
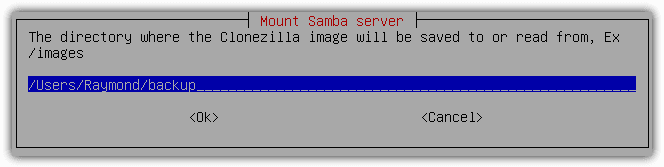
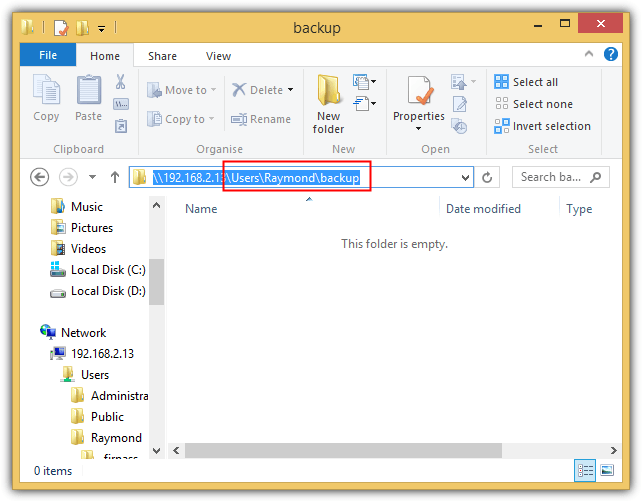
You’ll need to enter the relative path to the shared folder. You can find out the relative path by opening a Windows Explorer or press the WIN+E key, go to the address bar located at the top or press ALT+D to get there automatically, and type double backslash followed by the IP address of the remote computer. For example:
\\192.168.2.13
If you’re prompted to enter a username and password, enter the user account login that has write permission to the folder where you want to save the backup image. Now go to the folder where you want to store the backup image. When you’re there, press Alt+D again to see the full path of the directory. The relative path that I will need to enter in Clonezilla is \Users\Raymond\backup.
7. Select “auto Use system default” option for security mode and press Enter.
8. You will now be asked to enter the password for the username that you’ve entered in step 5.
9. If you’ve got it right, you should see the file system disk space usage like what is shown at the screenshot below.
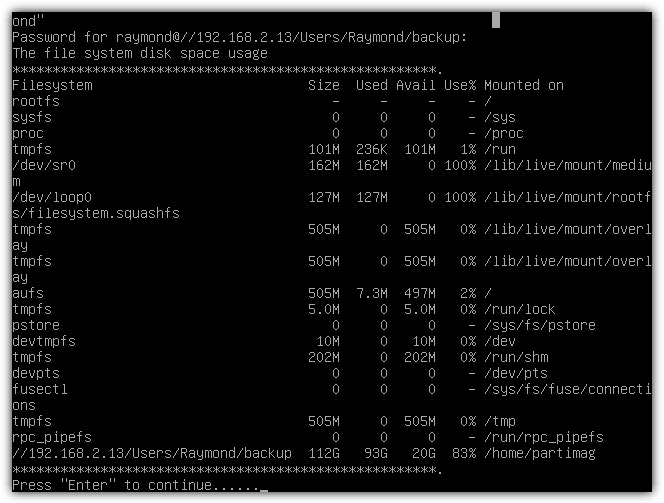
If you’ve entered an incorrect user account or the wrong path, you’ll see a message saying “Clonezilla image home directory /home/partimag is not a mounting point! Failed to mount other device as /home/partimag!“. If this is the case, you can go back to the mounting options by pressing the N key until you get a choose mode to select rerun1.
10. Once you’ve get passed the mounting options, select the Beginner mode.
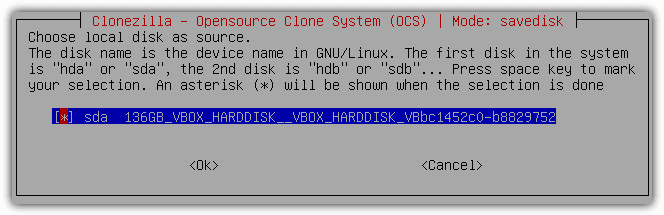
11. At the next step, you can select either to save the entire disk or partition as image. If you’d like a full backup of your hard drive, choose savedisk and press Enter.
12. You can now input a name for the saved image. By default it uses a combination of year, month date and hour as the name of the folder. Press Enter to continue.
13. If you only have a single hard drive, then press the Enter key to continue. Otherwise you can choose the hard drive that you want to backup.
14. You can optionally check and repair the file system before saving it. We’d recommend to skip this part by selecting the first option.
15. Choose the first option to check the saved image and press Enter. This is a safety precaution to be sure that the saved images can be restored in future.
16. If you need to password protect the image so that only the person with the correct password can restore the image, select the second option. Otherwise, choose the first option and click OK.
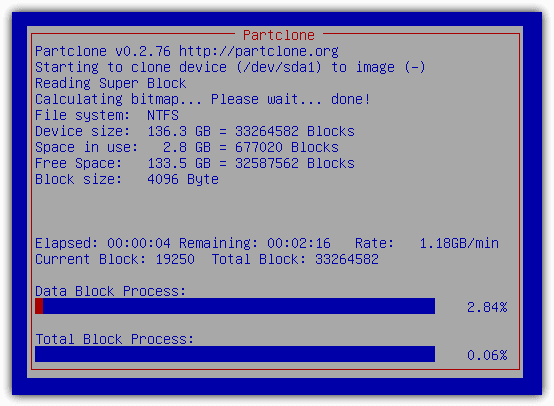
17. Press Enter to continue followed by the Y key to confirm saving the hard drive to image.
Backup Image to SSH Server
The good thing about backing up the image to a Windows shared folder is you don’t need to install any third party software on the remote computer. All you need to do is configure the proper permission on the shared folder and get the absolute path correct in Clonezilla. However some people might find it hard to mount a Windows shared server correctly and perhaps would find it slightly easier connecting to a SSH server.
You will need to install a SSH server software on the computer where the image will be saved to. We recommend Bitvise SSH Server personal edition (previously known as WinSSHD) which is free for non-commercial users.
1. Download Bitvise SSH Server
2. Run the setup installer, tick the “I agree to accept all the terms of this License Agreement” checkbox and click on the Install button.
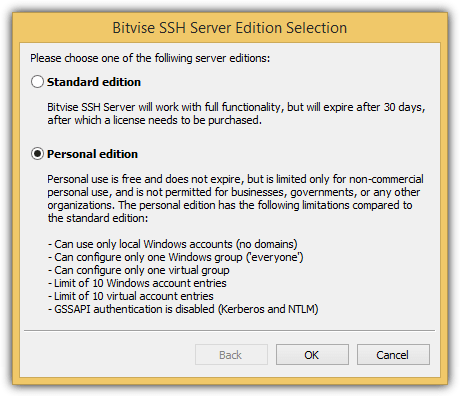
3. Select Personal edition and click OK.
4. Fill in the name, last name and click OK.
5. When the installation has been completed, click the OK button to close the window and restart the computer. Bitvise SSH Server service will automatically run whenever the computer boots up.
Your SSH Server setup is complete and is ready to accept a connection from Clonezilla to save the image to the remote computer. On the computer that you want to create the backup image, follow the steps 1-5 from the “How to Back Up Computer with Clonezilla” and select ssh_server instead of samba_server.
1. Select dhcp and press Enter.
2. Enter the IP address of the server running SSH service.
3. Leave the port as 22 and press Enter. Port 22 is the default port for SSH and you only need to change it if you’ve configured a different port on the server.
4. Enter the user account name with write permission. The default setting of the Bitvise SSH Server allows login using the Windows user account. An advantage in using SSH server option in Clonezilla is there is no need to specially configure a shared folder with write permissions to store the backup image file. As long as the local user account is able to read and write a folder on the computer, then you can use it as a backup path to transfer the backup image.
5. Now it comes to the part where you’ll have to specify the directory where the Clonezilla image will be saved to. You will need to enter an absolute path, meaning the full path recognized by Windows operating system. An example is C:\backup.

The remaining steps are the same as shown previously in backing up image to SAMBA server from step 8.
How to Restore Computer with Clonezilla
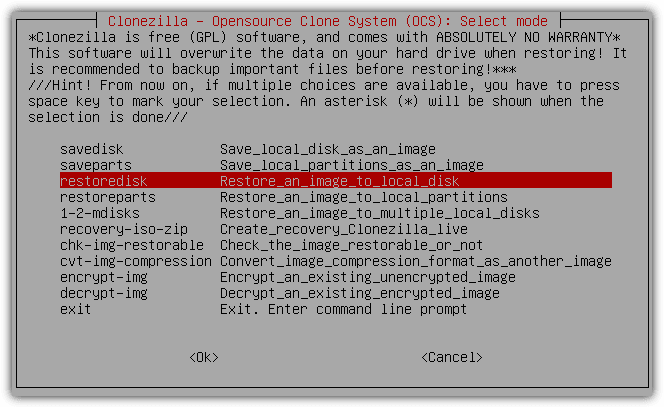
The steps to restore a computer using a backup image created with Clonezilla is pretty much the same as the backup instructions. When Clonezilla detects the backup image files in the specified path, then there will be additional options such as “restoredisk” and “restoreparts” in the menu.
You might also like:
 Backup Files from a Non Booting Windows to LAN or FTP Using a Live CD
The terms BACKUP, CLONE, IMAGE, FULL BACKUP, etc always let me confuse…….. can someone please explain all the possibilities?
Hi Felipe
Backup implies copying files from source to destination (can be the same of different disk or partition/ folder). This also has 3 flavors- Full, Incremental and Differential. Backup can also mean just copying your files from one computer/disk/partition/folder).
Cloning means to make an exact replica of the source
Image means Creating a mirror image of the backup/source folder/disk/partition
Full Backup as the word suggest is only a full backup. This is also known as Normal Backup
I have provided this information in short, you will be able to get the information by googling :)
Thanks
good program thanks raymond. Thanks a lot.
I’ve been using clonezilla along with PXE boot for more than 4 years now, and it simply rocks.
.) never any crc errors. I wonder how people can have some..
.) never used samba to store images: only plain NFS
.) clonezilla can image parts/disks using partclone, partimage (hence clonezilla is not “slower” than partimage), ntfsclone, or plain dd.
.) never ever tried to image one Windows computer, then deploy to several computer. Anything else than sysprep is a pain in the ass. Can’t even imagine that some “admins” use Ghost without sysprep, thus spreading clones on their network.
We use SUSE 11, with a samba server for our images. We have over 2TB of images and have never had an issue restoring any of them. Great product.
I user Clonezilla Live CD and a USB HDD for imaging and deploying loads of PCs every year. Its been fantastic. We’ve shaved hours off our deployment time. Currently, I am setting up a samba share to pull the images from and put images too since I am getting tired of carrying this old HDD around. I assume it will be a little slower over the network but I can still start it and let it run.
Thank for the article.
thanks raymond.
thanks ray
hi ray
i have used clonezilla enterprise successfully on 33 machines.
rodwell
I always though it would be very difficult to backup an restore a partition, but it’s really simple, thanks :)
Thanks Ray, That is a good program
Looks good. I need to try it for backup and restore where I do not want to install Macrium.
Interesting, thanks Raymond!
Thank you Raymond,
very handy program
bookmark! :D
thanks, Ray!
It’s awesome when we can backup through LAN network. I love the features CloneZilla has, by using it, we can do all type of backup :)
Thank you very much for this article.
Really useful thanks ray