How to Disable DVD Drive on Windows 7 Laptop
Something introduced into Windows Vista and and is still there in Windows 7 and 8 was that if you don’t have a disc in your CD or DVD drive and you click on the drive in Windows Explorer (or double click on it in Computer), Windows will very kindly open the drive tray for you to insert one. On the face of it, this may seem like a nice thing to have, but quickly gets annoying if you sometimes click on the drive by mistake. This is especially true when your drive is hidden behind a door in your case, the tray will just hit the back of it.
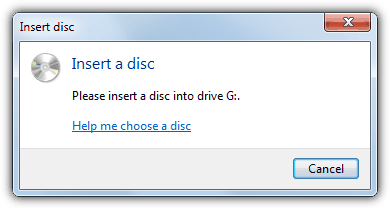
Although it sounds like a very trivial thing, in Windows there is no setting available to change it where you can just tell Windows not to eject the drive tray. It seems that auto eject is hard coded into Windows and there is no perfect way to disable it, only various workarounds. Windows assumes that when you try to access the optical drive and no disc is present, then you would want the opportunity to insert one.
There are a few very simple workarounds which don’t require any special actions. One is to right click on a drive to access it instead of left clicking, which isn’t very useful when you’re so used to left clicking. Another is to leave a disc in the drive at all times so that if you click on it, you will see the contents on the disc instead of it ejecting. Again, not something you might find acceptable. Here’s a few other workarounds that aren’t perfect, but are more useful.
Disable The Windows CD/DVD Burning FeatureOne of the ways to turn off the auto eject annoyance is to disable the built in Windows CD/DVD disc burning feature. Not great if you use integrated burning, but it doesn’t disable burning on your RW drive altogether and therefore you’re still able to use third party software such as Nero or ImgBurn etc.
This registry edit works in all versions of Vista, 7 and 8 and is better for the average person than using the Group Policy Editor which does the same thing but isn’t available in any Home versions of Windows .
1. Press Win key+R, type regedit and press Enter, or go to Start and type regedit into the search box.
2. Navigate to the following registry key:
HKEY_CURRENT_USER\Software\Microsoft\Windows\CurrentVersion\Policies\Explorer
3. Right click on the Explorer key and select New -> “DWORD (32-bit) Value” and give it a name of NoCDBurning. Double click on it and enter a value of 1.

Now simply log off or restart and Windows burning will be disabled along with the eject on click. If manually editing the registry isn’t for you or you don’t have an Explorer key, there’s a couple ways to get the same result to disable disc burning. The first is to download the zipped registry files below, then double click the one you want and accept to import the data into the registry:
Download Disable/Enable Vista 7 & 8 Disc Burning registry files
Alternatively, there is a small portable utility around that can do exactly the same thing and add the NoCDBurning key to the registry. Disable Auto Eject requires the .NET Framework version 2 which you will have installed anyway.

Simply run the tool and select Disable to turn off burning and also the auto eject, or Enable to do the opposite. Then log off for the change to take effect.
Disabling the Drive While Not in Use
This workaround is only really acceptable if you don’t use your optical drive that often and simply lets you disable the ROM drive while you don’t use it, therefore the drive won’t eject on click by accident because it’s not available.
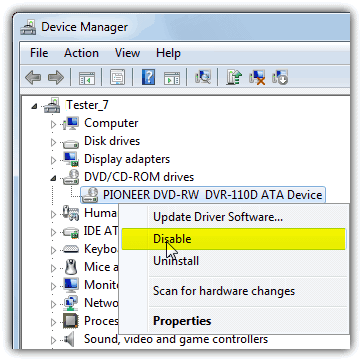
This can be done from Device Manager and while the drive isn’t in use, you simply go to Device Manager and disable the drive, and then go back and enable the drive when you want to use it. This method is a little extreme for some users but if you very rarely use the ROM drive, it won’t be such a problem.
To disable/enable the CD/DVD drive in Device Manager:
Right click on Computer -> Properties -> Device Manager. Expand DVD/CD-ROM drives, right click on the drive and select Disable. Then do the same for enabling the drive again, the Enable option will be in the same place as Disable was on the menu.
To make things easier, Microsoft has a tool called DevCon to automate doing the same thing and acts as a command-line alternative to Device Manager. Using DevCon, you can enable, disable, restart, update, remove, and query individual devices or groups of devices. With that in mind, it’s easy to create a simple batch script or desktop shortcut to enable or disable the optical drive.
When using Devcon to enable or disable a device, you’ll first need to know the specific hardware ID of your optical drive. To find the hardware ID, follow the same step as above to get to Device Manager except select Properties instead of Disable. In the device properties window, go to the Details tab, click on the Property drop down and select the second entry, Hardware Ids.
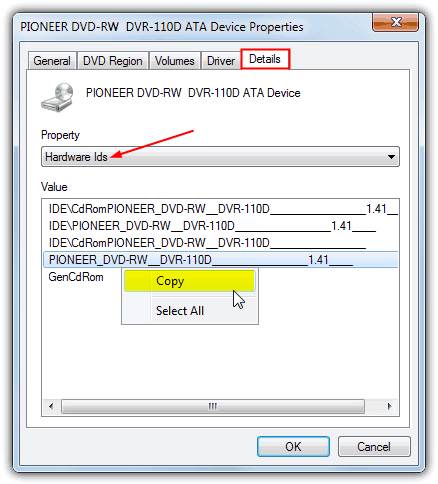
As you can see, the hardware ID for the DVD-RW drive above is very long and most other ROM drives will have an ID equally as long. Instead of typing the whole ID you can simply right click on it and select Copy. Any ID in the list will work although using “GenCdRom” will disable EVERYTHING listed under DVD/CD-ROM drives in Device Manager. The command to disable the specific drive with Devcon is:
devcon.exe disable [hardware ID]
If you want to disable your only optical drive or all optical drives you can use:
devcon.exe disable gencdrom
Do note that you can also use the asterisk “*” to enter parts of an ID, so something like *DVR-110D* will also work on the drive in the screenshot.
To enable CD/DVD drive using devcon:
devcon.exe enable [hardware ID]
What you can do is create 2 batch files, one with the name enable.bat with the line “devcon.exe enable [hardware ID]” and another called disable.bat with “devcon.exe disable [hardware ID]”. Alternatively, you can do the same with a desktop shortcut and simply place “devcon.exe [enable/disable] [hardware ID]” into the target or location box.
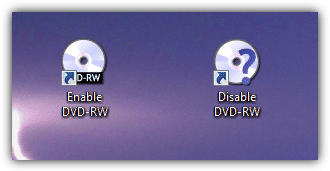
Make sure to place place the Devcon.exe file in your C:\Windows folder. Whenever you want to enable or disable the drive(s), run the associated .bat file or shortcut.
The Devcon utility only comes as part of The Windows Driver Kit (WDK) which is a massive 620MB ISO file. As it’s ridiculous for you to have to download all that for an 80KB file, we have extracted both 32-bit and 64-bit executables to make it easier. Do make sure you use the 32/64-bit version specific to your version of Windows.
Tanks for this information. This build in functionality of Windows 7 to auto eject if the drive is empty and you click on the drive letter accidentally was really annoying to me. Shame on Microsoft for this from me. To get rid of it I opted to disable the drive while not in use. And to get quick access to the device manager I created a shortcut to C:\Windows\System32\devmgmt.msc over which I can open it.
Thanks. Greeting from Azerbaijan ;)