Safely Remove Hardware Icon Missing in Windows 7 [Fix]
We’ve previously written about a trick on how to hide or remove safely remove hardware try icon. Although the tip has it’s uses, it’s is probably not useful for most of us because the majority of users own a USB flash or portable hard drive nowadays and we need the Safely Remove Hardware icon to eject or unplug our USB device so that the files in our USB flash drive won’t get corrupted.

Although Windows by default chooses “Optimize for quick removal” in the Write Caching policies tab in the device properties window, there are times you might have noticed when you try to stop the plugged in USB flash drive or device at Safely Remove Hardware, it says “The device cannot be stopped right now. Try stopping the device again later.” If you forcefully attempt to unplug the USB flash drive during that time, there is a big risk any previously opened files will become corrupted and then you will have to depend on data recovery software to get back the files. So, never fully trust the “Optimize for quick removal” setting!
There are times that the Safely Remove Hardware Icon is missing or disappeared from the system tray. In Windows Safe Mode, you can’t find the Safely Remove Hardware icon at all. Is shutting down or restarting the computer the only way to safely stop and unplug your USB devices? Fortunately not. Here are some ways you can bring back the Safely Remove Hardware window when the icon is missing.
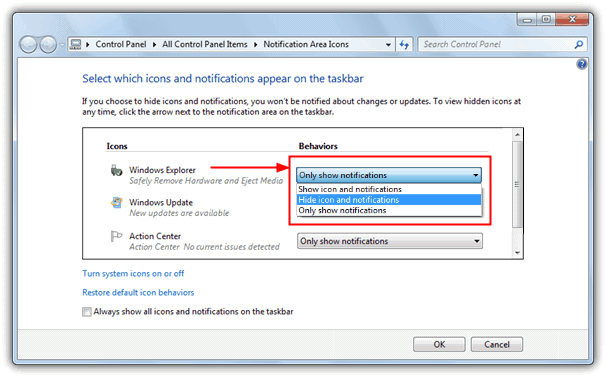
Solution 1Firstly, and the most obvious solution of all is make sure that the Safely Remove Hardware icon is not set as “Always Hide“. In Windows 7 make sure “Windows Explorer – Safely remove hardware and eject media” is not set to “Hide icon and notifications” by selecting Customize on the tray and checking the icon status in the list. In Windows XP it’s pretty much the same apart from you right click on a space in the tray -> Customize Notifications, and make sure safely remove is not set to to “Always Hide”. You’d be surprised how often this simple thing can be the cause.
Solution 2
The manual way of bringing back the Safely Remove Hardware window is by running a command. Go to Start -> Run or press Win key+R, type in or copy and paste the following line and click OK. The command below IS case sensitive.
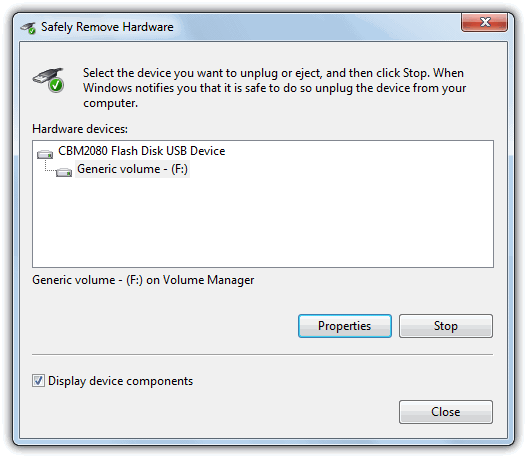
rundll32.exe shell32.dll,Control_RunDLL hotplug.dll
That will bring up the “Safely Remove Hardware” dialog which you can use to stop the USB device that you want to unplug. When you close the window, this often has the side effect of also restoring the icon back to the tray.
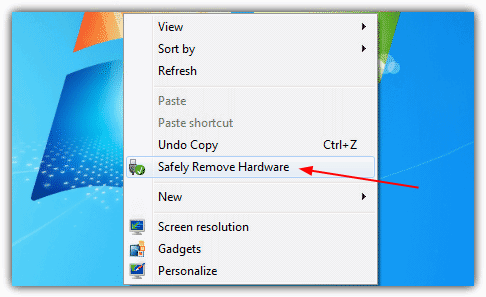
If somehow your Windows installation is not in the best shape and the Safely Remove Hardware icon is never displayed in your tray, you can create a shortcut or even a batch file using the command line above. Just run the shortcut or batch file and the Safely Remove Hardware dialog window will appear. To create a shortcut:
1. Right click on the desktop and click on New -> Shortcut.
2. In the “Type the location of the item” box, type in, or copy and paste the rundll line of text from above.
3. Click Next and then give it a name like “Safely Remove my Hardware”, and finally click on Finish.
Or to make things even simpler, just Download a ready made desktop shortcut with the default Windows hotplug.dll icon which does the same as above. Alternatively if you don’t want to have an icon on the desktop, you can place the Safely Remove Hardware entry into the right click context menu for the desktop. Download the registry files, and click on one to add the entry and the other to remove it.
The 3rd and 4th solution can be found on page 2.
The ‘create shortcut’ solution worked for me. Thanks for solving a daily annoyance.
my problem is, the “safely remove hardware icon” appears on taskbar but the notification for removing the hardware does not appear or pop up when i tried to remove any USB device.
Many Thanks for this ..
Solution 2 … worked for me Windows SP3 XP ..
none of these work due to access restrictions or because restarting loads the OS and settings from a template. c:\>goto Square1
Here is the best solution that I discovered by accident after 2 hours figuring out how to do get it back.
If you have Windows 8, 8.1, or 10 the solution is
1) Click on Start icon
2) Scroll down the list till you get to Windows Administrative Tools
3) Click on Settings. This will bring up your Services (Local) folder
4 Scroll down till you find Plug and Play and right-click on it. It will bring up a splash window. On the Splash window click on Properties.
5) Under the General tab go down to Startup Type and change to “Automatic”
6) Click Apply and exit.
7) Restart your computer and you find in your taskbar next to your WiFi, Volume Control and above the clock and date the Safely Remove Hardware icon.
You’re good to go.
Every now and then the icon disappears from the tray and when it does I have always been hesitant to remove the USB stick, fearing files might get corrupted. So I have had to resort to restarting my computer. Annoying and inconvenient.
I used your solution 2. It works fine and I can safely remove the memory stick and it also restores the icon to the tray. I now have the shortcut on my desktop so it will be quickly available any time the problem occurs in the future.
Many thanks for a quick and easy fix.
Method No.3 did the trick for me! Many thanks indeed!!
I have a public computer at my local library that the idiot monkeys at the county IT department have removed the Safely Remove button from the Taskbar and of course have all the Control Panel, etc. settings administratively locked, so none of this works, they either fail because of restrictions or in the case of downloaded 3rd-party programs, don’t do anything, at least not without restarting, which wipes everything the patron has done. I already spend about 7 minutes making these things usable. It used to be there, but of course they removed it because, ya know, that would be too usable and convenient.
Of course I can tell the librarians who can do nothing about it except tell the IT people about it which again are idiot-monkey county employees who can set up as in install sh–, but have no idea WTF they’re doing as far as the end user is concerned. They even tell the librarians who come to them with a problem that they’ve personally observed, ‘no, it doesn’t do that.’ Even so, that would naturally involve several weeks or months before being reimplemented.
Yes, I know I can go to the drive letter in Windows Explorer and select Eject **which Microsoft has so wisely put right next to Format,** because some of the senior citizens who also use library computers have such fine eyesight and motor control, but I think I’ll just start yanking drives out until they’re corrupted and then suing the county for $100K; the TOS you have to agree to when you start a session makes no mention of that sort of thing, just what content is appropriate online or from your own files.
Dear Raymond,
You are a lifesaver! I have spent all day searching for a fix for the missing eject safely icon. I started with my system and then went on the internet. I have read and tried over 50 solutions including on a Microsoft forum. Nothing worked. I finally came to your website and in a few minutes my problem was solved. Words can not convey my gratitude but I had to let you know how grateful I am. GOD bless you and yours.
Charity
Thanks.
Your registry fix was the best fix in my case.
It took a while searching through other websites ineffective, basic fixes until I found yours.
Thanks a million. the second option was skookum!
My little problem with Safely Remove Hardware and Eject Media under Windows 10 does not seem to be in the article or the comments. I have a USB external, backup drive. All the family use USB Flash Drives. Frequently, the Backup Drive gets ‘Unplugged’ by mistake. Is there a way that I can hide the Backup Drive from the Safely Remove Hardware and Eject Media list?
I’m not sure there’s a simple way to remove a single entry from Safely Remove Hardware while allowing it to function.
There is a way I can think of but it involves using the freeware USB Disk Ejector and a method to hide the Safely Remove Hardware icon. Basically you tell USB Disk Ejector to hide card readers and then configure your backup drive as a card reader, then hide the Safely Remove icon. We have an article on how to hide the icon in Suggested Reading to the right. >>>
It’s not perfect but will do what you want.
I used a temporary file cleaner and after that I don’t see the option to “safely remove hardware”, although I can click on the icon.
I just typed “rundll32.exe shell32.dll,Control_RunDLL hotplug.dll”. Clicked on the portable HDD and Windows says the USB device is not removable and cannot be ejected or unplugged. :-O
Windows 10 and eject icon
I also thought the icon had disappeared.
I have a hub and an extension cord between my usb stick and the lapop (tosty bar) When I use the hub for mouse headset etc. I don’t see the eject Icon. The moment I insert a USB stick in the hub the Icon reappears. It must have something to do with version or .. … voltage electricity (headset and mouse are brand new and Logitech). USB stick is a scandisk and a fe years old.
I hope this will help you to analyse the problem
kind regards
Surely it ought to be possible to correct a corrupted or missing registry entry to restore a missing ‘safely remove hardware’ icon. Or maybe not, because my icon disappeared after updating my motherboard chipset INF files.
Thank you Raymond. Typing
rundll32.exe shell32.dll,Control_RunDLL hotplug.dll
into windows 10 ask me anything bar also works.
Thanks for the help
Well, after my own solution of opening Explorer on Windows XP and choosing “Eject”,
I decided to look for someone smarter than me, in order to restore that Hardware Symbol.
Finally got it!
Thank you very much.
Thank you!
I tried everry which way to get my eject safely icon back on the taskbar but everything failed. So I tried your solution on making a shortcut on the desktop and this worked like a charm. Many many thanks.
I have usb drive… when i plug it.. it show green icon in the task bar… but it does not show the removeable drive…what should i do with it? i have important data inside it :(
Dude … Just back up your data. Don’t put yourself in that kind of risky situation in the first place. If you needed to unplug the drive, and you didn’t want to lose your files, then at that moment, copy your most important, if not all of the files, to the computer you have it plugged into. Therefore avoided the risk. Pretty simple. … Ultimately, electrical devices fail. Guaranteed! … So accommodate for the loss/risks! :)
You saved the day !! I spent hours on this one and your solution took 2 minutes. Thanks
Thanks so much!! Excellent solution! I am so grateful! Worked instantly!
Excellent. Type 3 did it for me, both system tray & context menu.
Many thanks.
“this often has the side effect of also restoring the icon back to the tray.” in my case it did, but the moment I tried to click it, it dissapeared again… any thoughts? I really need this icon back.
thanks so much i tried solution 3 option on how to restore my safely remove hardware icon and it worked great i got it back instantly on my taskbar and the notification taskbar list
Awesome! Solution 2 worked for me! :~
Where do I go for solution 1 on Windows Vista?
Right click on the taskbar -> Properties -> Notification Area tab -> Customize.
I found all of your explanations on how to remove my kindle from my PC very readable. However, none of them worked at all; I am unable to bring up the safely remove hardware icon with any of them.
I got so close with one of them only to be thwarted by this message ‘the kindle internal storage USB device is not removable and cannot be ejected or unplugged.
I am perplexed!
The RUN command worked like a charm. My Safely Remove Hardware icon appeared immediately. I can’t thank you enough for your help! You’re the BEST!!!
Creating desktop shortcut provided most excellent solution. Many thanks.
thank you master!! that did it!
Your “free and helpful advise” really did help me and after following the instructions my icon was returned to where it needed to be. I have never seen the point in hiding icons so it was just lost and I had to keep going into My Computer to find the eject button on the appropriate place.
Thank you so much for the logical steps to follow.
Thre rundll dialog worked perfectly for me to restore my “safely remove hardware” icon. Thank you so much.
very helpful. thanks a lot!
Thanks a million, the command is really clever :)
I tried it and it works! Thanks!
thanks a lot!!:)
Thank you so much! this is incredibly useful.
thank you so much dude, it’s really a help.. i was able to restore my safely remove icon. thanks again..
Thanks Raymond!
Thanks a million Raymond…. The info was very helpful :)
Cheers Raymond! The “Run” command helps.
excellent – thank you.
thanks-worked great, got my icon back
Thanks for the useful tip…………….
thanks very much! the command helped me a lot, by bringing back the Safely Remove Icon on the taskbar
Thanks! the “rundll32…” command worked beautifully for me on Windows XP Professional SP3
What worked for me was to follow your steps in your 2nd example and click on the “safely remove hardware” link, then remove the hardware. The taskbar link has returned. Couldn’t have done it without your excellent instructions!
Thank U Raymond thank you So Much !!!!
you are awesome. I had no “safely remove hardware” icon at the bottom, and I googled “safely remove hardware missing. ” Copy, paste the command like you said to Start, Run, clicked ok and the icon is restored. God bless you and your family.
Thanks for the RUN command tip. It worked like a charm. I saved the RUN command line in a CMD file on the desktop and all I have to do if the icon disappears again, is to double click die CMD file.
Very helpful – thanks for the tips.
this was extremely helpful – many thanks!
Thanks Raymond, the run cmd worked a treat ! Main thing is, I didn’t have to remove my ipod unsafely. Thanks a million mate !
Cheers,
Tony
Thanks that was so easy.
Hi Raymond, thanks for the help on ‘safely remove hardware icon missing’. I have tried all sorts of methods suggested by so many – but yours is the only one that I found worked. I now have in ‘my favourites’ bookmarks
Thanks, optimizing performance brought the remove safely icon back.
better than microsoft support
thanks
“rundll32 shell32.dll,Control_RunDLL hotplug.dll” command worked on WinXP.
Thanks Raymond =)
Hey thanks for this. An easy way to implement your advice I discovered was to right click on desktop > create new shortcut > paste “rundll32 shell32.dll,Control_RunDLL hotplug.dll” (without the quotes) in the filepath > then give it a useful name e.g “Safely Remove Hardware”.
This worked for me on XP and now I can put that shortcut on my quicklaunch so it will never be an issue again.
Thanks, Worked like a charm.
“rundll32 shell32.dll,Control_RunDLL hotplug.dll”
It works on my Win2K
Thank you Raymond
Thanks for the useful tip! Just wanted to let you know it worked for me.
Whooo hoooo!!!! Thanks Ray man!!
No more USB troubles!!!for now….
great tool and tips. I always had this problem on my laptop. Now i don’t have to worry about corrupting the files on my usb drive any more