Recover Formatted Hard Drive: Best Free Data Recovery Tools
Recently there was a discussion in our forum about data recovery and we were quite surprised to discover that many people don’t think that data recovery software works. In our experience, it does work more often than not and it’s saved me many times after accidentally deleting important files, or after formatting a hard drive and forgetting to backup some files. There was only once, I wrongly formatted my external hard drive and somehow I wasn’t able to get back all my files. I have several external hard drives, all with the same casing and no label. I guess the reason I wasn’t able to get back my files is because I might have copied some files to another hard drive.
The data recovery market is quite competitive and there are loads of products out there, but mostly it’s paid commercial software. Some may have a free version or trial but usually you only get to view the files that can be recovered or you’re able to recover a small amount of data such as 64KB. There are still some free and unrestricted products out there that can help you get your files back, and we have 10 useful data recovery programs here for you to have a look at.
When recovering data from deletion or corruption, there are some simple rules to follow for the best chance of recovery:
- Try to stop using the device or partition you want to recover from because if you’re trying to recover files from your C drive for example, any activity such as browsing the internet might accidentally overwrite what you’re trying to get back.
- Do NOT install, download or extract the data recovery software onto the hard drive or external device that you want to recover from.
- Do NOT save the recovered files onto the same hard drive that you’re recovering from, some recovery tools will automatically warn you or not allow you to do it.
Do take note that these are our top 13 picks for Free data recovery software and are in no particular order of preference. Being at number 1 does not necessarily mean it is better than number 5.
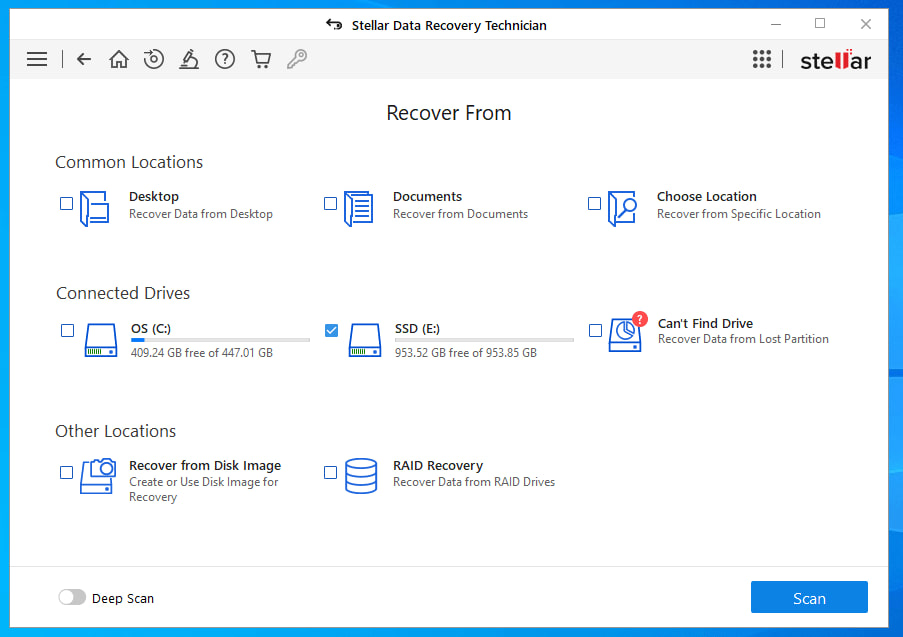
Developed by Stellar, this application is among the top data recovery tools available. Users use Stellar to retrieve deleted files from storage devices like formatted hard drives, USB drivers, hard disks, and memory cards. The software is compatible with Windows, iOS, and macOS devices, giving users more access and flexibility. One feature that stands out is the product’s friendly interface which makes navigation easy and effective.
Furthermore, the company boasts of a high success rate when recovering lost data due to formatting, virus attacks, or partitioning. The tool can recover various file types, including but not limited to PEG, PNG, BMP, GIF, Word, Excel, AVI, MPEG, MPG, MP4, 3GP, DBX, and EDB. The tool offers different scans to help users locate lost data based on their specific needs. Some of these scan types include Quick Scan, Deep Scan, and Raw Recovery.
Download Stellar Data Recovery
2. EaseUS
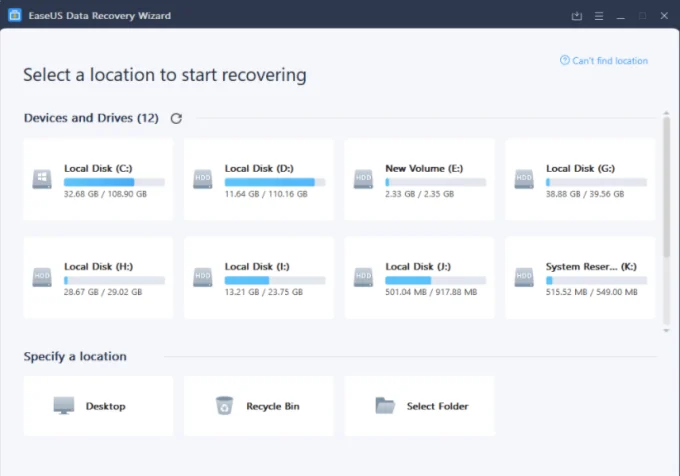
This platform is a secure and reliable data recovery software that allows the user to recover deleted data. Used by millions of customers worldwide, the software has a range of features that make it useful. For example, users can choose from a wealth of different scanning modes, like deep scanning that ensures absolute recovery results.
Although it’s a bit pricier than other tools, this recovery software improves the quality of the data it retrieves. The company offers customers a free and paid plan, depending on their needs.
3. Recuva
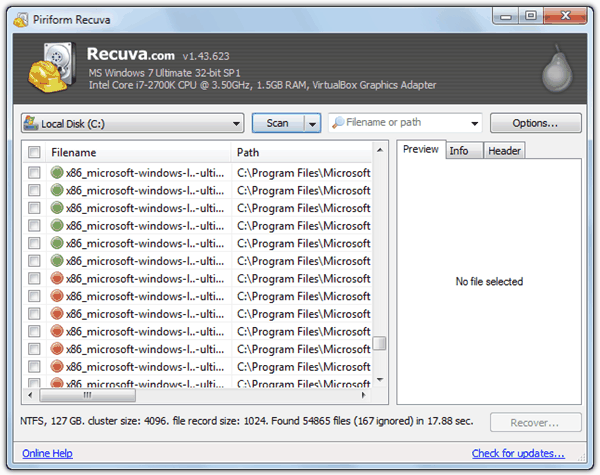
Recuva is a free Windows utility from the makers of CCleaner to restore files that have been accidentally deleted from your computer. This includes FAT, NTFS and exFAT file systems, and files emptied from the Recycle bin as well as images, music, video and other files that have been deleted by user error from digital camera/phone memory cards or MP3/MP4 players. By using the more thorough Deep Scan mode you have a better chance to recover files, and “Scan for non-deleted files” turns Recuva’s search mode into recovering files from damaged or formatted partitions. There’s also a useful secure file eraser so selected deleted files cannot be recovered.
The zip file is only 3MB in size and it’s portable (an installer version is available) giving Recuva an advantage over some other tools which need installing.
4. Disk Drill
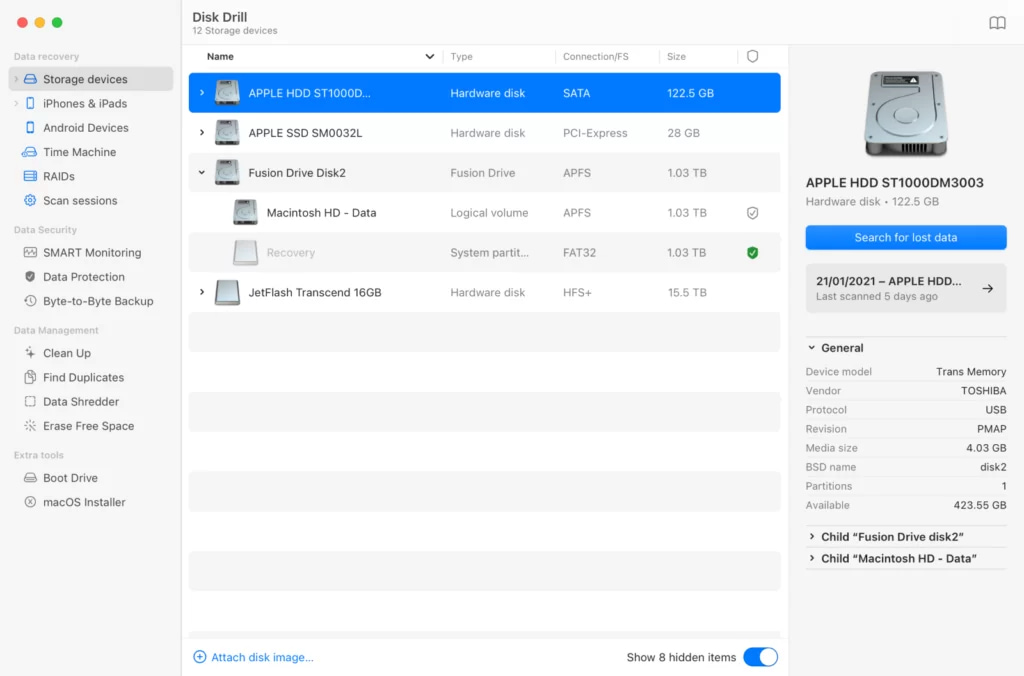
This data recovery tool is designed to recover data from formatted hard drives and storage devices like USB drivers and memory cards. The tool uses various techniques to help the user restore lost data. First, the software uses a “Recovery Vault” feature to keep track of all deleted files, making it easy for the user to restore their data from one dashboard.
One reason the tool is a go-to for computer owners is its intuitive interface that is readily accessible to non-technical users. As long as the data has not been overwritten, users can rely on the tool to recover data in different formats, including photos, music, videos, documents, etc. Furthermore, you can easily pause and resume scans at your own convenience. Even the free version of the app includes all versions of the Disk Drill security updates, making it possible for you to maintain and protect your privacy at all times.
5. PC Inspector File Recovery
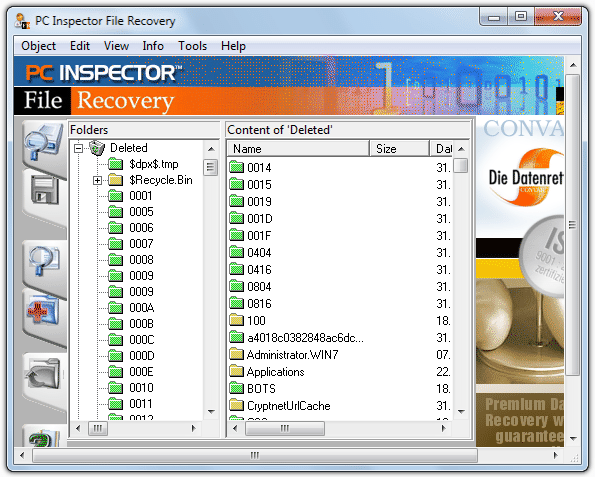
PC Inspector can recover data from most FAT and NTFS partitions even if the boot sector has been erased or damaged. You can also save recovered files onto network drives and several types of video, audio, pictures and archives with damaged headers can be recovered using a special mode. Formats include ARJ, AVI, BMP, DOC, DXF, XLS, EXE, GIF, HLP, HTML, JPG, LZH, MID, MOV, MP3, PDF, PNG, RTF, TAR, TIF, WAV and ZIP. You can also scan just specific areas of the disc with the Cluster scanner if you know the lost files are near the beginning, middle or end of the drive etc.
The setup file is 3.3 MB in size. The FAQ says it’s not compatible with any Windows operating system above XP although it ran perfectly fine on Windows 7 when tested.
Download PC INSPECTOR File Recovery
6. Puran File Recovery
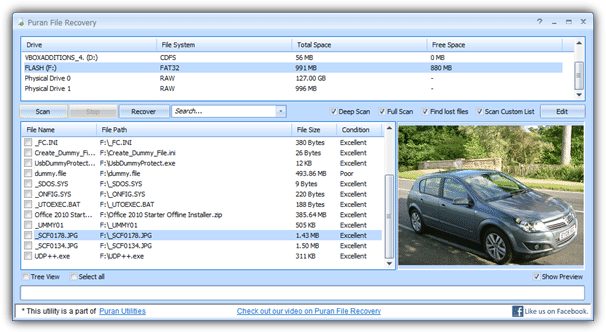
There are 3 main recovery modes and range from the default Quick Scan which simply reads the FAT or NTFS file system for deleted files from the recycle bin etc, to Deep Scan that also includes scanning all available free space, or Full Scan will check all space on the device for the best chance of recovery. Using the “Find lost files” option turns Puran File Recovery into a tool to recover all files from a lost or damaged partition. Something else you can do is edit the custom scan list which stores file signatures for more accurate recovery of badly damaged data.
This program is available either as a standalone tool or as part of the also free Puran Utilities suite. The standalone installer is 2.2MB in size and works on Windows XP up to Windows 8.
7. LazeSoft Data Recovery Home/Free
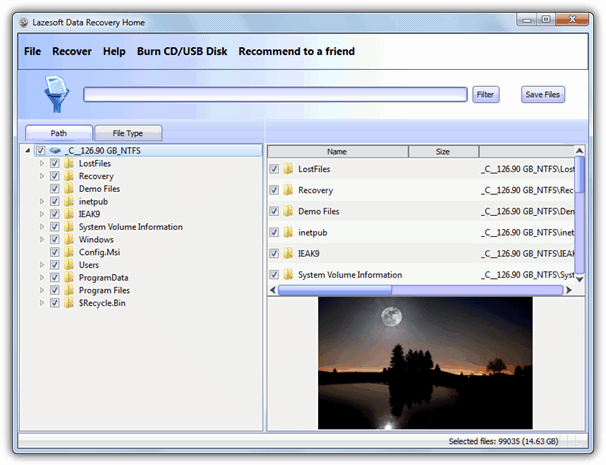
The LazeSoft program has 2 modes; deleted or lost file recovery for general undelete purposes, and a partition recovery mode which can find and recover files and folders in formatted, lost or damaged partitions. It can recover data from FAT, NTFS (including encrypted and compressed), memory cards, USB, phones/mp3 players and RAID arrays etc. MBR, GPT partitions and dynamic partitions can be scanned in the partition recovery mode. You can easily narrow down your file search by using the filter option or File Type tab.
LazeSoft has 2 free versions for download, the 6MB Free edition simply installs and works within Windows, the 21MB Home edition has an added option to create a bootable CD/USB/ISO recovery disc. Using this could greatly reduce the risk of overwriting files you’re trying to recover.
Download LazeSoft Data Recovery Home/Free
8. Wise Data Recovery
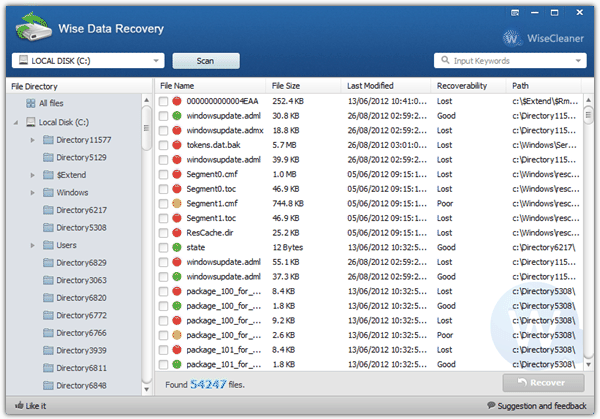
This utility is one of the fastest undelete tools around, looks good and has an intuitive interface. Wise data recovery can find deleted files from local drives, USB drives, cameras, memory cards, removable media devices etc. As well as being easy to use, it also includes a fast search filter by selecting in-built file extension groups using the file’s type. Although the scanning is fast, the program has no deep scan mode which it could mean a slightly reduced chance of recovering the most hard to recover files.
An installer executable or portable version is available, the portable version is on the Download page and not the product page. Wise Data Recovery is compatible with Windows XP up to Windows 8.
Download Wise Data Recovery
9. SoftPerfect File Recovery
You might also like:
 6 Tools to Recover Saved Windows Live Messenger Password
Pandora recovery is no more. When you click on download you get Disk Drill which is a paid program
this article is dated -some of the comments are 13 years old
it needs to be redone, as some of the links don’t work, and many of the programs have changed
“This site can’t be reached
pcinspector.de took too long to respond.”
roadkill’s undelete is a fifteen year old program (no updates since 2007), doesn’t work with win10, and win 7 is asking me if i want to run it in compatibility mode, so i don’t get why it’s in the same paragraph with easeus recovery
but i am getting distracted – i want to find out which one of these programs is designed for use with optical media
or maybe i should go back to my search results …
I only had to ever recover files once at a critical stage a good few years back. I found RECUVA worked well.
Thanks for your posts and advice here.
Blessings – Spencer Courtis
Freeware iCare Recovery free helped me rescue the files for free of charge. I guess it worth an installation.
I saved all my precious travel photos in my PC hard disk and backup on an external hard disk. A few weeks ago, my computer got some problem so I formatted and reinstalled Windows.
After installed Windows. I tried to copied the travel photos from the external hard disk to my PC. This is really unbelievable that the external hard disk failed working at this moment!
Therefore I have to get the photos back from my PC formatted hard disk. However, most software seems not working. I am very worried every day. I need to get all my travel photos back!
P.S. This incidents remind me that always backup important files on at least three hard disks.
You potentially have a major problem because if you formatted the partition with the photos on, then reinstalled Windows on it, whatever old data has been overwritten is gone forever. You most probably won’t be able to recover all photos, but more likely a few or none at all.
When you say most of the software is “not working”, how do you mean? I think many of them can recover data from deleted partitions but if they are finding nothing, it probably means the photos have been overwritten and simply cannot be recovered. Also, if you are still using that partition to run Windows, that’s very bad and should not use it at all, every time you boot to it, the chances of finding anything get reduced.
Really helpful thank you so much
Thank you for your informative post. It saved my work and project.
The data recovery software magnificently processes to retrieve lost, formatted, corrupted and deleted files.
If data backup is not there, then to get back data in original format, data recovery tool is the safe, easy and effective method for restoration. The list is beneficial, as we can compare the product and choose according to the need.
Data loss and deletion is the most hampering thing and results to downfall. Thanks for sharing this post as it is useful. The requirement of these tools can arise anytime so pre-knowledge is essential.
Which one have you tested for formatted hard disk
I’d like to recommend Eassos Recovery Free here, as it helped me retrieve data from damaged partition successfully.
Thank you !!!!!!!!
Thanks for the list, I’ll definitely try one of these and get back to you.
THANK YOU!!!!!!!!!!!!!!!!!!!!!!!!!!!!!!!!!!!!!!!!!!!!
How is GetDataBack not on this list? I’ve been using RuntTime Software’s GetDataBack alongside their RAID Reconstructor program for years and it has proven itself every time. I was even able to use those two programs to rebuild a guys RAID-0 array and get his data back (lol),
I would have thought that was quite obvious why GetDataBack is not listed here.
This article is about FREE data recovery software, GetDataBack is not free. You can only view and not recover any data unless you purchase the program.
Thanks for the post. I used Recuva and it worked perfectly.
Thank you a lot! Your article was very helpful for me.I used the LazeSoft Data Recovery Home/Free and managed to recover data from my memory card. Also thanks for sharing links for downloading. I will save this article for the future reference.
Thanks for sharing information,it is very useful for me.
Aweosme blog i could recover the important files which were deleted accidentally .
Thanks to you Guys :)
thank you so much
THANK YOU!!!!!!!!!!!!!!!!!!!!!!!!!!!!!!!!!!!!!!!!!!!!
I wanted to recover data from a Sony DCR-SX50 Camcorder’s internal memory. The Sony data recovery Program V 3.2 ended in bluescreens on W7 and WXP as soon as I started the recovery. Same with PC Inspektor smart recovery.
Wise data recovery worked well, fast and easy and restored 99% of my data. Thanks to raymond, thanks to wise.
Very useful information. I used PC Inspector recovery software and it worked very well. I recovered all the file which i thought lost due to virus attack. Thanks
Thanks for this article. I hope I won’t have to use these. But if I have to, I use one of these.
Thank you so much for posting this article. You rock!
Syukur Alhamdulilah…. almost give up…I google for almost 5 hours and finally I reach your website….Thank you very much for sharing this info with us..it’s really work… I download Recuva and was able to recover my corrupted .txt files… Thank you again…
I downloaded the easeus data recovery wizard free edition, but it’s user’s agreement states that you can’t save recovered files unless you purchase their program. Is that correct?
On their website (easeus.com/datarecoverywizard/free-data-recovery-software.htm) they clearly state you can recover 2GB of data for free, which is actually more than they used to offer. I suspect the EULA relates to the full program as opposed to the free data recovery option.
hai thank u
Thanks
I highly recommend RECUVA. I accidentally dropped my external hard drive, and was desperate so I started searching all the relevant places where i could have put information and lo and behold recuva managed to retrieve some of the data that I had lost, not all of it but quite a bit. I am now going to ensure that I make more copies including hard copies of the data so that I don’t lose any more in the future. Recuva is fantastic and so is CCleaner which I use to clean my pc.
I deleted by mistake a folder instead of a file I wanted to delete. It was a huge folder with hundreds of files. It was not in the recycle bin (too large), so I tried to recover it with free data recovery software. Believe it or not, ‘Recuva’ managed to recover the whole folder.
Very useful info, thanks a lot for all those links
Hi there Sir Raymond.. At first I was having second thoughts on downloading the software, honestly I’m lazy when it comes to installing and stuff… But I’m desperate to retrieve the files that somehow is really important to me, and I tried Pandora, cause the name sounds familiar that’s why I chose it..I’m being wordy.. Well anyway it did work and I’m happy.. :) Thanks a lot
Great post. Very useful.
Thank you for posting this up. I found it very helpful. I loss ALL my data on my external hard disk. But I was able to recover all my data following the guidelines in this article. THANK YOU SO MUCH!
Nice Guidelines to recover lost data and then get back
Is a very good website, I would recommend to my friends.
THANKS!
Thank you!! Just used SoftPerfect successfully and it couldn’t be easier. Windows 7 user too.
Cheers! :-D
thanks for free software
good good day for me as well as you
Panda did what I wanted to recover from 1TB NTFS partition. I’m going to donate them. Congratulations!
thank you very much for your help in advance
thanks for providing this software
This Pandora software is great, i can’t explain my happiness when I found my excel file of my company’s profit and loss statement which i prepared in a week surfing 10 hours daily, thanks
thanks thanks thanks
Recuva is great. My Second HDD was mistakenly formatted when i wanted to format my External Disk.
I’ve tried several different data recovery software today, including #1 & #2, trying to recover 200 pics off my phone….finally #3, PandoraRecovery worked! I’m so happy! It did really well, I’m sure I’ll use it again.
Hey man… Thanks so much…
OMG. I was so happy when I download Pandora, it actually worked :D but the names wasn’t clear if they didn’t have authors so I used PC Inspector instead.. I’m currently over the moon right now~ thanks so much for posting this article! 11/10!
its very good.
That is a fantastic software I really happy thanks panda recovery software
THANK YOU!
thanks PC INSPECTOR File Recovery
thanks ray!
Pandora worked for me, restoring files from a server I thought had gone forever. I was so happy with the programme, I even made a small donation! A couple of dollars is not much to pay for this much relief :-) (PS. I’m in the UK and not connected with Pandora in any way, I’m a photographer, just a happy one now!)
thank you
Thank you very much from India
first i appreciate your efforts so much. i was suffering since 3 days cos all my work pictures lost from the camera card (5 days of work in africa forests) and after i return home cam misbehave and all pictures lost. i used PC inspector and got all my pictures again.
Thank you so much
Thank you so much for listing these programs – I used Panda and found my photos deleted off the camera’s SD card whilst in the computer’s card reader.
Really appreciate it.
Kris
thanks a lot
i managed to retrieve/recover all my loss data …
god bless you
thank you
I just accidentally dumped several files of photos (thought they were duplicates, so emptied the recycle bin >:O
I found this site and because of previous recommendation I used RECUVA. HIGHLY recommend it! Really free (but worth donating to) and FAST! It recovered almost 7,000 files from my recycle bin (photos only) in less than 10 minutes.
Thank you soooooooo much for your help!!!!
Jen
Thanks so much for this. Accidently deleted some study guides that took hours to do from a jumpdrive but was able to get them back with the first listed program. Thanks once again.
this is an awesome post and very helpful!!! thanks so much! i’ve been trying to recover my niece’s pictures for a week now.. this helps a lot!!!
thank you so much, it has been what i was looking for. thank you.
thank you for the good work
Panda Recovery is Really Excellent one. so i would suggest u to use it.
Thanks, I be giving some of these a try.
Very nice article.
Thanks a million, you saved my life, I found that PC INSPECTOR File Recovery recovered files.
Again, THANK YOU!!
Good Stuff man keep it up.
thank for this
Hi everyone!
Just wanted to tell you that I tried Recuva for recovering images from a xD memory card where the images had been deleted, and I managed to recover 148 images = all images except one image. Amazing, really ment alot to me.
The ones you have to pay for might be better, but this free app worked just great for me.
Have a nice day!
Thank you so much!!!
Very fine to Deleted File Recover Supports
Another Good Post
thank u ! huf…….
Thank u! Wonderful! Software Recover Quickly!
Hi Raymond,
Thanks a lot for your information. Free Recovery tools were not easy to find till I read your post.
Thanks
Thank God i found your post..
huff..thanks a lot..!!
thanks raymond, thanks to your recovery tools!! I recovered all of my deleted files…. thanks a lot
Hi Raymond,
Thanks for sharing. It’s really informative because I’ve got files lost by accident.
A++++
Recuva worked great on the pictures my 10 year old deleted off an sd card.
Great site – keep up good work
Wonderful! thanks so much for this list, it saved my time and peace of mind, I used Undelete pluse it is amazing,
thanks again
Thanks a lot for your recovery software….I agree recuva best of the best for the recovery software. Bravo………
Let’s take to recuva….
Recovered a whole lost thumb drive.
Number 4 is the winner. I was looking at a pro $400 version that seemed to be the only option and the rest of the list failed but TOKIWA did it in seconds flat. Ironic how it is the smallest one too.
Go TOKIWA DataRecovery
it requires a password. did i miss that part
thanks a lot! a very useful article for me! thanks
GREAT JOB I GET MY DATA
good data recovery sotwere. i liked it
It is really nice. You helped me lot.
hey nice stuff! thanks
Really you are helping a lot for every one, thanks very much
great post. i liked it…
Good stuff! Thanks,
Essential post! Thanks for the list. Might be useful when I accidentally shift+del stuff..
thank you!!! wish this can help a lot on my daily work…
A worthwhile link to have, as there are still people out there deleting files accidentally. Even formatting a drive without thinking of backing up, or a drive becomes corrupt through lightning strike and power surge.
i like your posts …. you are great keep it up that way
Great list–one thing I like especially about PC Inspector File Recovery is that it can also copy files that are locked or “in use by another program” which can actually come in handy sometimes.
Thank you :)
another great post…
i share most of your blog post with my friends… :)