10 Best Free Monitor Brightness Control Software [2023 List]
One of the most obvious things that can show the strain of being at your computer for a period of time is your eyes. It doesn’t take a lot for a badly configured monitor or laptop screen to cause problems and put extra strain on your eyes because brightness or contrast settings are set too high. Proper configuration can make viewing more comfortable, especially you are at your computer for prolonged periods of time.
Most monitors should have controls to adjust these types of settings but that isn’t always the case. An old Dell Studio One 1909 desktop we have here, is one such system without external controls for brightness and contrast. Laptops and netbooks should have a dedicated Fn key combination or utility from the manufacturer for brightness. Windows sometimes has a brightness slider in the notification area or the system power plan.
If you don’t have or cannot find brightness and contrast controls to adjust the display to your liking, an option is using a third party tool. Here’s a selection of 10 free programs to adjust the brightness, contrast, gamma or color temperature settings of your computer screen.
1. ClickMonitorDDCClickMonitorDDC is probably the most powerful utility of its type and it adjusts the real settings of your monitor. By default, it shows sliders for brightness, contrast, saturation/vibrance, monitor audio volume, and device audio volume. This can be expanded to include red, green and blue sliders if your monitor has a User profile. If available, the User profile can be selected from the top drop down in the lower left corner.
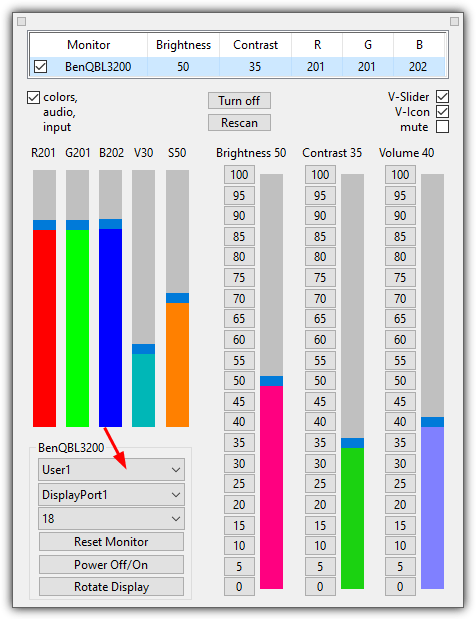
Besides using the sliders, numbers or the mouse wheel in the user interface to adjust the settings, there are also icons in the system tray showing the current values. Hovering over any of the tray icons and scrolling will alter that specific value on the fly. There are also buttons to turn off all monitors, the current monitor, rotate the display, and reset the monitor’s settings back to factory default.
ClickMonitorDDC has a vast array of settings (tiny top-left button) to control a number of options. These include tray icons and colors, mouse wheel commands, hotkeys, add commands to the tray icon context menu, timers and limits, and autorun commands when a specific program is run. Most of these options require ClickMonitorDDC’s command line arguments to function so you will need to have a good read of the help guide. There is a portable or setup installer version.
2. Win10 Brightness Slider
If you are looking for a simple slider to adjust screen brightness and require no extra functions or features, this is a useful option. Despite the name, Win10 Brightness Slider also works on Windows 7 (needs .NET Framework 4 or higher) and Windows 8.1, is open source and a standalone executable.
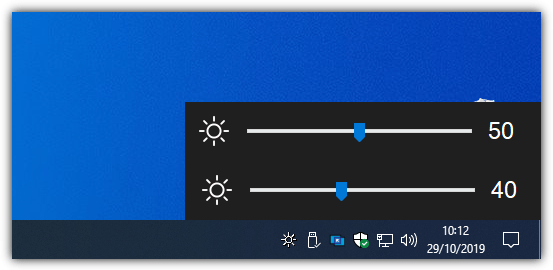
The program just sits as an icon in the tray notification area and left clicking on it will popup the brightness slider. A second or third slider will be available if you have a multiple monitor setup. DDC/CI is supported and there’s a run on startup option in the icon’s context menu. Make sure to put the program in a permanent location before enabling run on start as the tool will be launched from its current location.
Download Win10 Brightness Slider
3. Gamma Panel
Gamma Panel actually dates way back to 2002 but still seems to work fine in Windows 10. It should be good for users who want to change a bit more than just the standard brightness of their display. In addition to brightness, Gamma Panel can also adjust gamma and contrast with the added ability to allow each of the Red, Green and Blue colors to be tweaked individually or all together.
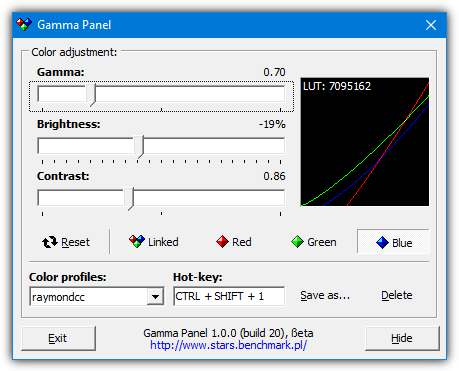
Another useful option is creating different profiles that can be activated with a pre-defined hotkey. You can, for example, set up a night profile or a reading profile and activate it when you feel the need by pressing the key combination or from the right click tray menu. You also get a little LUT (LookUp Table) graph with its associated value from the results of the changes.
4. f.lux
Windows 10 has a built-in display temperature feature called Night Light. f.lux is a similar but more feature rich tool that can adjust the color and brightness of your screen depending on the time of day and light condition of the local environment. Your location can be entered during the first run of the program, this can be a city name, a zipcode or coordinates (if you know them).
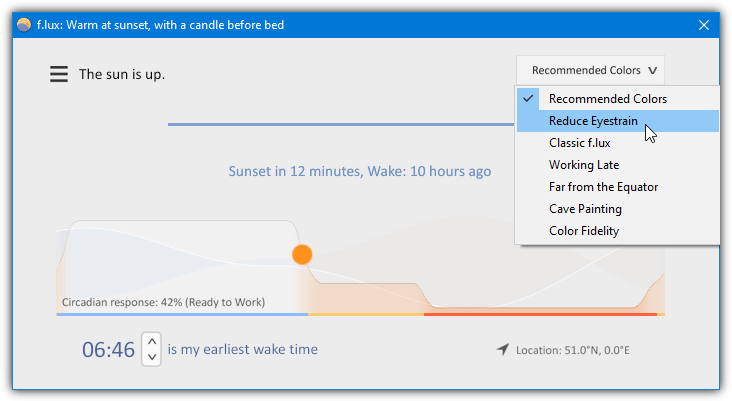
While you can just leave the default settings and the program will work fine, there are a number of options for tailoring the colors and temperatures to your liking. There are several preset colors available at the top right drop down, a custom warmness slider, effects and extra colors in the settings menu and options for setting up f.lux with smart lighting such as Philips Hue.
5. ScreenBright
ScreenBright is a free and portable tool that can adjust the brightness, contrast, color luminance and color temperature of your display. There is a slight drawback of the program needing a DDC/CI or USB-control compatible display to work, which not all monitors or laptop screens will have. Usage is simple and you adjust the sliders then click Save when you’re happy with the result.
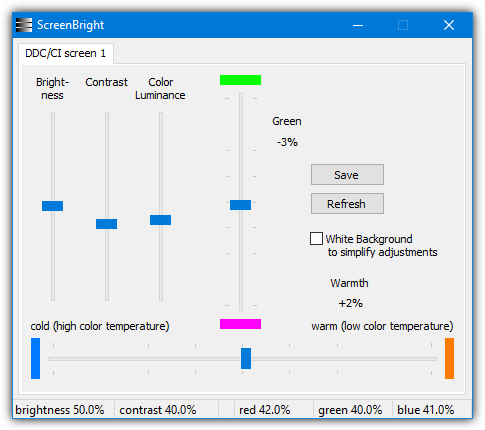
In addition to brightness, contrast, and luminance, there’s a vertical slider that affects green levels while the horizontal slider affects color temperature. There is no reset option in ScreenBright so make sure you note down the default settings before you start. ScreenBright also has support for command line arguments so you can use it in shortcuts, scripts or even set up a scheduled task.
Hi,
Is there any software that allows to manage the picture mode (like movie-normal-nightmode functions of monitor that are normally accessible only by buttons on monitor)
thankyou
You forgot about the Twinkle tray! It’s a very good program.
twinkletray.com
Thank you very much, Greg. I downloaded and try Twinkle Tray, it’s easy to use.
Thanks, Greg for the good recommendation.
Definitely the best utility for brightness control. Great for controlling multiple screens with a single slider (link monitors feature).
Been using screenbright for years with bat files to quick set desired level. Your suggestion is way easier.
Thank you!
for me gamma panel work good. it has setting gamma, brightness and contras. thanks raymond cc.
desktop lighter was very helpful for me. Thank you for information.
Is there another software just like Gammy?
Gammy is great but its behaviour is undefined with multiple monitor setups.
I’d probably even pay for software just like Gammy for multiple monitor.
It is written in Python, and still contains some issues:
github.com/Juno72/MonitorControl
Hello Raymond CC,
I inform you that the soft called Eye Saver (2.43 version) isn’t a freeware : after a few days it says to register for a longer usage. Best, Fabio
thanks for these stuffs
Win10 Brightness Slider is not working for me. I am using win10 1909
Can any of these programs be used to set brightness automatically at a certain time of the day? Say 50% bright from 8am-7pm and go down to 30% brightness from 7pm-8am?
Probably f.lux could help.
clickmonitorddc.bplaced.net/special.png
1. ClickmonitorDDC can manage this kind of time schedule
Twinkle Tray does this: github.com/xanderfrangos/twinkle-tray.
You can change your brightness depending on the time of day. It even adjusts per-monitor if you want.
Not automatically, but Gamma Panel allows you to save different modes, and assign a keyboard shortcut for each one of them, so shifting between those modes can be as easy as a key combination whenever needed.
very good software . I had been searching for this kind of software for about half a month It is very great. I am very greatful to the developers .
Thanks a lot, dude. I would make a sandwitch when you visit my place.
thnx I wish there were alot more people like yourself !
if you where not here i would defently downloaded one (mayB 2 or 3) of the above givven list; I gues ill try the ClickMonitorDDC first :-)
Thanks for this post.I need more details for gamma panel?
You see that “Use NVidia settings” option?
For some weird reason (after a Windows/Driver update, I don’t know for sure), after restarting my PC it reverts back to default “other apps control…” setting, is pretty annoying.
I downloaded the 4#Gamma Panel, and created a basic task on Task Scheduler that auto-run this program when Windows boot.
It works perfectly! Thanks!
(I would still like to know if anyone has ever had a similar problem, though).
Please try the program to change the brightness of the entire video-system “MyMonic v1.1” very comfortable
THANKES ClickMonitorDDC works perfectly
Thank You very much, ClickMonitorDDC works amazing for me.
Desktop Lighter worked for me also after the windows 10 update killed my brightness.control
Desktop Lighter works for me after the Windows 10 1803 update killed the brightness control.
Battery endurance is still an issue, however I can at least work in the evening using the dimmer.
Thank you sir..ClickMonitorDDC works !
Thank you!!
Amazing! Installed ClickMonitor after reading your post. Quite simple and straightforward.
You’re a genius. I have been trying to get my monitor to where I could see the text on the screen for days. Your information solved my problem.
Thank you very much for the info and links. It saved my eyes from straining due to monitor’s brightness.
tHanks bro Desktop Lighter is superb
gamma panel works for me , thanks bro 10-/9/2016
thanks mike you saved my time :)
Does anyone know of a Windows program that can change the black level / brightness of a particular display in an extremely fine-grained way? For example, by inputting a decimal/floating point scaling factor? These slider bars do not give me the resolution I need for my particular application.
You may try Free Monitor Manager. But you’ll have to adjust the settings in its data files manually. It’s easy, btw.
Gamma Panel ‘Contrast’ adjustment did not do much for me, however lowering the Gamma setting worked great! I’m using Win 10 on an Asus Laptop.
One yet utility similar to ScreenBright: Free Monitor Manager.
It supports multi-monitor configurations and allows to change monitor settings using global hotkeys.
freemonitormanager.com
I tried a bunch of these and found that only iBrightnessTray works on my Thinkpad W520. It’s great to have that when the built-in hotkeys for screen brightness control stop working.
How can you put f.lux in 6th position? It wipes its ass with all screen dimming softwares I’ve used. The Desktop lighter was pissing me off the most.
This isn’t a “top 10”.
I found a tool similiar to screenbright, but more easy to use:
ClickMonitorDDC is a portable freeware tool to adjust brightness or contrast of a DDC compatible monitor by simply clicking a dynamic notification icon in the taskbar tray area, also supports shortcut icon command-line arguments
clickmonitorddc.bplaced.net/
Excellent topic. I’ve been searching for something like this for a while.
But no-one seems to have observed that there are two very different ways of achieving this. Most of the above work by lowering the image brightness. What is needed if you want to save power and maximise the life of your backlight is to lower the backlight power. So far, the only free one I have found that does this is iBrightness Tray. Working that way also gives a much better brightness range.
Thanks Ray, GammaPanel works in my laptop. You are a star. May God Bless You
Gama panel does not work with windows 7. Once you reboot your pc, all settings an hotkeys are lost and it reverts to default – rather useless.
Not sure what your problem is but Game Panel is working perfectly fine on Win 7 64-bit. Saves the profiles and hotkeys OK and they can be selected without issue on reboot. When it’s launched Game Panel reverts to the profile you used last time.
excellent idea, thnak you very much
the screen of my laptop is too bright inside, even with all the settings put to the minimum.
I´m using F.lux on my desktop but it´s not possible to modify brightnes with it.
For me RedShift seems to be the best because in one software I have F.lux functionality and brightness control.
For me FriendEye work best, not change the colors
Thank you!
Thank you ray, I had to change brightness and contrast every day and night, by pressing these monitor buttons according to background light, These tools are very good and more than my expectation…
this is so awesome! my laptop wouldn’t dim the brightness enough..and the lowest setting was always brighter than I always wanted it to be..Thanks very much Raymond! God bless! :-)
Thanks posting Raymond
thanks for the great info ray :D
Thanks Raymond for the very useful tool, on my BENQ it works perfect!!!
thanks for the desktop lighter!