What is Recycler Folder in Windows? Is it Safe?
As you might expect, there are many files and folders hidden away in Windows that deal with important tasks such as keeping the system running or allowing certain features to function. A couple of examples of this are Hiberfil.sys and Pagefile.sys that reside in the root of your C drive.
You have to enable the show hidden files and protected operating system files settings in Control Panel Folder Options for these and other files to become viewable. More folders in the root of C which also become visible after unhiding are $Recycle.bin or Recycler and System Volume Information. But just what are these folders for?
The first thing about hidden files and folders in general is that they’re usually not made visible for a reason, which is often a sign that you’re not supposed to play around with them. But also, like many things in Windows, if something isn’t behaving correctly or the behaviour looks odd, you might want to have a closer look.
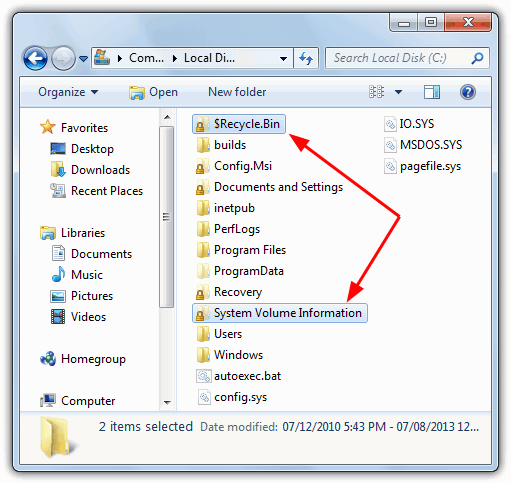
So what are the $Recycle.bin, Recycler and System Volume Information folders all about?
First we’ll look at the generically named System Volume Information.The System Volume Information Folder
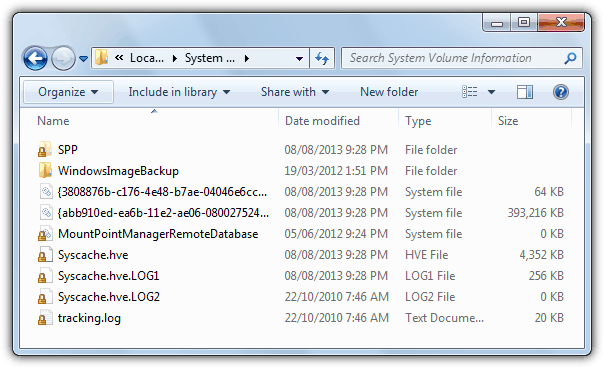
The System Volume Information folder is a hidden folder in the root of your C drive that the Windows System Restore tool uses to store its information and restore points. It’s not just System Restore data that gets stored in here though and the Windows Indexing Service uses it to store search databases, the Volume Shadow Copy Service creates live system backup data and also Distributed Link Tracking stores database information to repair shortcuts and linked documents. Check Disk logs are also saved here.
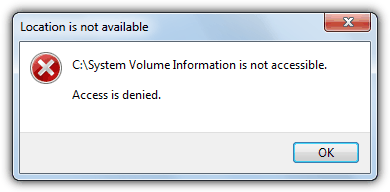
There will actually be a System Volume Information folder created on every partition on your computer, including external hard drives and even sometimes flash drives. Because it’s the storage location for System Restore points, if System Restore backs up files that are infected with viruses or other malware, it becomes a problem. Most antivirus software cannot delete viruses from System Volume Information because it’s a highly protected folder. To verify this yourself, simply double click on the folder and you will receive an error “C:\System Volume Information is not accessible. Access is denied”.
What you need to do is either give the appropriate permissions to the currently logged on user for full access to the System Volume Information folder, or delete all the previously created restore points to remove any viruses attached to them. Here we show you both methods.
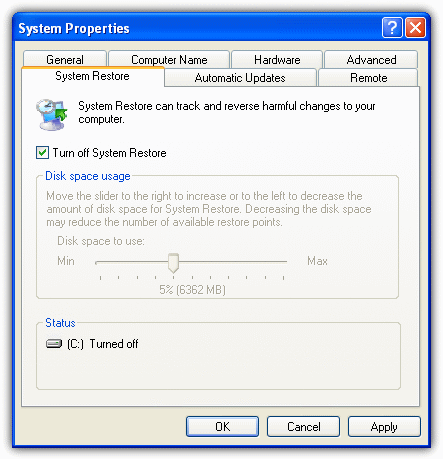
Turning off System Restore
Turning off System Restore completely will remove all your restore points from the System Volume Information folder, removing anything malicious attached to them. After turning System Restore off, restart your computer and then re-enable it again once your system is free of viruses. It will then create a new and clean restore point. By default, System Restore is automatically turned on in all versions of Windows that have it, and you can turn it off from:
1. Go to Control Panel -> System and click on System Protection (XP users simply click the System Restore tab)
2a. For Windows XP, simply click the “Turn off System Restore” box and press OK. You can also adjust the percentage of the drive System Restore can occupy.
2b. For Windows Vista and above the process is slightly more complicated. Look in the list of available drives, click on any that have Protection set to On and press the Configure button. Then select “Turn off system protection” and click OK. Users just wanting to empty all restore points to free up some space, simply click on Delete.
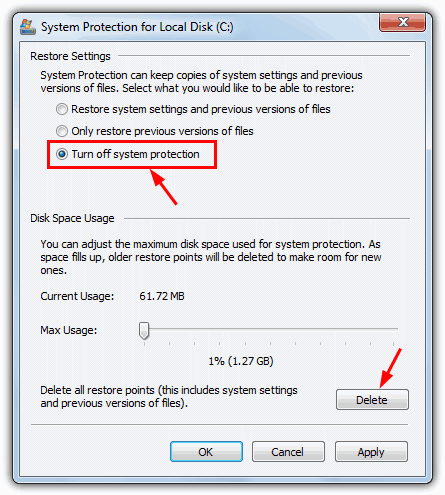
To free up space by deleting restore points you can also use a utility like the popular CCleaner although it won’t delete all restore points and will leave the most recent point in tact.
Accessing the System Volume Information Folder
As mentioned earlier, the System Volume Information folder is protected by Windows and you can’t simply open it up and look at the contents because an access denied error message will popup. However, it is possible to gain access by setting the appropriate permissions for the folder, here’s the easy way to do it.
For Windows XP
Because Windows XP deals differently with accessing folder security permissions depending on whether you’re using Home or Professional, the easiest solution is to use a context menu shortcut that works on both with a single click.
1. Download Take Ownership XP and extract the zip file.
2. Copy Subinacl.exe, TakeOwnershipFile.cmd and TakeOwnershipDir.cmd to your C:\Windows folder, then double click on Install_Take_Ownership_XP.reg to install the menu entry into the registry. SubInACL is a Microsoft utility to change user security for files, registry keys and services.
3. Now, go to the System Volume Information folder, right click on it and select “Take Ownership” from the menu.
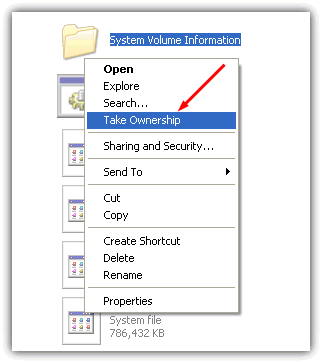
You should be able to enter the folder and have a look around without receiving the error. To remove Take Ownership again, run Remove_Take_Ownership_XP.reg and delete the 3 files from the Windows folder. It’s still not possible or recommended to start deleting stuff from System Volume Information, more on that later.
For Windows Vista and above
This method also uses a Take Ownership context menu shortcut but is even easier to install as newer operating systems have a built in tool called Takedown.
1. Download Take Ownership and run the InstallTakeOwnership.reg inside the zip file to import the context menu shortcut.
2. Right click on System Volume Information and select “Take Ownership”, then you can get into the folder straight away.
On the next page we’ll show you how to delete the System Volume Information folder and its files, and also talk about the $Recycle.bin and Recycler folders.
Deleting System Volume Information or its Files
Once you have gained ownership of the System Volume Information folder, it’s then possible to access and delete any of the files inside or the whole folder itself. We highly recommend you DO NOT do this for the System Volume Information folder on your Windows drive (C:). As we said earlier, it contains data for many other system components besides System Restore and could make Windows unstable or even crash. Besides, if you delete it from C, the whole folder will simply be created again automatically.
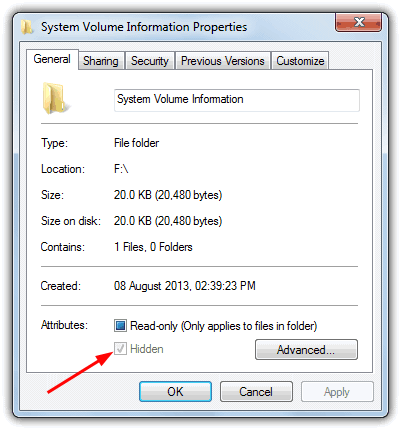
You can however, safely remove the System Volume Information folder from other drives or partitions such as data drives or external USB/ESATA drives etc. External hard drives can in fact start filling up with restore points from be attached to other computers if they have System Restore enabled. The next issue is everything in System Volume Information, including the folder itself, has the System and Hidden attributes set meaning you can’t simply delete through Windows Explorer.
With the help of the Command Prompt, it’s only a few commands that need typing in to remove the whole folder and its contents. Assuming you have already taken ownership of the System Volume Information folder, which you need to do first, here are the commands to delete it from another partition other than C:
Attrib -s -h -r “{drive}:\System Volume Information” /S /D
RD “{drive}:\System Volume Information” /S
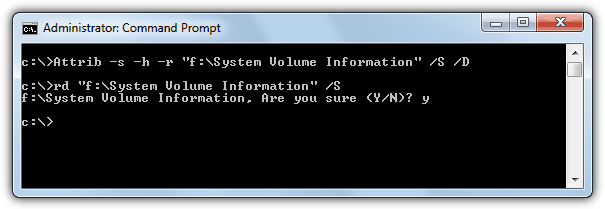
Press Y when asked for confirmation. This will completely delete the folder, make sure you have no windows open which are inside the folder before running the commands. You can use other tools to unhide and unsystem files and folders, have a read of our Reset System and Hidden Attributes article related to this subject.
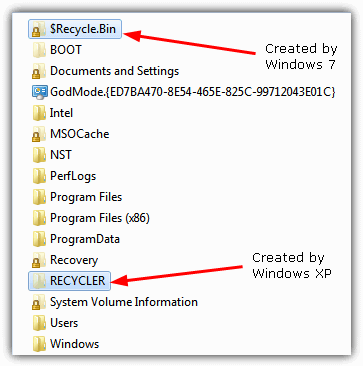
The $Recycle.Bin and Recycler Folders
As you might expect from their names, $Recycle.bin and Recycler are connected with the Windows Recycle Bin. When you delete a file in Windows Explorer or My Computer etc, the file is stored in the Recycle Bin and not completely deleted from the system. These folders are the holding location for the file while it remains in the Recycle Bin. The file remains in there until you empty the Recycle Bin or restore the file back again. But there are 2 hidden folders we are talking about here and you will likely have only 1 of them, so what’s the difference?
The simple answer is the Recycler folder is found on systems running Windows NT, 2000 or XP with hard drives that are NTFS formatted. The $Recycle.bin folder is found on Windows Vista and above systems. These folders aren’t present though on storage media like flash drives, memory cards or network drives. If you have a dual boot system with XP and Vista or 7 for example, or an external hard drive that has been plugged into different operating systems, there might actually be one of each created on your drive.
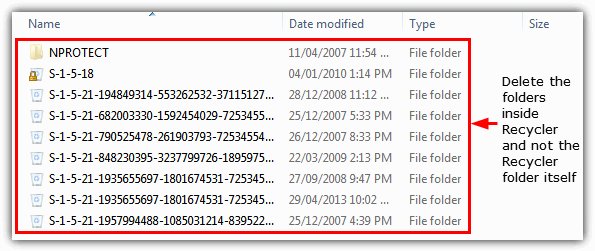
You can delete these folders without causing too much trouble to Windows and all you will lose is any files that are currently held in the Recycle Bin. In actual fact, the main folder itself will just get re-created again by Windows the next time a file is deleted so it can’t be removed permanently. The exception is if you delete Recycler for example and never connect the drive to an XP system, or vice versa.
The best solution is therefore to delete the folders inside of the main $Recycle.bin or Recycler folder as they won’t return and will delete all recycled content. This is a useful trick if for some reason Recycle Bin content has become corrupted as it won’t delete itself by emptying the bin normally. This will also delete Recycle Bin content for all users not just the current user.
If you’re unable to delete files inside the Recycle folder, you can use a number of tools such as Unlocker to unlock and delete files that are being used. Doing this is not something you need to do very often, only if you suspect there has been a problem deleting Recycle Bin content or receive any Recycle Bin related errors.
great old tools which work great for this!
Karens PTRecycler
and also RecycleNow……
have used them on thousands of machines of various flavors. (xp..vista… 7….10)
never fail!
“$Recycle.bin” folder is also found on XP SP3 before Vista. When you delete a file, it goes there with SID along with Recycler folder together. It is as what I found out
Updating my comment: At least on some XP systems, 3rd party programs may place $Recycle.bin folder as they suppose that OS is Vista and above.
All of your article is very useful bro, thanks a lot
it worked
I am using windows 10. how can I delete recycle bin and system volume information?
i too using windows 10 and having same problem. if you found the solution pls reply me.
The easiest way to do it would be from an as-administrator cmd window. You can use rd (rmdir) to remove %RECYCLE.BIN, which will purge your recycle bin and let Windows create a fresh, completely empty replacement.
Thanks for the straight forward tutorial. Very helpful in understanding folders i am finding on old HDDs i am trying to clean up.
I have an external HD connected to a WIN XP box which has both the $Recycle.Bin and Recycler Folders. Clear from the above that the $Recycle.Bin is for when the HD was connected to a WIN 7 box. From the XP box i check the size of $Recycle.Bin and get 5.6 GB but inside the folder there is no content.
1. Should the files inside $Recycle.Bin be visible from XP or is there something wrong?
2. If they should be visible i don’t mind deleting them but if possible i would like to view them before doing so. If i hook the HD back up to a Win 7 box is it likely that they will become viewable again?
TIA
I thought SVI is a type of worm/virus because this folder is easily harmed/infected, my flashdrives keep having multiple shortcut, broken files, also duplicates media files.
Even if I already take ownership of the folder, I still could not delete it :(
I don’t need it because most of my drives is easily infected.
Also, I’ve read some of other article saying this SVI could harm your file in a way :(
I’m very sad with SVI like whot mate???
The reason System Volume Information gets infected is usually when malicious files are backed up with System Restore. If System Restore is turned off the chances of SVI containing malware are greatly reduced.
Hi! I’ve been following your instructions carefully and I hope you could help me with this. I’ve been stuck on a step wherein I clicked the “Take ownership” and it asks me what app I should use on the .exe file. What should I do by then? Thank you and please reply ASAP. Have a good day!
Once you double click the Take Ownership registry file, right click on the System Volume Information folder and select “Take Ownership”.
Thanks. I used to delete the annoying folder in Linux but this worked beautifully. A hint to stop it from coming back: Create a file called “System Volume Information” in the root of the drive you want to “innoculate”. That way Windoze cannot create a folder with the same name in there.
I am running OS Windows XP pro. I have the System Volume Information folder appear on one of my flash drives that I previously had a OS win7 installer on. Even after formatting the Flash drive it still contained the System Volume Information folder. I followed the instructions (Copy Subinacl.exe, TakeOwnershipFile.cmd and TakeOwnershipDir.cmd to your C:\Windows folder, then double click on Install_Take_Ownership_XP.reg to install the menu entry into the registry.) When I click on “Take Ownership” from the menu it asks for me to choose the program I want to open this file. I chose SubInAcl. It will not let me view or delete the file. What am I doing wrong? It does the same with the C: Drive System Volume Information folder, or any Access is denied folder. Please help. Thank you.
I have an external hard drive connected to my windows 8 laptop which used to be plugged in to my windows 7 desktop, and only in the past week (I’ve had the laptop for just over a month) have the $RECYCLE.BIN and System Volume Information folders started appearing (as well as desktop.ini files in places and album art things in music folders (but VLC probably did that one)) and I thought some sneaky virus got in undetected because I had never seen those folders before
you can always go on properties change security settings for users add the “computer name/users “and press find names, then tick full control and write permissions, then apply and after all this delete the file.
that works on any file from any computer with any security locks on win7
thanks …
how does system volume information comes in pendrives also how does it comes to every drive of your pc…automatically.. i thouht its a virus,,,,
Windows adds System Volume Information everywhere because the folder holds data for quite a lot of system components, as mentioned in the article. Most of the time it doesn’t need to add the folders everywhere, but it does so anyway.
Good morning for all of you ..
actually I’ve only one question here it it what would happen if i format the hard drive , is it work with that to solve all these problem mentioned from all gusts here …
please tell me ,
i am gonna format my H Drive for these unreliable questions .. System Volume information ..
why it is appear on others Drivers and why i can’t remove it easily or hide it ..
Thank you in advance..
It doesn’t matter if you reformat your hard drive or not, System Volume information will keep coming back, especially on your C drive. You can delete it from other partitions however.
Is “$RECYCLE.BIN” and “System Volume Information” a virsus?
No, they are part of Windows. Viruses have been known to get into those folders but the folders themselves are put there by Windows.
Hi , thanks a lot for you help
i did every steps you said, but as soon as i delete system volume information folder, it appears.
why does it keep appearing , and is there any other way i can solve that?
It depends which drive you are trying to delete it from. If it’s from C, you can’t permanently delete because the system recreates it. If it’s from another drive, disabling system restore should keep it from being created again.
How do i get rid of System volume information if its inside the C drive?
You shouldn’t touch the SVI folder on C, even if you delete it, Windows will automatically re-create the folder again.
Its not working….hmmm Im using windows 8 I follow all the instructions here but when in cmd its says “The system cannot find the file specified.”…
Have you substituted {drive} for the drive letter you are deleting “System Volume Information” from?
Thanks a lot, recycler I mean the virus had an “file folder” that can’t be removed, I’ve tried a lot, but with take the ownership works, I’ve been in trouble for long time, now it’s solved…
Good Day,
I would like to inquire if it is normal for all my internal and external hard drives to have
$RECYCLE.BIN and System Volume Information? I did not notice them before it only appeared yesterday
when I used my friends portable drive. Now all the external and internal hard drives connected to my PC suddenly have this $RECYCLE.BIN and System Volume Information.I’m using windows8.
Is it a virus? Cause whenever I delete the $RECYCLE.BIN it always comes back and I can not delete System Volume Information.
I tried to format my external drives but it always comes back. Appreciate if you could help me identify if it is has a virus or not.
Thank you very much.
Have you read both pages of the article? It explains how to disable System Restore and remove System Volume Information from external drives.
Page 2 also talks about the $Recycle.bin folder and that fact that it will keep coming back when deleted. That’s how Windows works.
it did not work with unlocker so how can I get rid of this. Noting is working not even commands
system volume information and recycler those are not virus but system volume information take place 12% of you C drive for system restore point. it’s a huge space so you can off system restore(see help in xp). system restore we usually don’t use but only turn off it when u have load a good anti virus program on PC because system restore use when your PC corrupt.
very very useful …
very useful
nice info…
I knew some of the stuff but your instructions were excellent. AVG found a Win32/Heu on a DLL file in a restore folder on a Win XP Media (it’s pro plus) and I was not sure what would happen if I let AVG remove it from the System Volume Information folder. Once I realised that I could remove the restore points and how to do it I felt reassured I had not broken anything. Thanks for that.
I did it and it worked
Thanks!
thanks! You are such a great man! love you!!! keep up the good work! may god always bless you! :)
Thanks a lot……
Superb post, thank a lot
Thanks………….
great information, It helps a lot…………..
Thanks… No More Trojans On My Computer…
good work…………………….
Must have missed this posting – thanks Raymond.
Thanks Mr Raymond! I’ve managed to delete the RECYCLER folder but the System Volume Information folder keeps appearing. But thanks anyway!
I’ve linked this page in my blog. I hope that it’s fine with you.
Thanks a lot!
thanks a lot dude!!!
for this problem i had format my system 3 times, but every time these folder were came after 3 to 4 days.
now i have got a perfect solution.
Thank you.
Kamalakar (India)
Thanks a lot… it worked!!! thanks…
Thanks – AVG told me about suspicious files in here and it has taken me ages to figure out how to delete them :(. Now I know the answer!
Excellent just as usual!
thank you very much raymond. you always have a good advice for someone who is lost.
Thanks GUys
I tried the option Ray gave and it seems to have worked for the C
Thanks very much!
Don’t know why they made Vista so complicated.
thanks a lot about system volume information
thanks a lot.
Thanks it solved my problem on XP SP2
thank you
it was a very helpful more than microsoft
thank you
I got a solution for many problems with my pc.
Thanks a lot
Thanks a lot….
I got a solution for all my problems with the PC..
I also understand that using this method we can remove the ntd1er.com, autorun.ini virus… Thanks a lot..
God Bless u…
VERY HELPFUL. THANKS
Thanks for the article Ray ….. The info was helpful…
nice nice… great post indeed… :)
nice info..
thanks for the post.. :)
Nice post… now i know what is all about..
thanks ray keep up the good work!!! :)