4 Tools To Auto Adjust System Volume At Specific Times
There are many different sounds that come through your computer’s speakers at varying degrees of volume. Windows itself is good at outputting various sound effects. There are many other ways sound may blast out of your PC or laptop speakers such as gaming, video and audio clips on web pages, messaging or chatting on Skype, or simply listening to audiobooks and music.
Many users would like to hear audio at a certain volume depending on the time of day. For example, you might want to watch a video clip or listen to music at a reasonably high volume level in the daytime or evening, but at night that volume needs to be reduced so as not to wake family members. It’s easy to increase or decrease the volume level in Windows but it’s also easy to forget and have sound blasting out when you least expect it.
A simple solution is using a program to automatically alter the system volume to a level you prefer when you want such as daily at a specific time. If you don’t want sound during working hours, want it louder during the evening, or want it quieter during late hours, it’s easily done. Here are four free tools that can help.
1. Volume²Volume² is a free and fully featured Windows volume control tool with loads of options. These include setting an on screen display, setting a custom volume tray icon, using mouse events and gestures, countless keyboard shortcuts, and screen edge volume control. Of course, scheduling the system volume levels is also available. Screen brightness is another function that can also be controlled.
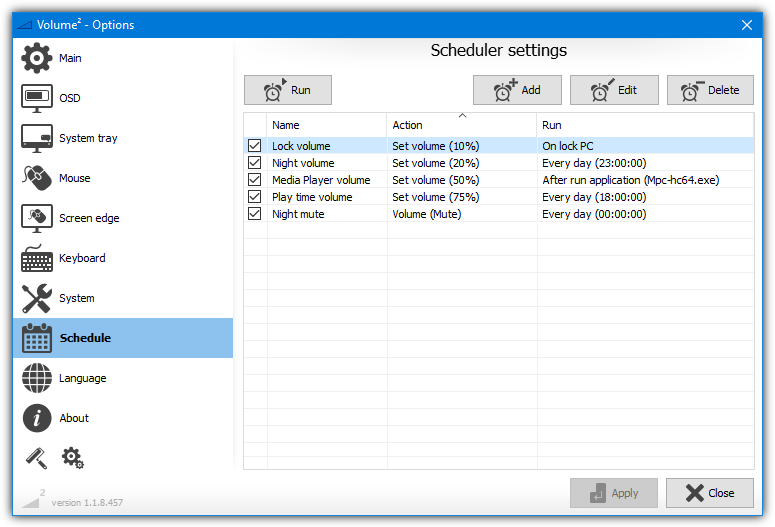
The scheduling function in Volume² is quite advanced. It offers additional options to schedule Left/Right audio balance, screen brightness, running a program, or showing a message. But for a simple daily volume up, down or mute it’s quite easy.
In the Schedule window click Add and give it a name, choose the Action of Set volume or Mute, use the slider to choose a target volume (or check the Mute box), change the Run drop down to Every day, and set the trigger time, then click Apply.

Add as many schedules as you see fit. More advanced run triggers include on Volume² start or close, every xx number of runs, every minute/hour/day, on PC wake, lock, or unlock, on audio device change, on starting an application, or after a period of system idle time. You can also choose a specific audio device to run the task on if there is more than one.
While sitting in the tray, Volume² is very frugal and uses less than a single Megabyte of RAM. This is good news for old/low memory systems and users that don’t like memory inefficient software. There’s also a portable version so you can try Volume² out without installing it.
2. Volume Concierge
Do take note that this is an older version of Volume Concierge (v1.4.7) dating back to 2017. The program has since been taken full shareware and only a 14 day trial is available without payment. Volume Concierge is a very simple tool to use and the rules system is easy to configure. Be aware that a YouTube Converter tool is offered during installation which you will manually need to opt out of.
When you try to add a rule, a window will appear that requires a free one time activation before the program can be used. However, as this is an older version of Volume Concierge, the activation server no longer works. We found that adding a few values to the system registry bypasses this requirement. Download the registry fix and double click to import the data into your registry to skip the activation requirement.
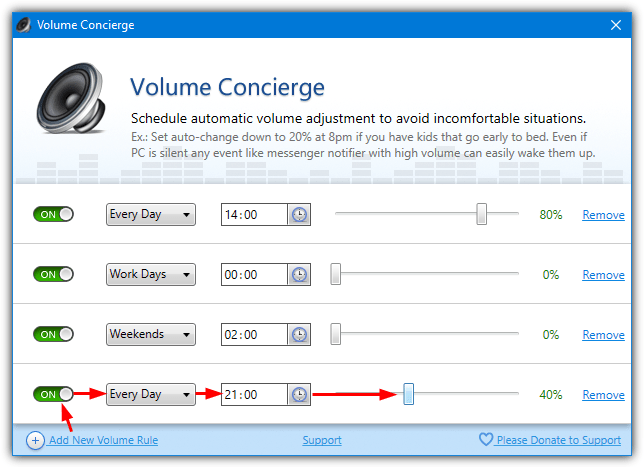
After installation, click Add New Volume Rule at the bottom left, click the OFF button to turn on the rule, and select from the drop down whether you want the rule to run Every Day, Work Days (Monday – Friday, or Weekends. Then set the time for the rule and apply the desired volume level. Click the Add New Volume Rule button to add extra rules.
On close, the program will minimize itself to the system tray. Right clicking on the tray icon itself can enable or disable Volume Concierge automatically running on Windows startup. We found memory usage very erratic and it fluctuated between 20MB and over 80MB while sitting in the background. Not a problem for most users but low memory or old systems may find that a bit high.
3. Speaker Locker
Speaker Locker does not just set the volume at specific times but it’s also able to lock the volume to a specified level. This also explains the included password protection option which locks the user interface and prevents modifications to the volume settings. The program is currently shareware costing $5 but we found a slightly older version which was freeware and is pretty much identical.
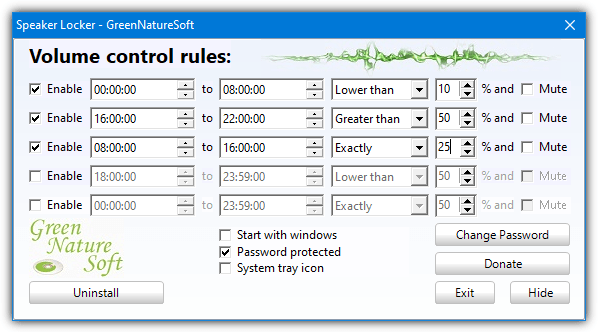
You can assign up to five rules, check the Enable box then set the start and end time for the lock to be active. For the lock you can choose the volume percentage and whether the volume will be locked above or below that level, or locked to a specific volume level. The Mute check box will lock and mute the sound while the rule is active. The password can be disabled or changed from the default of 12345.
Note: The free version does have a few issues you should be aware of. Firstly, it produces false positives with online virus scanners and antivirus software (including Windows Defender) which might cause a problem unless you know how to allow potentially suspicious programs.
It also asks to update to a new version on launch. If you update or allow Speaker Locker to access the internet, it will update and/or revert the free version to shareware. To get around these issues, “Speaker Locker.exe” and “gns_maintain.exe” need blocking in your firewall. If you have already run Speaker Locker and converted it accidentally to shareware, download and run this registry file, block the executables in your firewall, then rerun Speaker Locker.
4. NirCMD Via A Scheduled Task
The system volume can be automatically raised and lowered using a combination of an external tool and the Windows Task Scheduler. An advantage here is you can change the volume at a specific time without having software constantly running in the background. With a task, you can set the volume to change on specific days and times or use other triggers such as Windows logon.
We’re using Nirsoft’s swiss army knife tool NirCMD because it can perform dozens of simple commands and tasks effortlessly. These include changing, setting, and muting/unmuting the volume. Here’s how to set up a simple scheduled task to raise, lower, or mute the system sound with NirCMD. It works on all systems including Windows 10 and 11.
1. Download NirCMD 32-bit or 64-bit depending on your system. Extract the zip, right click on nircmd.exe, and run as administrator. Press the “Copy to Windows directory” button. This isn’t essential but adds nircmd.exe to the Windows path for easier usage in step #5.
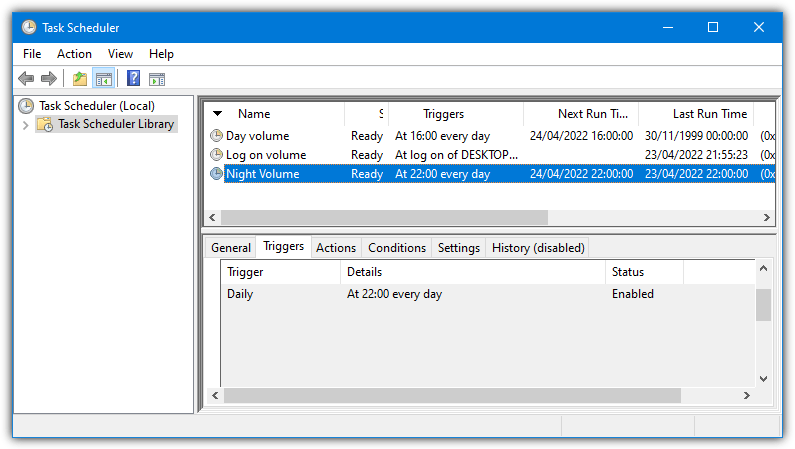
2. Open Task Scheduler by typing “sch” or taskschd.msc in the Start Menu or go to Control Panel > Administrative tools. On the Actions menu select “Create Basic Task“.
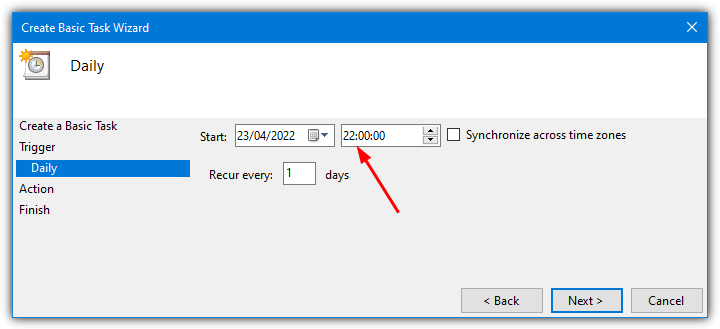
3. Give the task a name such as “Volume Mute” or “Night Volume” and click Next. Select a trigger event for the sound to be altered. Daily or when you log on are probably the most useful. Click Next.
4. Change the numbers in the box to the preferred time if you selected Daily. Click Next, leave “Start a program” enabled, and then click Next again.
5. In this window, input the commands to alter the volume. In the program/script box simply enter nircmd. What you enter into the “Add arguments” box depends on what you want to do with the volume. Here are a few basic NirCMD commands.
Mute system volume – Mutesysvolume 1
Unmute system volume – Mutesysvolume 0
Mute/Unmute Toggle – Mutesysvolume 2
Set system volume level – Setsysvolume {0-65535} (65535 is 100%, 32768 is 50%, 13107 is 20%, and etc)
Change system volume level – Changesysvolume {65535 to -65535} (-6554 is down 10%, 13107 is up 20%)
6. Enter the desired argument and value into the box, click Next, and finally Finish. Click on Task Scheduler Library to see your new task in the list. Right click on it and select Run to try the task out and make sure the volume does what you want.
I record programs on weekend schedule from various NPR web sites. One problem is that they do not seem to have a common volume level. Some play the program at a higher level than others. Is there an app that will auto-adjust the volume level so that each hour is adjusted to some semblance of sound level balance?
An Automatic Gain Control (AGC) comes to mind. Does it exist for Win 10?
Something like AGC might be more related to your video/audio player or audio driver because obviously, these tools don’t check the audio level coming in, they just adjust the system volume. Many drivers have some sort of leveling or auto-gain adjustment.
What a bout a tool that mutes and unmutes a computer at not only specific times, but at spesific dates too with a calendar function?! And the posability to add countless dates/times for a year.
One of the bedt written and researched articles I have read.
I know this article is quite old, but in regards to NirCMD… how would you do this if you had multiple sound cards?
I am guessing the instructions above are relevant if you have a single sound card as opposed to 2, 3 or even 4 audio outputs…
Cheers and hopefully this gets answered :-)
Thank you for this article. I’m looking for a tool that can increase the system volume when i receive a skype call. Do you know if it is an option of the 4 tools you presented ?
Very useful software Raymond.