4 Ways to Change Windows System Restore Disk Space Usage

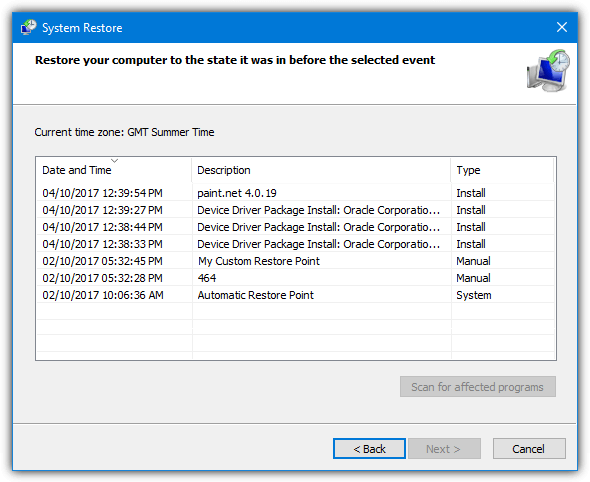
Microsoft has included a backup feature called System Restore in Windows since ME. It is different to other backup methods like taking an image of the whole system. This is because System Restore doesn’t backup everything but only backs up important or system files when they are likely going to be changed. A restore point can be automatically created at specific points in time, before software or driver installs, before Windows updates or manually.
If a piece of software, driver or update is causing a problem, you can then select one of the created restore points to go back to that point in time. All the files and registry information will be restored to the earlier time, hopefully eradicating the issue. System Restore can also be used offline to restore the system by booting from a Windows repair CD or installation DVD.
Depending on how you use your computer, the system may create restore points quite often. This takes up space on your hard drive or SSD. By default, System Restore uses a specific amount of drive space before older points are removed to make way for new ones. However, it’s possible to adjust the amount of space that System Restore can use. Set it lower if you don’t want restore data to take up too much room, set it higher if you make lots of restore points.
System restore reliability is hit and miss but it might just save your system from needing a complete reinstall. As a result, it’s not recommended to turn the System Restore feature off if you don’t back up your system using other methods.
Here we show you four different ways in which you can change the maximum amount of drive space System Restore can utilize to create restore points. Use more if you need it, use less if you don’t. All methods work on Windows Vista, 7, 8 and 10.
Change System Restore Disk Space With a Third Party Tool
Although there is a way to set the system restore disk space within Windows itself (apart from Vista), the option is slightly hidden away. A very simple solution is to use a small third party tool that can easily do it for you with a couple of clicks. We have created a portable utility that can do just that, called System Restore Space Editor. It works on Windows Vista, 7, 8 and 10.
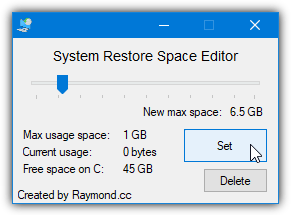
Using the tool is very simple, it will tell you the maximum space allocated for System Restore on the system C drive and how much of that space is currently in use. Just move the slider to adjust the amount of space in Gigabytes and press the Set button. You can allocate from 500MB to 50GB in half Gigabyte increments. The max usage space value will flash to reflect the new size.
There is also a Delete button that will remove the oldest restore point or all restore points to free up some space before reducing the allocated space. The System Restore Space Editor tool requires administrator privileges to run, make sure to use the correct 32-bit or 64-bit version found in the Zip file.
Download Raymondcc System Restore Space Editor
Use Windows System Properties to Change Restore Space Usage
The most obvious and the official way to change the disk space used by System Restore is through Windows itself. Strangely, the option to change the maximum available space was present in Windows XP, then was removed in Vista, then put back again from Windows 7 onwards.
To reach the configuration window, type systempropertiesprotection into Start, press Win+Pause/break then click on System protection or right click Computer/This PC, click Properties and then System protection. Make sure drive C is selected in the list of drives and press Configure.
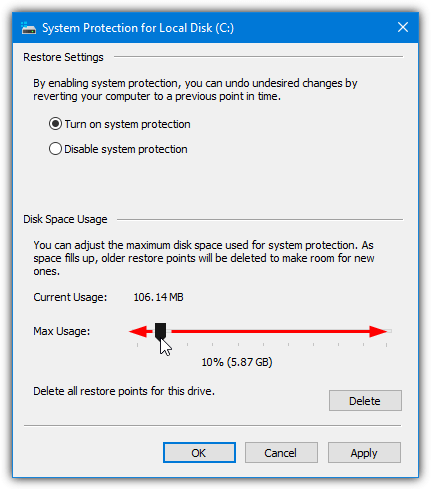
To change the amount of space that can be used, the System Restore feature doesn’t actually have to be turned on. Simply use the slider to set the amount of space to use, it is displayed as a percentage of the drive and in Megabytes/Gigabytes. Click OK when you’re done.
Note: There is a counter shown for the amount of space currently in use by System Restore. If you set the new maximum amount lower than this value, it will result in restore points being deleted to fit into the reduced size, starting with the oldest.
Change System Restore Space Usage From the Command Line
It’s quite easy to set the restore space usage from the System Protection window although Vista users don’t have that option available. This method is a little more advanced and allows you to change the space value from the command line. You can use this method in Command Prompt, Powershell, custom scripts or even your own programs.
To do this the Vssadmin (Volume Shadow Copy Service administration) tool is used which is available in Vista and above. Go to Start and type cmd into the search box, then hold Ctrl+Shift and press Enter to run an administrator Command Prompt. Windows 8 and 10 users can alternatively use the Win+X power user menu.
To list the current maximum restore usage size type:
vssadmin list shadowstorage
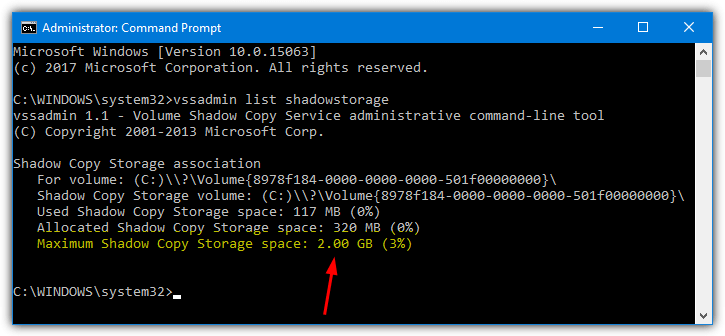
If you have System Restore enabled on more than one drive, they will all show here although the restore for C will be the most important. The last line “Maximum Shadow Copy Storage space” is the amount of space that can be used for restore points. You are also shown how much of that space is currently in use. To change the maximum size available, type:
vssadmin resize shadowstorage /on=C: /for=C: /maxsize=[size in MB, GB or %]
The maxsize value can be entered in either Megabytes, Gigabytes or as a percentage of the size of the partition. As an example, to set the size as 10GB, enter:
vssadmin resize shadowstorage /on=C: /for=C: /maxsize=10GB
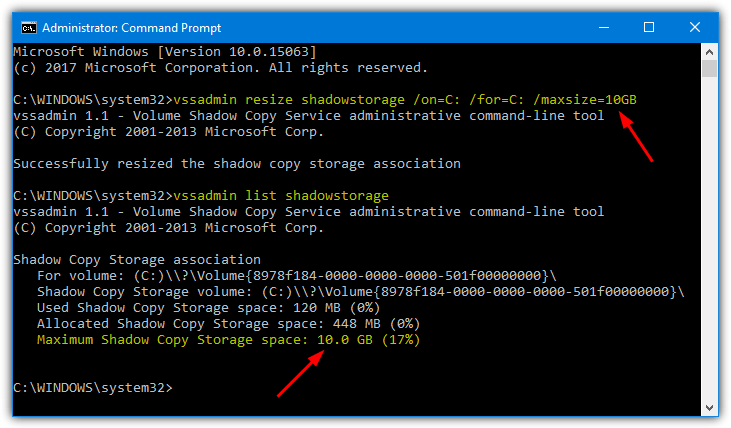
The “On” argument tells vssadmin where the restore files are stored and “For” tells it which drive the restore points are being created for. Therefore, the command above makes 10GB of space available for system restore. The restore points will be created for drive C and the restore point data is also stored on drive C, which would be the Windows default.
Using a Windows Batch Script to Change Restore Space
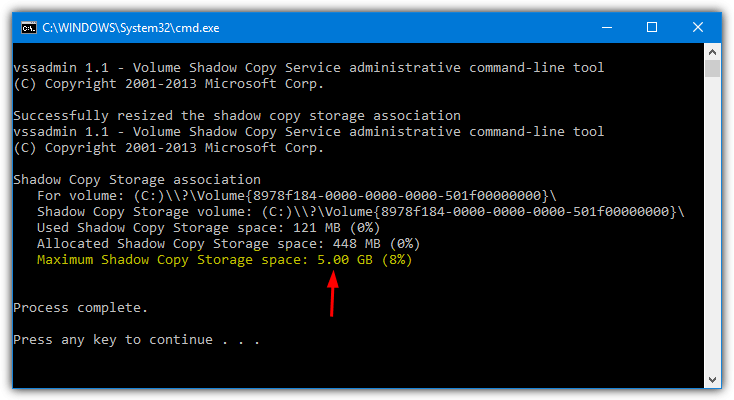
If you find the command line method confusing or too slow, then an alternative is to use the same vssadmin commands from a script. This has a big advantage of being quick and puts you only a double click away from changing the restore allocation space. Here are four scripts we have created to set the System Restore space to 2GB, 5GB, 10GB or 20GB.
Download set restore space to 2GB/5GB/10GB/20GB
Download and extract the Zip, then double click the batch script you want to set the required size. The script will automatically ask for administrator privileges if required. You can, of course, change the space value to whatever works best by editing any of the scripts at line 22.
There is also an all in one batch script on the internet that will do the same as above but allow you to enter your own restore space size during the process. It was originally created by the ReliancePC website but only worked with Windows Vista. We have updated the script to work on Vista and above systems with automatic requesting of administrator privileges if required.
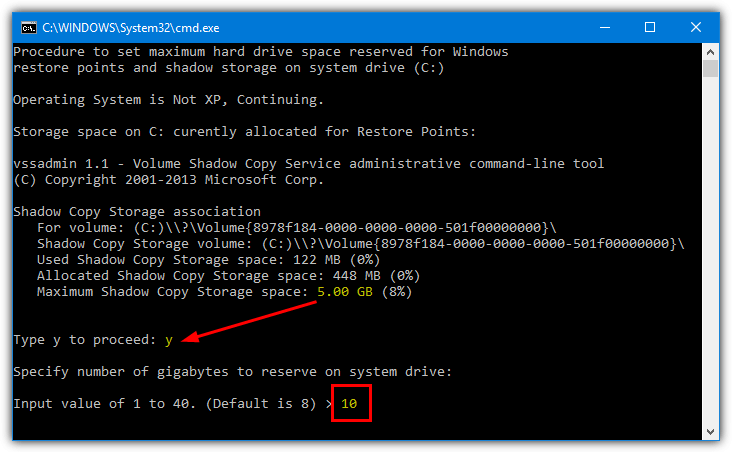
Download the Maxvss.BAT file, run it and press Y to continue. Enter a size for the maximum restore space in Gigabytes. The upper limit in the script is 40GB although this can be increased at line 67 if for some reason you need more.
Final Note: It is important to be aware that the storage space allocated for System Restore is shared with another backup feature called Previous Versions. If you set the restore point space too low it will also affect how many previous versions of files you will have available. Make sure to keep the space allocation generous if you make use of Previous Files as well.

Improve this guide

User forum
0 messages