6 Ways To Remove Unused Icons from the Notification Area

The Windows notification area, also known as the system tray, shows the system clock and other important icons such as network and audio volume by default. It has evolved since it first appeared and is currently split into two parts, visible icons and hidden icons. The hidden icons are shown when you press the up arrow to the far left. Windows decides which icons go in the hidden area and how many are permanently visible.
It’s quite easy to control yourself what icons stay in the main notification area. Simply right click on the clock and select “Customize notification icons”. Windows 10 users need to also click “Select which icons appear on the taskbar” in Settings. In Windows 7 you have the option to show the icons and notifications permanently, hide them and don’t show any notifications, or only show notification popups when they appear. Windows 10 has the option to put the icons into the visible notification area (on), or in the hidden area (off).
![]()
The main issue with the window that lists all the notification area icons is unused or even uninstalled software can leave entries behind and it can get a bit messy. Although those redundant icons won’t appear in either the main or hidden notification areas, it’s recommended to remove them if there a number of unused entries. There is no way to remove anything through the select icons window and it has to be done manually. Here are 6 ways in which you can do it.
Note: An issue with removing unused notification area icons is they cannot be selectively removed and all have to be deleted at once. This isn’t a major problem as used applications will add their icons back into the area. One thing you do lose though is the custom setting for icons to be shown or hidden, so you will have to reconfigure the icon settings through the notification window.
1. Notification Area Cleaner
This tool is from the same developer as the useful Network Activity Indicator and Network Lights programs, ITSamples. The program is portable and not much more than 100KB in size with separate 32-bit and 64-bit versions.
Just run the program and press the Clean button and it will go through the process of clearing the necessary registry entries. Then Explorer is restarted which you need to do to complete the removal. Although it says for Windows 7 in the title bar, the tool does work fine in Windows 10, just make sure to close any Explorer or Settings windows before running.
Download Notification Area Cleaner
2. CCleaner
In actual fact, one of the most popular system and junk cleaning tools of all time has an option built in to clear the notification area cache. You might miss it because the option is grayed out and not enabled by default. If you have CCleaner installed on your system, there will be no need to use anything else for the task.
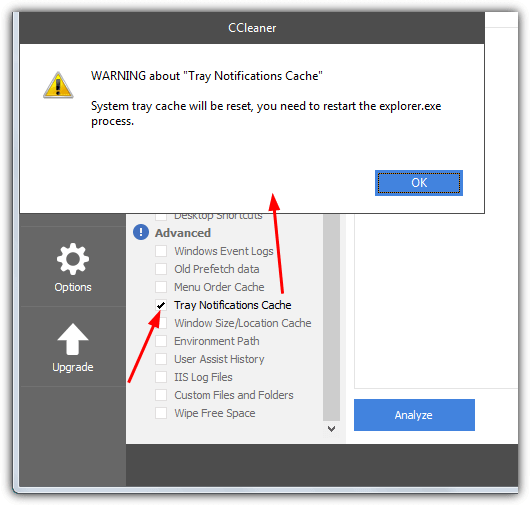
All you have to do is open the CCleaner window and check the Tray Notifications Cache box in the Default section of the Windows Cleaner tab. On checking the box a dialog will popup telling you Explorer needs to be restarted manually. Click Run Cleaner to clear the cache. Either kill and restart Explorer.exe from Task Manager or use this simple Restart Explorer batch script.
3. Tray Cleaner 2
Tray Cleaner 2 is a very simple and portable tool that only has three buttons on its user interface, Clean, Exit and About. On launch, Tray Cleaner will tell you if there are any entries to clean or not. The clean button will be whited out if there is nothing to clean, which probably means you have deleted the cache without restarting Explorer afterwards. When the program opens you simply press the Clean button.
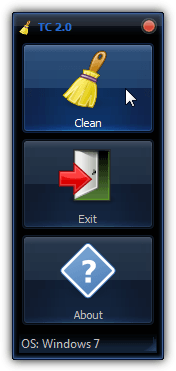
A useful feature is the program will backup the TrayIcons registry key where the necessary values are stored. Double click that file to restore everything back. Weirdly, it doesn’t restart Explorer automatically or even warn that you need to manually restart it for the changes to take effect. Tray Cleaner will work with Windows XP and newer systems.
4. System Tray Cleaner
System Tray Cleaner is a program we have mentioned before because it’s quite useful to identify icons in your tray that don’t have a visible name. Although it may be a bit overkill to just delete the redundant icons from the tray, System Tray Cleaner becomes quite valuable if you want to do both that and check any icons you are not sure about at the same time.
After install, right click the tray icon for the program and select “Display info for tray icons only”. When the page listing your current tray icons appears, simply press the Restore Default Tray Settings button. After receiving the warning that Explorer will be restarted, the icons that are not currently attached to a running program will be cleared.
5. Remove The Notification Icons Via The Registry
The tools above do the same thing which is delete the required registry values. They just make it easier and more comfortable from a user interface. To do it yourself, open Regedit from Start or the Run dialog (Win+R) and navigate to the following key.
HKEY_Current_User\Software\Classes\Local Settings\Software\Microsoft\Windows\CurrentVersion\TrayNotify
For safety, backup the key first by right clicking on TrayNotify and selecting Export, then give the backed up .REG file a name. In the right pane find the value Name of IconStreams, right click and delete it. Do the same for PastIconStream.

Explorer then has to be killed and restarted. To do it via Task Manager, end the Explorer.exe process and go to File > New Task (Run…) and type Explorer into the Open box. Alternatively download the Restart Explorer batch script which will do it for you.
6. Use a Batch Script To Remove The Registry Entries
Taking the manual removal a step further, it’s easy to use a simple batch script to delete the two registry values. The option can also be added to terminate and restart the Explorer process so it behaves pretty much the same as the third party utilities. The main difference is the batch script uses only built in Windows commands.
We’ve already created a simple script that will ask if you want to backup the TrayNotify key to the desktop, then delete the values and finally ask if you want to restart Explorer to complete the process.

Improve this guide

User forum
0 messages