How To Disable AVG Zen And Uninstall Avira Connect Launcher
These days, many antivirus companies are branching out and now sell VPNs, tweaking and cleaning software and various other services or applications. While you as a user might have no interest in anything else being offered apart from the free antivirus, the antivirus company is keen to make you aware that these other products exist. A few vendors have gone further and now put their free antivirus behind a launcher fronted that advertises their other products.
Both AVG and Avira have gone down this route and when you click the tray or desktop icon for the antivirus it takes you to the launcher instead. AVG’s interface is called Zen while Avira’s launcher is called Connect. They are referred to as central hubs to control the products you own from the company on all your devices. In reality though, they are hindrance for the majority of users that just want the antivirus and are not interested in any of the other products.
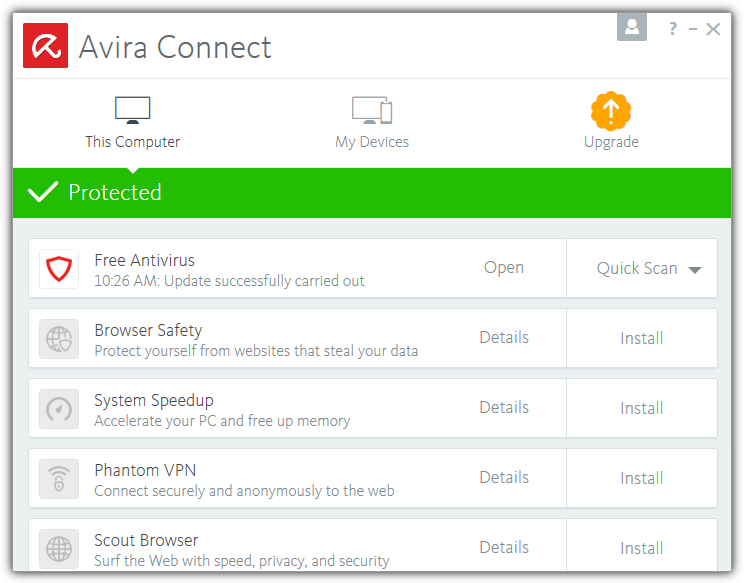
The problem is Zen and Connect are integrated into the free antivirus packages and refuse to let you uninstall the launcher software while the antivirus is installed. The tray icons also take you to the launcher instead of opening the antivirus main interface. In essence, you are stuck with the launcher whether you want it or not.
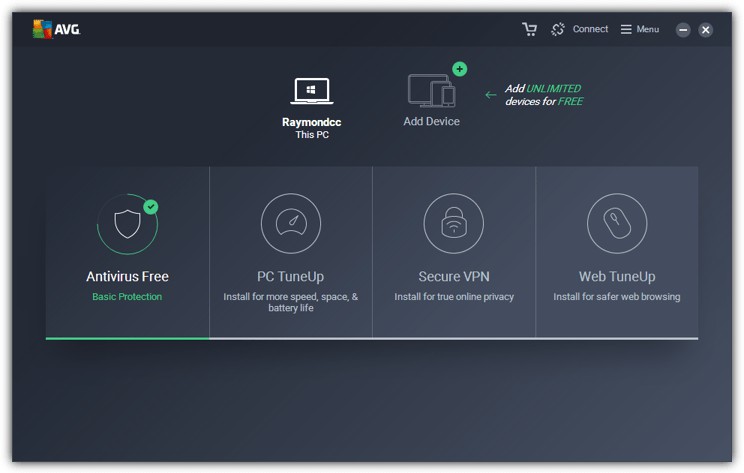
While these launchers shouldn’t really take up a huge amount of system resources, they are for the most part, unnecessary. Here we’ll show you how to disable AVG Zen and uninstall the Avira Connect Launcher so you don’t have to use them if you don’t want.
For those who dislike AVG Zen, the bad news is the 2017 free antivirus has integrated it even more tightly into the package than before. Previous methods to uninstall Zen or stop it from installing altogether now don’t work. Therefore, the best option with the current AVG Antivirus Free is to disable Zen so you don’t have to use it. Here’s how:Disable AVG Zen In AVG Antivirus Free 2017
1. If you don’t have it already, download and install AVG Antivirus Free (watch out for the adware). AVG no longer offers a full offline installer on their main download pages, so download the 3MB stub installer and install while connected to the internet.
Tip: AVG has removed all previous version free antivirus offline installers from their servers, but weirdly, they’ve been replaced with full offline installers for the 2017 version. Even though AVG doesn’t officially release 2017 offline installers, and the names are the old filenames, the installers are the newest version. Here’s the offline installers for AVG Antivirus Free 2017.
Download AVG Antivirus Free 2017 Offline Installer 64-bit
Download AVG Antivirus Free 2017 Offline Installer 32-bit
It is not certain how long these files will remain available, but for now, they work fine if you want the full offline 2017 installer.
2. Once AVG is installed open the Antivirus interface via Zen and go to Menu > Settings at the top right.
3. Click on Troubleshooting and uncheck the option for Enable AVG Self Protection Module. Press OK and Yes to accept the warning.
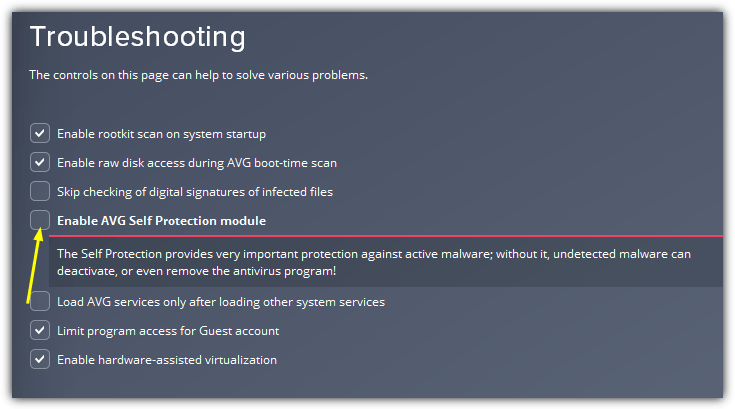
4. Close all AVG windows and open the Registry Editor by typing Regedit into Start or the Run dialog (Win+R). Navigate to the following key:
HKEY_LOCAL_MACHINE\SOFTWARE\AVG
5. Right click on the Zen key and press Delete. Close Regedit again.
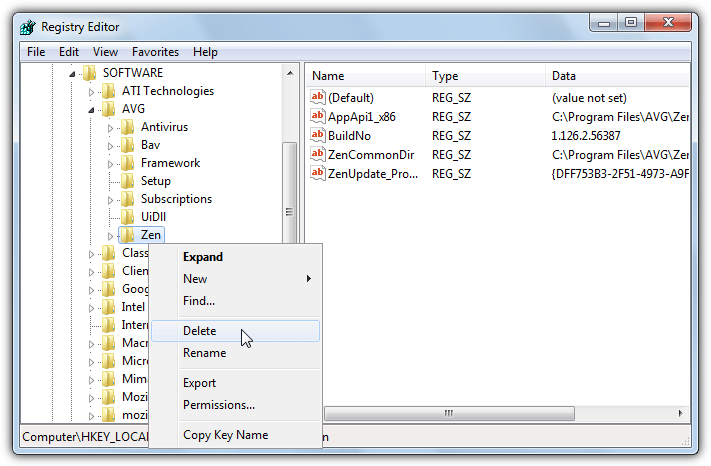
If you prefer not to go into the registry yourself, you can download this ready made Delete Zen key .REG file which will automatically delete the key for you when you double click on it.
6. Log off or restart the computer. Now when you left click on the tray icon the AVG antivirus main window will open instead of the Zen UI. Right click and and it gives the options to open the antivirus direct or run a scan. Also, the arrow on the left of the AVG window does not open Zen.
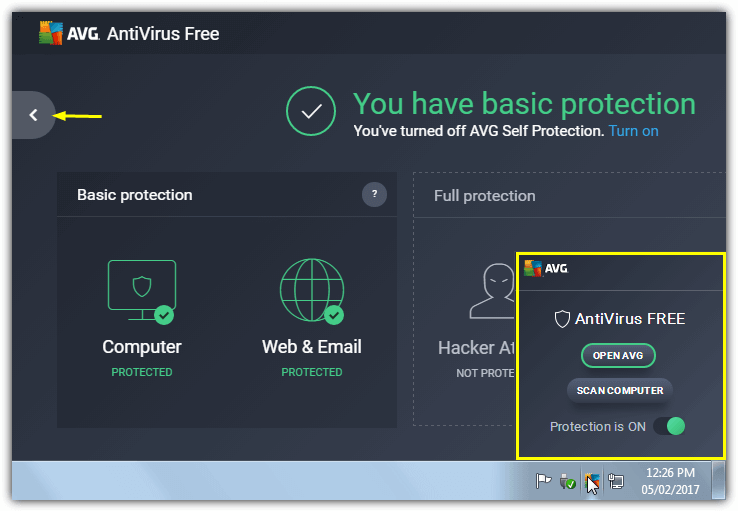
Do note that after booting, the tray icon sometimes takes 30-60 seconds to revert to the Antivirus Free popup. If everything has worked as expected you can go back into AVG Settings at step 3 and re-enable self protection.
The desktop and Start Menu icons no longer work as they point to the Zen launcher. Change the Properties > Target for the shortcut to “C:\Program Files (x86)\AVG\Antivirus\avgui.exe” or “C:\Program Files\AVG\Antivirus\avgui.exe” for 32-bit, or just delete/not use the shortcuts.
Here’s a short YouTube video showing how go through the steps above to disable AVG Zen.
We have run AVG for a few weeks like this and Zen has not returned, although there was not a major program update during this time. If a program update enables Zen again simply disable self protection and delete the registry key by following steps 3-6.
Use AVG Antivirus Free 2016 Without Zen Installed
While Zen is present in 2016 versions of AVG, it is only force installed in the free version. Antivirus and Internet Security don’t have Zen included during install. It is possible to find a full offline setup installer for AVG Free 2016 elsewhere on the internet which doesn’t include Zen, but it will fail during install.
If you don’t want to have AVG Zen on your system and don’t mind using the 2016 version, there’s still an easy way to do it. All 2016 versions should be supported for the foreseeable future and with this method you get the latest release released from the AVG website.
1. Go to the AVG support page and download the AVG Antivirus full installer for the paid version (not the trial). Make sure to get the correct 32-bit or 64-bit version for your system.
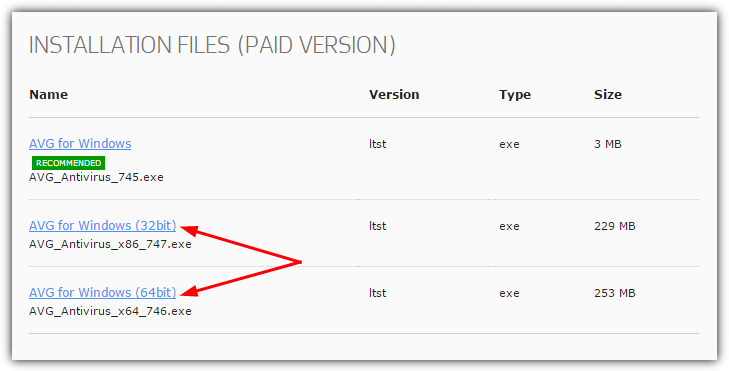
2. When starting the install you will be asked to enter a license key. Copy and paste or type the following into the box:
4U4AP-Z24UV-BTWWP-QW93F-4NWRE-KMEUE
This serial number is taken directly from the Antivirus Free 2016 setup installer. You are simply using the free license key on the Zen free paid installer.
As previous AVG products do not update to major new versions automatically, you will remain on 2016. There is another way to do this which is to install the trial version of Antivirus, choose to uninstall it and you will be offered the chance to revert to the free version. For users with Antivirus Free and Zen installed already, it’s probably easier to uninstall both and then use the above method.
Uninstall Avira Connect Launcher
Although the Avira Connect launcher looks somewhat different to AVG’s Zen, they both do the same thing. Before Connect, there used to be a popup when you clicked the Avira icon in the system tray. Now it’s a full blown user interface. One advantage Connect has over AVG Zen is you do have direct access and some control over the antivirus from the tray icon context menu, so opening the Connect interface can be avoided.
The good thing is Connect can be completely uninstalled from the system. The drawback is you get no tray icon and have to open the antivirus window from a shortcut on your desktop or Taskbar etc.
1. If you haven’t already, download and install Avira Antivirus Free edition. Open the antivirus window and goto Extras > Configuration (or press F8).
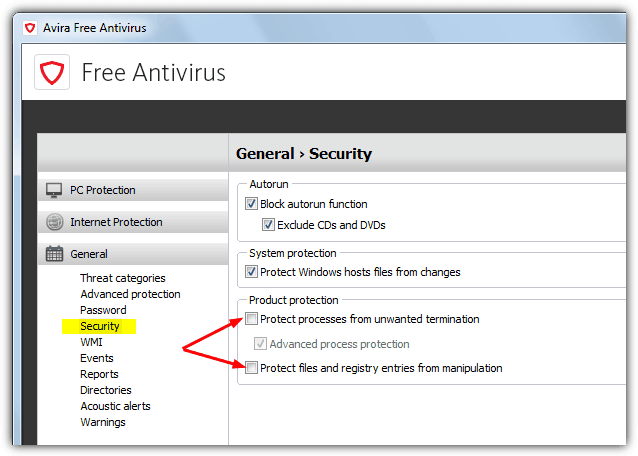
2. Click General > Security, then uncheck Protect processes from unwanted termination and Protect files and registry entries from manipulation in the “Product protection” section. Click OK.
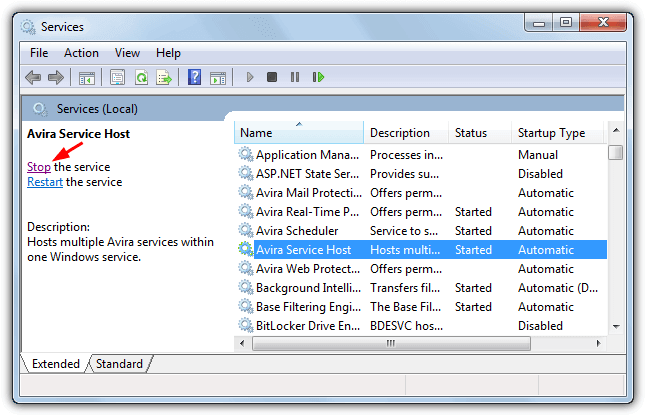
3. Type Services.msc into Start or the Run dialog (Win+R) or go to Control Panel > Administrative Tools > Services. Find Avira Service Host, select it and press Stop. Close Services.
4. Go to Control Panel > Programs and Features (or right click on Start > Programs and Features). Double click the Avira Connect entry to uninstall Connect.
5. After Connect has been uninstalled, download the following registry file to match your system:
Avira Connect 64-bit Registry File
Avira Connect 32-bit Registry File
Run the registry file and import the data to your registry. Adding these keys is essential otherwise Avira will not function correctly and Connect will reinstall itself the next time there’s a check for updates.
DO NOT open Avira or restart the computer before applying the registry file or Avira will cause crashes and system instability. It will also lock the registry keys you are trying to change so the registry import will fail.
If you have already opened Avira or rebooted before adding the registry file and are having issues, you need to reinstall Connect. The 4.5MB Connect installer is found in the following folder on 64-bit systems. Change the path accordingly for 32-bit systems:
C:\Program Files (x86)\Avira\Antivirus\avira_en____fm.exe
6. Repeat step 2 but this time recheck the two boxes to enable self protection and click OK.
7. This last step is completely optional which is to pin a shortcut to the taskbar or Start menu as Avira now doesn’t have a tray icon. This will give you quick access to the antivirus window.
To show you how easy the process is, here’s a YouTube video demonstrating how to do it.
Like AVG Zen, we have been running Avira Free without Connect for a while after following these steps. The addition of the registry key fools Avira into thinking Connect is still installed. As a result, it doesn’t try to reinstall Connect at the next check for definition and program updates. The other registry key stops the issue of Avira not working properly when Connect is uninstalled in more recent Avira versions.
Disable Avira Connect Launcher
If you are not particularly bothered about uninstalling Avira Connect but would still like to stop it from running and sitting in the system tray, it’s possible to do that. In fact, the process is quite easy and involves only a few steps. You need to disable the Avira ServiceHost Service and stop the tray launcher executable running when Windows boots.
To make things nice and simple, we have created a batch file to stop and disable the Avira ServiceHost service, kill the Avira.systray.exe process and finally disable the tray program from starting with Windows.
Download Disable Avira Connect batch file
Make sure to run the script as administrator. Using this method you don’t have to disable Avira’s self protection as the service and tray executable are located in the Avira\Launcher folder which is not protected by the antivirus. If Connect gets enabled in a future update, simply run the script to turn it off again.


umm.. or just install Bitdefender.
– it removes any antivirus on your PC in the installation process of itself.
few clicks, DONE.
I was unable to uninstall AVG, Bitdefender just did it in few seconds..
Once a year I come back to this site hoping it be alive again with a new article. Really liked this site.0
This is a very good blog, why didn’t update?
THANK YOU FOR THIS ARTICLE.
Hi HAL9000,Do you be on other forums?
this is awesome
Well written article.Presented in a different way.Easy to digest.Thank you.
The Avira method worked until I got pushed 15.0.29.32 yesterday.
Now the antivirus UI won’t start unless BOTH of Avira service host and the notification icon are running. Any of them not running the UI won’t appear.
This is very annoying. Not that I need the UI often but it is certainly useful.
Hi All, Sir(s), It seems AVG has released ”AVG Free Antivirus 2017” offline installers finally ! They have taken off ”AVG Antivirus 2016 (Paid)” offline installers from the links , plz help.Regards & Thanks.
I’ll never understand why AV/Firewall devs insist on making things so hard. Things like this are exactly why I never EVER will pay for AV software. There’s no guarantee the devs won’t make it unusable within the life of the licence. It’s like the inverse washing machine rule, which states that a washing machine only breaks down on the day the guarantee has expired. AV software becomes unusable/un-configurable/fully-automatic/not-fit-for-purpose on the day you buy a licence.
If I wanted big, bold, colourful, shiny interfaces, I’d buy from Fisher Price. If I wanted to remove functionality, I’d uninstall the program. If I wanted to remove configuration options, I’d use software without those options.
Stop dumbing software down to accommodate idiots.
Installed Avira Antivirus the 08 December 2016, 18:37:40
Three days ago, followed, step-by-step, your instructions on «Uninstall Avira Connect Launcher».
Until now no problem.
I’m grateful.
eao
Thanks for the AVG tip :) Worked!
Thank you for the methods. But with the latest version of Avira 15.0.25.154 it will no longer work. It will only cause freezing to the Avira control center and also might cause Windows Action Center to ask you to turn on the antivirus, but cannot be done. Please look into it.
Thank you.
Thanks for the report, think I’ve identified the problem. Just trying to find the best way to apply the fix.
You are welcome. Had done multiple installations on 3 different computers this week so was hopeful when coming across this article, but sadly did not work if computer rebooted. Looking forward to an update that can minimize the annoyance.
By the way, thank you for AVG tip, it worked well.
Thank you.
The method to uninstall Connect has been updated to take into account the issues with 15.0.25.154. Been tried successfully on several machines.
I also added an option to disable Connect instead of uninstall.
Thanks Hal, done and done ;)
Hey Raymond,
Good to hear from you again.
I personally use a paid Norton AV but the information you give is not bad.
You should update your blog more often.
Hey Raymond. While this particular article isn’t relevant to me, just wanted to say it’s nice to still get your blog from time to time.
BTW, when I want a free anti-virus, I use 360 Total Security . It’s light and seems to do the job. What do you think of it?