7 Ways to Disable or Enable Windows User Account Control (UAC)

Most areas of the system are protected by User Account Control, including Program Files, the Windows folder, the registry, and many system settings. Even trying to copy or save a file to somewhere like the root of your system drive will trigger a UAC prompt. Folders that are located under your user account don’t require UAC, which is why you and programs can freely save and create files in personal folders like Documents or Music.
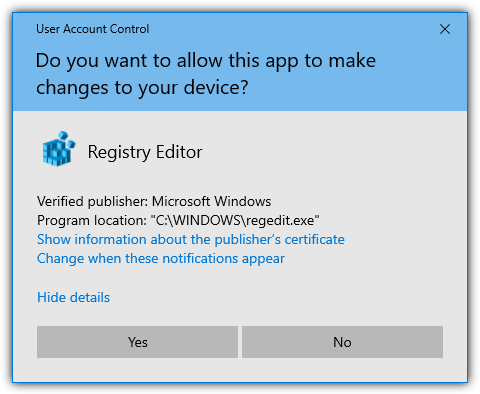
If a program requires access to any of these locations protected by UAC, it will need to be manually granted with the UAC prompt, which also includes when installing software or drivers. The biggest complaint about User Account Control has probably been that it bugs users too often and many people just end up clicking Yes without really looking at what is asking for access, which essentially nulls the effectiveness of UAC.
Although User Account Control does provide some level of protection in Windows, there are weaknesses and workarounds. For instance, it’s easily possible to bypass UAC elevation for specific applications. While it’s always recommended to keep UAC enabled if you can for that extra bit of protection, if you prefer to turn it off or adjust the levels of protection, here are some ways to do it.
1. Raymondcc UAC Changer
UAC Changer is a simple and portable tool only 26KB in size that we have created ourselves. It is able to turn UAC off or on while also switching through the four available modes when UAC is enabled. There is also the ability to disable UAC completely. The tool requires .NET Framework version 4 or higher.
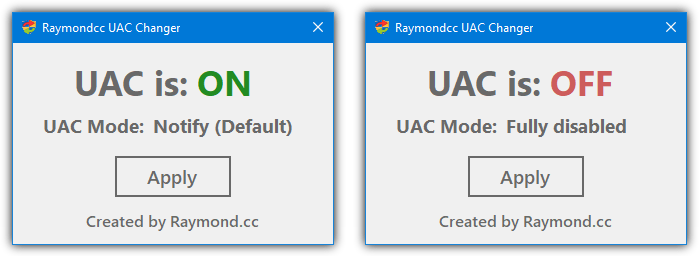
Run UAC Changer and it will start up showing the current status of User Account Control on your system. Click over the ON/OFF text to switch between enabled or disabled. You can also click on the UAC Mode text options when UAC is set to ON to switch between always notify, notify and dim the screen (system default), notify but don’t dim the screen, or Admin approval mode.

Simply click Apply when you are done and the settings will be changed. Users will need to reboot the system for new UAC changes to have an effect when switching to or from the fully disabled mode. If you have any feedback for UAC Changer, feel free to leave it in the comments. The tool works on Windows 7, Windows 8/8.1, and Windows 10.
Download Raymondcc UAC Changer
2. TweakUAC
TweakUAC has been around since the days of Windows Vista and it received numerous positive reviews at the time. That was mainly because Vista’s implementation of UAC was the first and the worst of all the operating systems that have included the feature. TweakUAC is portable and only 85KB.
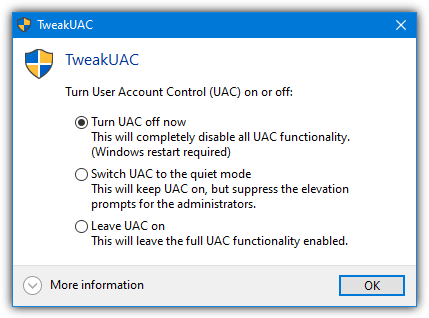
The three options available in TweakUAC are turn UAC off completely, put UAC in quiet mode (Admin approval), and turn UAC on. The on option is not the standard default option in Windows 7, 8, and 10 but the full always notify mode. Vista didn’t have different levels of UAC, only on or off was available at the time the tool was written.
For some silly reason, the download of TweakUAC at the official website requires sending the download link to a valid email address. As a result, we link to an external download site.
3. Winaero Tweaker
Winaero Tweaker is a tool we’ve mentioned before because it’s got hundreds of useful options and many of them are valuable to Windows 10 users. There are also some useful functions related to UAC, such as enabling UAC for the built-in administrator account and creating shortcuts to disable UAC prompts for specific programs.
After installing or creating a portable version of Winaero Tweaker from the installer, run the program and scroll down the functions tree on the left. The Disable UAC option is about three quarters the way down in the “User Accounts” section. Type uac into the search box to find it quicker. The option is a simple enable/disable switch which turns UAC on (to the last used setting) or off completely.
4. Disable UAC
Disable UAC is a free and portable tool at only 11.5KB in size that does two things; disable or enable UAC. The tool couldn’t be easier to use. If UAC is on, you just check the box and press Apply. If you want to enable UAC again, just run the tool and uncheck the box before pressing Apply.
Users will need to reboot for the changes to take effect. For some reason, the developer moved from a portable tool to a setup installer version back in 2014. We’ll just list the portable version as there’s not much point installing such a tiny program. Windows 10 users will need to have .NET Framework 3.5 installed if it isn’t present already.
5. Disable or Enable User Account Control From The Registry
The options to control UAC and its levels are all accessible in the Windows registry. Of course, inexperienced users shouldn’t play with the registry if they don’t know what they are doing, but more experienced users will likely make direct registry changes quite often. The tools above all use the same registry keys and values to control UAC.
All you have to do is download and extract the Zip archive and double click the required .REG file. There is a different file for each of the five options; always notify, default notify, no dim notify, Admin approval, and full disable. They work on Windows 7, 8/8.1 and 10, and will also require a reboot if you are turning on or off the disable option
6. Disabling or Enabling UAC From the Command Line
In essence, using the command line to turn off User Account Control is very similar to using a .REG file. The only major difference is you are typing the command to edit the registry values instead of double clicking on a file. To disable UAC, run a Comand Prompt as Administrator and type:
reg ADD HKLM\SOFTWARE\Microsoft\Windows\CurrentVersion\Policies\System /v EnableLUA /t REG_DWORD /d 0 /f
To re-enable User Account Control again:
reg ADD HKLM\SOFTWARE\Microsoft\Windows\CurrentVersion\Policies\System /v EnableLUA /t REG_DWORD /d 1 /f
As the levels of prompting are held in different registry keys, re-enabling UAC will revert it back to the last setting you used. Like all the other methods, a reboot will be required.
7. Adjust UAC Through Windows
Of course, it’s also possible to adjust the levels of User Account Control from within Windows itself. All you have to do is click Start and type UAC, the Change User Account Control option should be the first to appear. Alternatively, go to Control Panel > User Accounts > Change User Account Control settings.
Move the slider all the way to bottom to “Never notify”. In Windows 7 this will turn UAC off but it doesn’t in Windows 10. When you set the slider to the lowest setting, the UAC prompts are turned off in Windows 10 but Windows is still in “Admin approval mode”. In this mode, you can receive a prompt for administrator permission in certain situations such as writing data to important areas of the system.
An easy way to see Admin approval mode is trying to copy a file to somewhere like the root of the C drive, Program Files, or the Windows folder.
Something like the image above shows an Admin approval mode prompt instead of a UAC prompt. You have to manually allow the action before continuing but the prompt still allows access to the desktop while on the screen. This mode is not as secure as when UAC prompts are also turned on but it’s better than turning off UAC entirely, so it might be an acceptable compromise for some users.
For Windows 10, one of the other methods is required to disable UAC completely. As the lowest slider in Windows 7 turns off Admin approval mode as well, you can still enable admin approval without the UAC prompts by using one of the options above.
Final Note: As we have said earlier, disabling User Account Control in Windows decreases the level of security and increases the risk of malicious software damaging your system. It is not something that should be taken lightly and you should only do so if you have sufficient experience and adequate security software such as antivirus, firewall, anti-keylogger, and HIPS software.

Improve this guide

User forum
0 messages