Windows 7 32 bit to 64 bit Converter Software Free Download
In the last few years, most computers have come preinstalled with at least 4GB of memory and one change that has to be made with that amount of RAM is you need to be running the right version of Windows to take advantage of it. By default, no version of Windows can make use of more than about 3GB of RAM unless it is the 64-bit edition of the operating system. There are third party hacks to force a 32-bit version of Windows to utilize more memory, but they are tricky to use and not completely reliable.
32-bit and 64-bit versions of Windows each have plus and minus points, 32-bit is better on memory usage, is less picky about unsigned drivers and also has better compatibility with older and certain types of software such as some security applications. A 64-bit Windows can use all the memory your computer has installed and also specific applications can further increase their speed under 64-bit via optimizations. There are valid reasons for you to want to upgrade your 32bit Windows 7 to 64-bit, and also downgrade from 64-bit down to 32-bit, it’s mostly about how you want to use your computer.
Converting from one version to another is not difficult but it’s also not quite as simple as popping in your Windows DVD and pressing a button because you will need to reinstall all your software etc. Before starting anything, it’s a good idea to backup all important data. An easy way is to create a full Windows 7 image backup so that you can restore it in case anything goes wrong.
Alternatively there are plenty of quality alternatives such as Macrium Reflect. Also the Windows Easy Transfer tool can backup documents, emails, media files and favorites for quick restoration. Go to Start > All Programs > Accessories > System Tools to open Windows Easy Transfer and follow the instructions to create a backup.
There are a couple of things you need to know about switching Windows versions between 32-bit and 64-bit. Firstly, you cannot reinstall a different edition of Windows to what you currently have installed. For example, if you are using Home Premium you need to reinstall Home Premium. Reinstalling to different hardware or another computer using this guide will deactivate Windows and you will need to reactivate manually from your COA sticker. Also, make sure your hardware has the appropriate drivers available, especially moving to 64-bit as there may be specific 64-bit drivers to download.
Unless you have a Windows 7 DVD from a retailer, you will need to either download and burn the correct edition ISO for your needs or remove the ei.cfg file from an ISO file you already have to create a universal edition of the Windows 7 installation disc. Fortunately we have covered how to download Windows 7 ISO images from an official source before. Once you have an ISO, it can be either burned to a DVD or written to a USB flash drive to make reinstall a bit quicker. For the more adventurous users and for sheer convenience there are also methods to create an all-in-one 32-bit and 64-bit install disc.
Here we will show you two different ways to reinstall your Windows 7 system. The first way works if you are going from a 64-bit Windows 7 to 32-bit because it can be done slightly differently. The second way is going from 32-bit to 64-bit.
Backing Up Windows Activation Data
Before migrating to a different architecture, backup your activation data so your system can be quickly reactivated without the needing the internet, a telephone or the product key from your COA sticker. There are two ways to do this:
Method #1
We have previously discussed a tool called ABR (Activation Backup and Restore) which is able to backup and restore the activation data from Windows Vista and Windows 7. This method can be used if you KNOW your Windows is pre-installed from the OEM manufacturer (like Dell, HP Asus) and has not been installed manually.
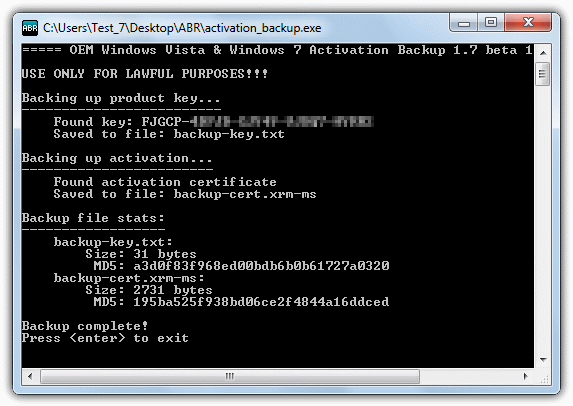
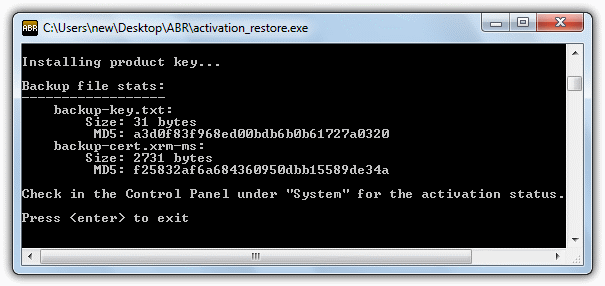
1. Download ABR Beta and run ABRbeta.exe, it will extract the files to a new ABR folder. Make sure now or after step #3 to copy the ABR folder to a USB flash drive or another partition so it’s available after reinstallation.
2. Run activation_backup.exe from the ABR folder and it will create two new files, backup-cert.xrm-ms and backup-key.txt in the ABR folder. Hit Enter to close ABR. The backed up product key is not the same as the key on your Windows COA sticker and is Manufacturer specific, which is normal.
Method #2
This second activation backup method is more universal because it doesn’t matter if you have an OEM pre-installed system, you activated over the internet or you had to use the telephone. There is also an added bonus that Office 2010/2013 activation data can be backed up as well. The tool is one we have talked about before and is called Advanced Tokens Manager.
1. Download Advanced Tokens Manager and extract the zip file. Make sure now or after step #3 to copy the extracted Advanced Tokens Manager folder to a USB flash drive or another hard drive so it’s available later on.
2. Run Advanced Tokens Manager.exe, click Activation Backup then read and accept the warning.
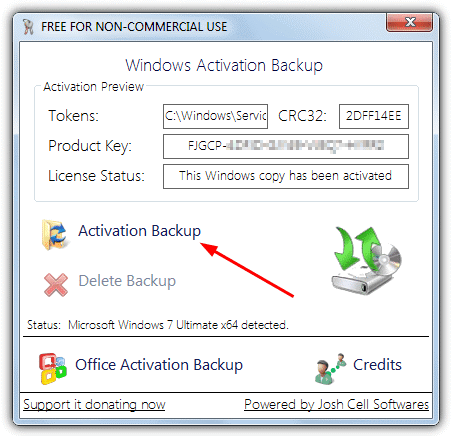
3. The window should now show that the backup was successful and is available to be restored. Two new files will have been created in a subfolder in the Advanced Tokens Manager folder called Config.ini and Tokens.Dat
On the next page we’ll show you how to switch from a 64-bit Windows 7 to 32-bit and also from 32-bit to 64-bit.
Installing Windows 7 32-bit from a 64-bit System
Strangely enough, it’s possible to install a 32-bit Windows 7 from a 64-bit desktop, but not possible the other way around. This is because the Windows setup installer for 32-bit will work on both 32-bit and 64-bit systems whereas the setup executable for Windows 7 64-bit will only work from a 64-bit install. You can use this or the second method below for 64-bit > 32-bit, this method requires more initial disc space but is slightly easier and quicker.
1. Insert the Windows 7 install disc and if Autoplay doesn’t offer you the chance to, open the disc in Explorer and run the Setup.exe file.
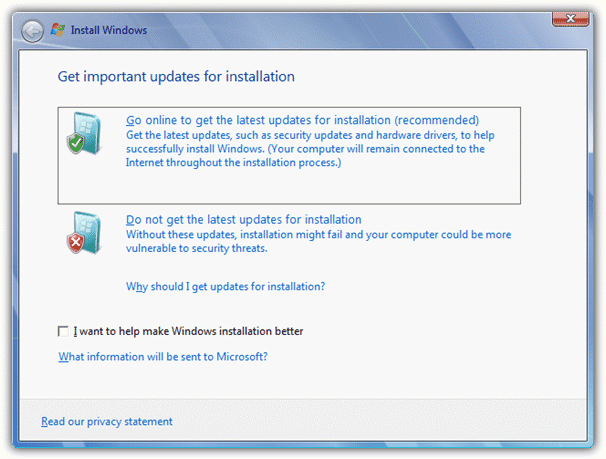
2. Click “Install Now” and wait a few seconds while the setup process copies some files. The next screen offers the choice to go online and check for installation updates. It is recommended you do this and for us it downloaded 1089K.
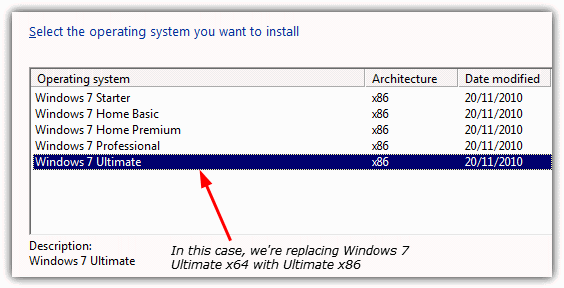
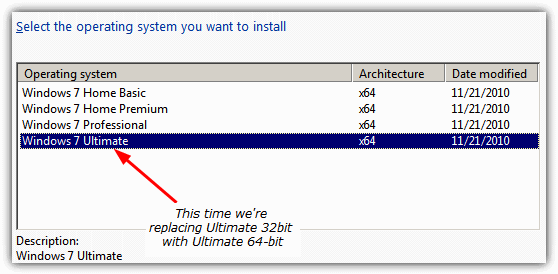
3. If you have an install disc with multiple distros available, select the version of Windows to reinstall, remember to select the same edition which you are replacing. At the next screen accept the license terms.
4. The next screen offers the chance to Upgrade Windows or perform a Custom install. As you cannot upgrade Windows with the same version, choose Custom.
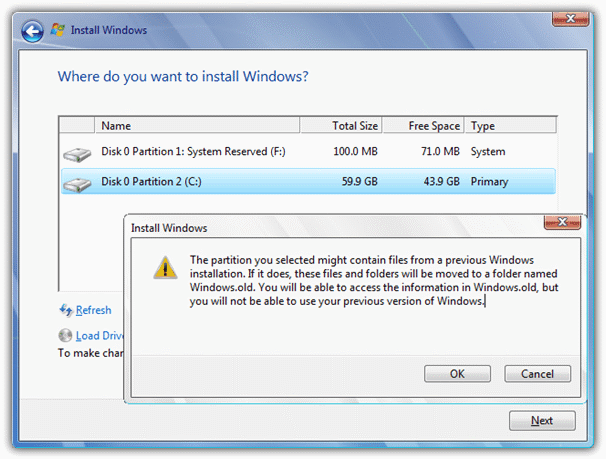
5. You will now be asked where you want to install Windows, drive C: should already be selected, but if it isn’t, choose C:, then click Next. A window will show with the text:
The partition you selected might contain files from a previous Windows installation. If it does, these files and folders will be moved to a folder named Windows.old. You will be able to access the information in Windows.old, but you will not be able to use your previous version of Windows.
Instead of erasing your current Windows, this method will keep the old Windows install until you choose to delete it. If you don’t have enough free disc space (about 15GB), method 2 will need to be used. Click OK to continue.
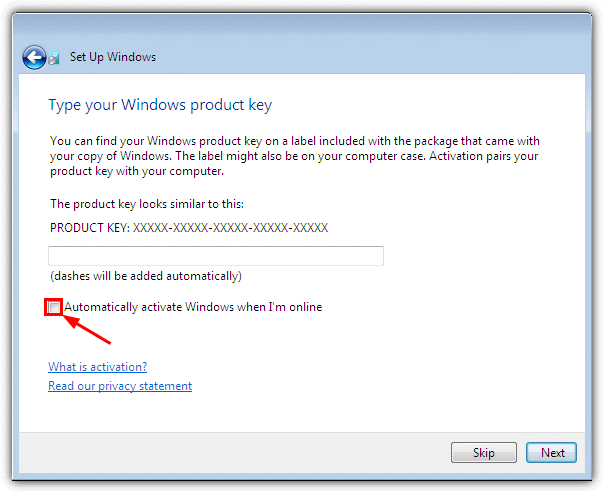
6. After a couple of reboots, the language/time zone screen and the computer/user name screen, you’ll eventually be asked to enter the product key. Leave the product key box empty and uncheck the option to auto activate when your computer is online. Click Next and continue the install choosing the options you require, you’ll finally reach the desktop.
In the root of C, you will notice the Windows.old folder which can be deleted at any point you choose from now on. Also, Windows leaves the “Program Files (x86)” folder in place, this can be deleted as well. It’s a good idea to run a defrag on a hard drive after deleting these folders because there will be a large gap of empty space on the fastest part of the drive where Windows.old once was.
Installing Windows 7 64-bit from a 32-bit System
As mentioned before, Windows 7 64-bit cannot be installed from inside Windows 7 32-bit so it has to be done the standard way by booting from the DVD/USB. This way will give you the option to format the hard drive and perform a clean install.
1. Boot your computer using the DVD or USB flash drive containing Windows 7 64-bit and when asked, press any key to boot to the disc. You may need to check your BIOS settings are correct to boot directly to DVD or USB.
2. Select the timezone, keyboard and language then click “Install Now”. As in the previous method, if you have an install disc with the ei.cfg file removed, the option will be available to install any of the Windows editions. Make sure to chose the same as you’re replacing.
3. Accept the terms of the license and at the next screen click on Custom as Upgrade won’t install the same operating system, even though it’s a different architecture.
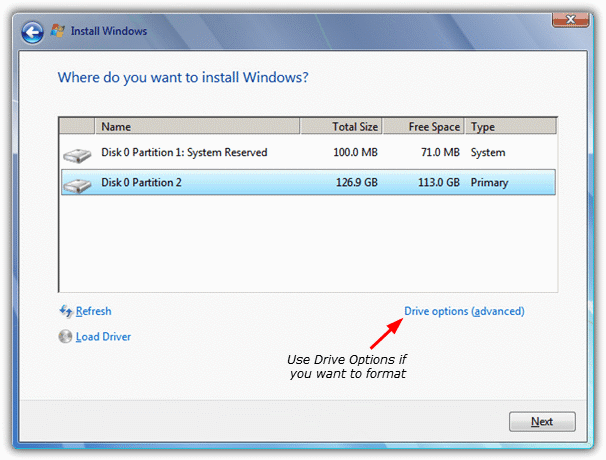
3. Then you have the option of formatting the the hard drive before installation or leaving the old Windows intact and placed in a Windows.old folder. The choice is yours and if you want to format, click on Drive Options (advanced) for the selected drive to create, delete and format partitions.
4. As in step #6 above, you will eventually reach the screen to enter the Windows product key. Don’t enter a key and untick the activate when online box, then continue the install until you reach the desktop.
Restoring Your Windows Activation
Once Windows 7 has been installed it won’t be activated and you will be given 30 days to do it, so it makes sense to sort this out before going any further.
Restore From ABR
1. Making sure you have the ABR folder available from a flash drive or another partition, run activation_restore.exe. It will then automatically restore the product key and license information.
Restore From Advanced Tokens Manager
Advanced Tokens Manager is immediately disadvantaged because it requires .NET Framework 4 or above to function which isn’t installed on a clean Windows 7. Either use Windows update to get it or download and install .NET 4.5 directly using the setup installer version.
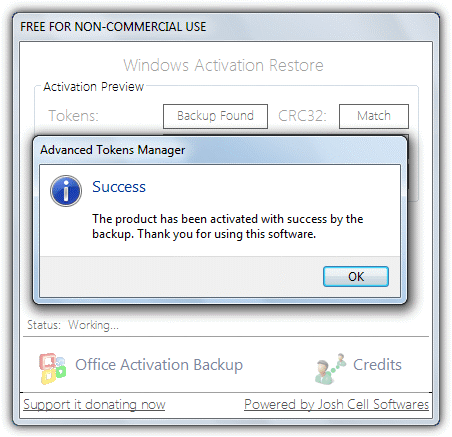
1. Go to the Advanced Tokens Manager folder you backed up earlier and run Advanced Tokens Manager.exe, note in the tokens box it should say “backup found”.
2. Click Activation Restore and accept the notice that it could take up to 5 minutes, then you should finally get the success message.
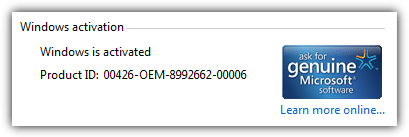
Press Win key+Pause/Break key to launch the System window if it hasn’t already shown. Scroll down and you should see “Windows is activated” with an OEM product ID.
Make sure to run both ABR and Advanced Tokens Manager as Administrator to avoid possible complications. Now Windows has been activated, you can start the long process of restoring personal data with Windows Easy Transfer and installing updates, offline Windows updating is another option to consider if you install Windows often.

window 7 ultimate for 64 bit installation setup
Thanks so much, i used your second method to change my OS from 64bit to 32bit. Thanks and keep up the good work.
Hey.. so i upgraded to windows 7 64 bit… As i start my computer i get two options… Both are named windows 7… One starts the 64 bit version and one starts the 32 bit version… Is there some way to get rid of the 32 bit version? Its not a memory problem but i dont like it
I will reinstall my win7 32bit but not converts into 64bit even my pc support 64bit length
Ha i have literally no software on my pc. Backups? nah.
Great tutorial by the way :)
hi,
will a downgrade to 32-bit win7 require re-install of all programs? the concern is that my OEM version of MS Office declared on the last installation that no more iterations of MS Office could be installed afterward.
Yes, a downgrade to 32-bit is a complete reinstall of Windows and all software, there is no other way around.
my laptop came with windows 64 bits and change it to 32 bits.how can i go back to 64 bits?without any lost files
need help badly
worried boy
Ben
It depends what you mean by “files”. If you’re talking about files in folders like My Documents or Pictures etc, then you can reinstall Windows without formatting the drive and those files won’t be erased. Your program settings and software you have installed will be lost though.
For best results it would be preferable to backup all your data and then perform a clean install of Windows.
You state: “Also the Windows Easy Transfer tool can backup documents, emails, media files and favorites for quick restoration. ”
It should be noted that Windows Easy Transfer tool will NOT allow you migrate files and settings from Win7 64-bit to Win7 32-bit. It DOES work very nicely for 32-bit to 64-bit migration, however.
thanks for the useful information.
But I cant downgrade my win7pro-64bit to win7pro-64bit.
My problem is, the Backed-up Activation couldn’t be used to restore the activation after Installing Win7pro-32bit.
I’m not sure with the reason, Is it because my win7pro-64bit DVD is OEM version and the Win7Pro-32bit ISO file is gotten some where on the internet?
But the Advanced tokens manager says that:
“The product can’t be activated by the backup. Please check the backup instructions on the readme file.”
While I did each steps carefully.
Any suggestion/Idea?
thanks for helping downloading
I did this process to “downgrade” a WIn7 64bit Home Premium to 32bit. After many hours of install, I am down to a clean Windows7 … still with 64bit. I never got the option to choose x86 or anything else that resembled 32bit. It cannot find the network card, nothing is in there now, just empty. Cannot even connect to the USB stick I have, with the registration information to re-activate.
Craters.
If you’ve reinstalled 64bit, then you must have downloaded a 64bit install disk. Microsoft doesn’t give you the choice of what version (Home/Pro/Ultimate) or what architecture (32bit/64bit) on the official install DVDs.
this information very very useful to me thank you very very much
wow!
Very helpful thanks!
Very saddened to hear the loss of your uncle-in-law, Please accept our condolences. God bless !
Ray can i also go from 32bit to 64bit
I am sorry for your uncle in law. May GOD rest his soul in heaven!
Need free Windows 7 activation keys…………………………
XD: Why go for piracy when my desktop comes with a legit license?
ding-dong: Like I said, the desktop is meant for testing stuff and some security software such as Zemana cannot support x64 and some won’t even let me install. I too don’t see any difference between fully using a 4GB RAM and 3.25GB, hence the downgrade for 100% compatibility.
why downgrading to 32bit ray? because iam planning to upgrade mine to 64 bit.
kaspersky is working well as i know coz i saw it in my friends pc. 64 bit ediotn has two program file folders one is for x86 and one is for 64, so it means it is very straight that it is a backward compatible to any software out there.
Why not use Windows Activation Remover or WAT? Seems easier than doing that.