8 Best Free Audio Output Switcher Software for Windows
Although a lot of people use sound chips integrated on their motherboards for playing audio in Windows, many users still like to have a sound card. This is due in part to the number of external connections they can offer and the higher quality audio. These days, you can also get sound output through your video card, and some headphones or headsets will even set themselves up as a dedicated audio device.
The trouble with Windows is it will only let you set up one of these audio devices as the default player at any one time. For instance, if you want to switch the audio output from your PC speakers to perhaps a TV or external media device, you have to go to the Sound options in Control Panel or Settings and change the default playback device from PC speakers to the other device.
When you’re done, you need to go back into the sound options to revert the changes back. This has long been a problem with Windows and switching audio devices is not something that can be done with a couple of mouse clicks. Thankfully, there are tools around that make it easier and faster than having to dig into Windows Settings every time you want to select a different audio playback device.
Here’s a selection of programs for you to have a look at.
1. Audio SwitcherAudio Switcher is a good option because it’s free, open source, and also a single portable executable of less than 500KB. Besides being able to right click on the Audio Switcher tray icon and choose the default audio device, there are a couple of other ways to change audio devices. You can set up quick switching and also change devices via hotkeys.
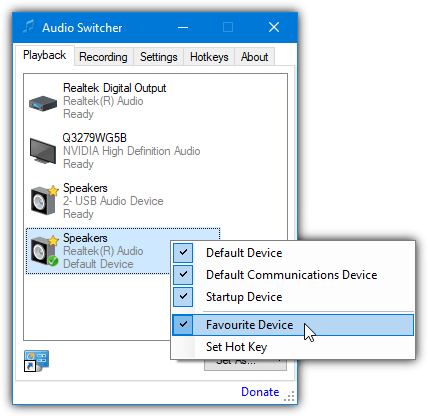
By default, quick switching is not enabled so you have to turn it on via the Settings tab. Then go to the Playback tab, right click on an audio device, and select “Favorite device”. Left clicking on the tray icon will rotate between favorite devices. Hotkeys are created by selecting the device to switch to and a related hotkey combination from the Hotkeys tab.
2. Default Audio Changer
Default Audio Changer is another simple to use and portable tool. It works by the user selecting which audio devices are to be defaulted to from a list and then the program will rotate between them. You can switch using the tray icon, the main user interface, or a hotkey combination.
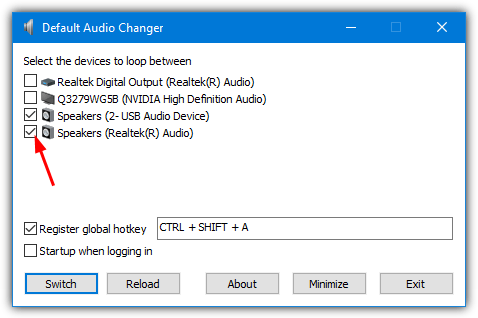
On the first launch, you will have to open the Options Window and check the box next to each device you want to rotate between. Optionally check “Register global hotkey” and enter a combination, then press Minimize. From then on, you can use the Switch button in the Options window, the Switch entry in the tray right click menu, or using the hotkey.
Download Default Audio Changer
3. Switcher
In terms of ease of use, Switcher is about as simple as it gets. This portable tool was created several years ago by a member of Hardforum.com and we’ve used it on and off ever since. There are no options at all and it will simply change your default audio playback device with a couple of mouse clicks.
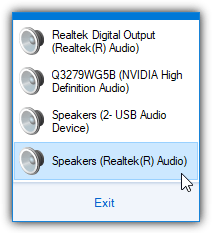
Run the program and a small speaker icon will sit in your system tray. Left click on it and you will get a list of the available playback devices pop up with the current default highlighted. Just click on another device you want to make the new default. Small, simple, and effective. The .NET Framework 3.5 is required for Windows 10 and 11 users.
Download Audio Switcher for Windows
4. EarTrumpet
EarTrumpet is a more modern tool because its primary download is from the Windows Store. This means it’s only available for Windows 10 and 11 systems. Not only can EarTrumpet change the default playback device but it can also display multiple audio mixer channels, has a dedicated volume mixer, and has the ability to move applications between playback devices.
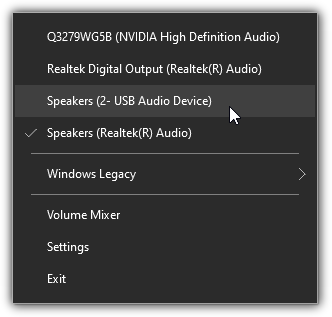
Being able to change the default sound output device is actually the easiest thing to do in EarTrumpt. Simply right click on the program’s tray icon and select the new device to switch to. For such an up to date and modern program, it would have been useful if EarTrumpt had a few more options for this function, such as assigning shortcuts, left click to switch, etc.
5. Win7AudioSwitcher
As the name suggests, Win7AudioSwitcher is from the era when Windows 7 was the current Microsoft operating system. However, it still works in Windows 10 and 11, is portable, and has separate 32-bit and 64-bit versions available. This tool includes a floating widget that displays volume level meters for each audio device with volume control if you scroll your mouse wheel over the relevant device.
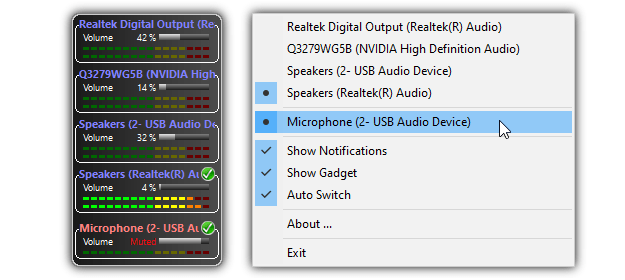
In addition to being able to switch audio devices from the tray icon right click menu, you can change the default playback and recording devices by right clicking a device in the widget. Verbose tray notifications will inform you of all changes and Auto Switch will change the audio device if the primary monitor changes. The widget isn’t the best looking skin wise, but at least it tries to offer something different.
6. SoundSwitch
SoundSwitch is one of the few audio device changing tools that’s still in active development. While it has the standard functions of selecting audio devices via hotkeys and the tray icon, SoundSwitch boasts a powerful feature called Profiles. This enables automatic switching of audio output and input devices when certain conditions are met, such as when a specific application or game is launched.
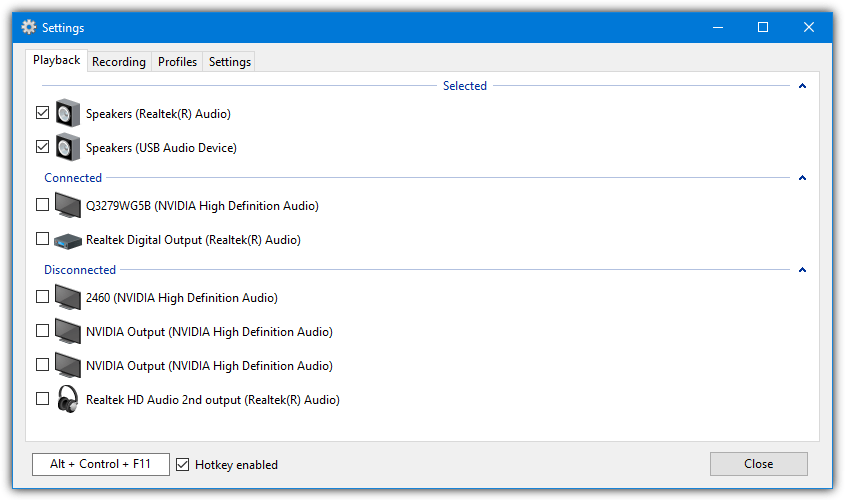
After installation, open the Settings window and check the playback devices to switch between. The default hotkey of Ctrl+Alt+F11 can be changed if it isn’t suitable. Recording devices can also be switched with the Ctrl+Alt+F7 key combination. Pressing the hotkey will cycle through the checked devices or left clicking the tray icon will let you select them with the mouse. A quick menu is also available.
The Profiles feature has a number of different actions meaning playback and recording devices will be changed automatically when an event is triggered. The trigger can be another hotkey, when a specific application/game is in the foreground, when Steam Big Picture Mode is enabled, when SoundSwitch starts, or when a Microsoft Store app is launched. It’#s a potentially valuable feature that many people may find useful.
7. SetSoundDevice (SSD)
SetSoundDevice (SSD) is a standalone tool that works by creating a desktop shortcut for the audio device you want to select as the default. In addition to creating a simple shortcut that defaults to a playback device, you can also create a shortcut that toggles between two playback devices or merge two existing shortcuts into a .BAT file. An added option can set the volume level for the new default device.
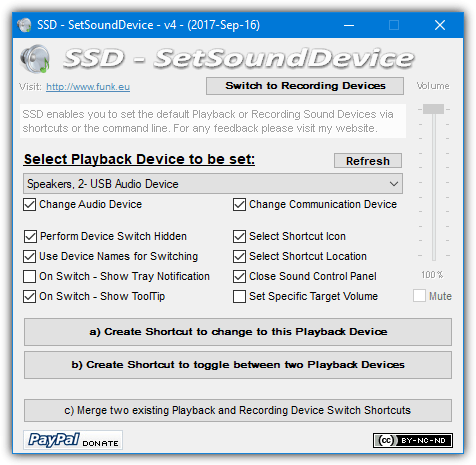
When running the tool it will open the Windows Sound Control Panel applet because the program can also be executed from the command line by parsing the number of the sound device as an argument. To create a shortcut, select the device from the dropdown list, set the options, and then click button a. Button b will require a second selection from the dropdown for the switching device. Recording devices are also supported.
8. NirCmd
NirCmd is a multi functional Windows command line tool that allows you to perform a large number of simple and useful tasks from standard Windows shortcut icons or within batch files etc. One of its features is being able to set the default sound device on Windows 2008, Vista, and 7 although, unlike the SSD tool, you have to create the shortcut yourself, the syntax is:
Nircmd.exe setdefaultsounddevice [Device Name (eg; speakers)]
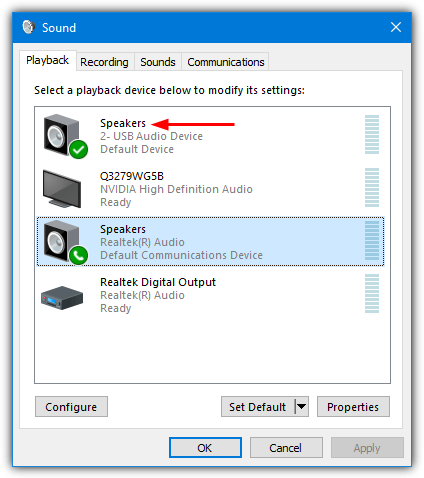
To find the device name, go to the Sound Control Panel (mmsys.cpl in Start or the Run dialog). Each device will be given a display name (arrowed above), which is what you use. If there is more than one device with the same name, right click on it > Properties and choose a different name. It’s best to change the name of fixed devices if you can as those you unplug will reset themselves to the default when plugged in next time.
To create a Nircmd shortcut, right click on the desktop > New > Shortcut and enter the command into the box (nircmd.exe setdefaultsounddevice [Device Name]), then click Next and give it a name such as “Switch to Speakers”. Double clicking Nircmd will copy it to the Windows directory for you, so if you don’t do that, will need to supply a path to the nircmd.exe in the shortcut.
These last two tools give you the added advantage of not needing to have a program running in the system tray or background if switching sound devices is not something you need to do that often.

In the Windos Store is the app called EarTrumpet.
Does the job well.
Windows ;)
Microsoft Ewald, Microsoft ;)
Let me second this, for those who don\’t want or need the flexibility of the command line option.
SoundSwitch does not work on my Windows 10. I can’t change the output device of a running program.
This article is the ultimate solution for my eternal dillema over managing between several sound sources.
Thank you very much.
nircmd works on Windows 10 perfectly. I linked the command line macro to a hot key so now I just press 1, 2, or 3 for the different audio sound outputs I want.
I recommend Sound Switch, it supports Win10 also and the developer keeps it always updated!
Today I created this autohotkey script, for people who don’t like to install a closed source solution.
pastebin.com/MZBxiicg
Thank you so much!! (Nircmd Recommended)
Nircmd & autohotkey
What a great article, thank you!
It helped a lot.
And the NirSoft solution is just what i needed.
Another great alternative for Windows Vista/7/8 is Audio Switcher.
Details Here: sourceforge.net/projects/audioswitcher/
Have you tried Default Sound Gadget?
defaultsound.tofran.com/
Thanks. You save my time alot..
I prefer nircmd + shortcut method. No RAM use.
PS: Jack dectection work only front panel and it has problem if we use extension cable plug in all the time, since our desktop is under the table.
Great post, thanks! I used “4. Audio Switcher for Windows 7” for a long time, and it worked great, except it didn’t display properly when using zoomed font settings in Windows Theme. Then I tried “5. Win7AudioSwitcher” which also works great and works with zoomed Windows Theme fonts.
+ 1 Brian, LOL.
I don’t understand how Microsoft can sell an OS in 2010 that does not have a built-in simple command to switch between headphones and speakers. Incredible. :(…..
I’ve written an audio changer for windows 7. I’m sure it’ll work for XP & Vista. It’ll handle up to five devices and hide in the system tray discreetly.
I found STADS and VistaAudioChanger wasn’t working for me under Win7 but it’s easier enough to replicate the functionality.
good spot with that QuickSoundSwitch ! THANKS!
Thanks
Check this out:
AudioSwitchGadget ~ 11 kb
VistaAudioChanger ~ 76 kb
QuickSoundSwitch ~ 108 kb
System Tray Audio Device Switcher (STADS)
2 MegaBytes
Bloat?
Thanks for the post Raymond, useful stuff as usual. It is relevant to my interests.
In a related matter, I was just wondering, maybe you, or some other commenter, might know of a free solution for “Per-Application Volume Control” in XP? If anyone could help me with this, that’d be amazing.
I know it can be done in Vista; and I also know of the program called “indievolume” which does the job in XP, but IMO it’s overpriced, and I’m pretty sure the serial I am using will be blacklisted in the next release ;)
Anyway keep up the good work Raymond!
Hi Raymond great post.
Very Useful.
Thanks!
Wow…really useful and choice of 3 apps. Nice job Raymond.
Thanks for the info raymond.You rock.