No Auto Play Dialog Box Pop Up: How to Fix it
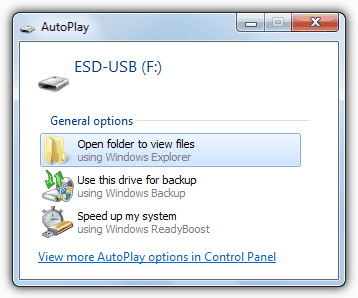
Whenever you plug a removable device such as a USB flash drive or hard drive into your computer, the default action in Windows will pop up a dialog box asking what you want to do with the newly inserted device. This is known as Autoplay and will give you options such as playing a music CD, watching a DVD, burning a blank disc or simply opening the drive in Windows Explorer to name a few things. There are many more options available and 3rd party applications can also add to this to give even more options.
By default Windows will allow the Autoplay feature to pop up on all drive types apart from those recognized as network drives or any which it can’t correctly identify. This includes any removable drives (USB flash etc), fixed drives, RAM disks and CD-ROM (CD/DVD/DVD-RAM/BD-R) drives that are inserted. Sometimes though, this function might not show when you want it to because of a problem with Windows or a piece of 3rd party software has changed the settings without your knowledge.
If you want to get this back when you plug in a device such as a USB stick, it can range from a simple fix to something a bit more difficult such as some wrong registry settings.
Here’s a selection of ways to try and help you bring back Autoplay for your removable drives.Reset the Standard Autoplay Settings
For XP: This is done on each drive letter itself and the Autoplay prompt may have been simply turned off for that drive.
1. Make sure the non Autoplaying device is plugged in, go to My Computer and right click on the drive letter that it uses -> Properties -> AutoPlay tab.
2. Select “Prompt me each time to choose an action” and click OK, or alternatively click the Restore Defaults button if available.
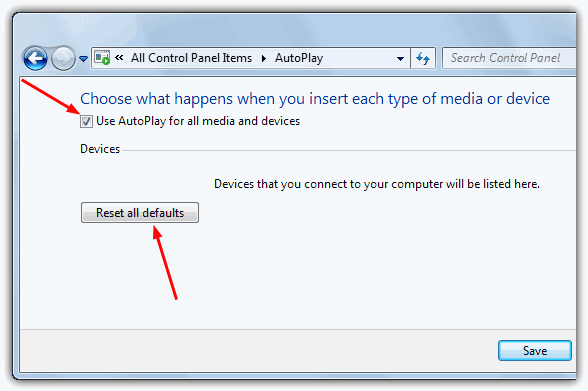
For Vista/7: The Autoplay options can be easily reset via the Control Panel.
1. Got Control Panel -> Hardware and Sound -> AutoPlay or just Autoplay if you’re in classic view.
2. Make sure the “Use Autoplay for media and devices” option is ticked and also press the “Reset all defaults” button at the bottom, and click Save. You can set individual Autoplay options in here later on.
Then (re)insert in your device to see if it gets recognized by Autoplay.
Repairing Registry Settings
One of the ways the Autoplay function can get disabled is through an incorrect setting in the Windows registry. There is a a specific registry value called NoDriveTypeAutoRun that can be set to a number of different numeric values which controls how Windows handles Autorun and Autoplay on various devices. This can affect CD-ROM’s, removable USB devices, network drives and RAM disks. Several pieces of software such as security applications and tweaking / virtual drive / burning / iso tools can also set this value to stop Autoplay from appearing.
To set it back to the default value follow the instructions below. This procedure is the same in XP, Vista and Window 7.
1. Press Win key+R, type regedit and press Enter.
2. Navigate to the following registry key.
HKCU\Software\Microsoft\Windows\CurrentVersion\Policies\Explorer
3. Check the value name NoDriveTypeAutoRun and make sure the data is set to 0x00000091 (145). If it isn’t, double click the entry and enter a Value data of 91.
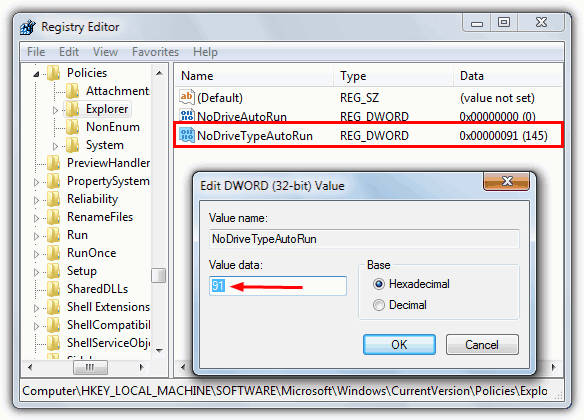
4. Navigate to the following registry key and repeat step 3 in checking and possibly editing the value of NoDriveTypeAutoRun.
HKLM\Software\Microsoft\Windows\CurrentVersion\Policies\Explorer
If you don’t have one or either of these registry entries don’t worry, they usually aren’t created in Vista and 7 unless the value has already been changed by something and it’s not necessary to add them in. The value of 0x00000091 (145) is the default for XP, Vista and 7 and disables Autoplay only on network drives and unknown drives leaving it enabled for CD-ROM’s, removable drives, RAM disks and fixed drives. If this has been changed to any other value such as 0x000000B5 (181) or 0x000000F5 (245) etc, then it could be the cause of the Autoplay problem.
The above default registry values have been made into downloadable reg files so you can easily set them back to default without going into the registry yourself. Simply double click and import into the registry. The Local Machine setting will affect all users and overrides any Current User setting that is present. If you’re the only user or want to affect all users simply change the Local Machine value only.
Set Default NoDriveTypeAutoRun for Current User
Set Default NoDriveTypeAutoRun for Local Machine
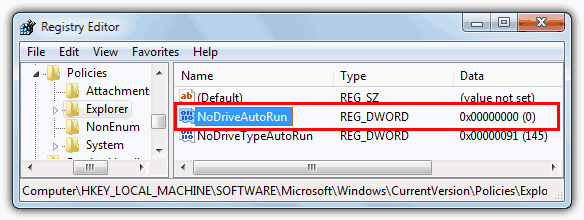
There is another value in the same location as steps 2 and 4 above called NoDriveAutoRun that can possibly affect Autoplay. Where NoDriveTypeAutoRun affects a whole class of drives such as removable devices, this other value will affect only drive letters directly such as D: or J: etc. If you find this value present and it ISN’T set to 0, double click and set it to 0 or delete it. Alternatively download and run the below registry files which will reset the value for User and Local Machine.
Disable NoDriveAutoRun for Current User
Disable NoDriveAutoRun for Local Machine
Reboot the computer after applying any registry settings.
There several more Autoplay not appearing fixes available on page 2.
Microsoft AutoPlay Repair Wizard
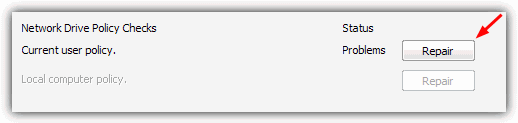
Microsoft created a program called the AutoPlay Repair Wizard way back in 2003 to try and help fix this problem, and as you might expect from a tool that old, is for Windows XP 32-bit only. The AutoPlay Repair Wizard scans your computer to find defective AutoPlay settings and attempts to fix those it finds. The areas it looks at are problems with the Shell Hardware Detection Service, the registry and any issues with the current user, local computer or driver level policies.
As the instructions how to use the Microsoft AutoPlay Repair Wizard are a bit thin on the ground and many people aren’t exactly sure how to use it, here’s how:
1. Plug in your external USB hard drive, USB flash drive or device that isn’t producing an Autoplay dialog.
2. Download and run the Microsoft AutoPlay Repair Wizard, click Next.
3. The Global Checks make sure the Shell Hardware Detection Service is running and auto starting. If there are problems with either option, click the Repair button and then Next. If you fix a problem here, you will be prompted to log off to finish. Do so and then run the tool again continuing to step 4.
4. Click on a drive from the list where AutoPlay is not working correctly and click Next.
6. Make sure that all policies are OK and if any show a problem, click Repair. You will be prompted to finish and log off again if any items need a repair. If you still have problems, run the tool through to this point again.
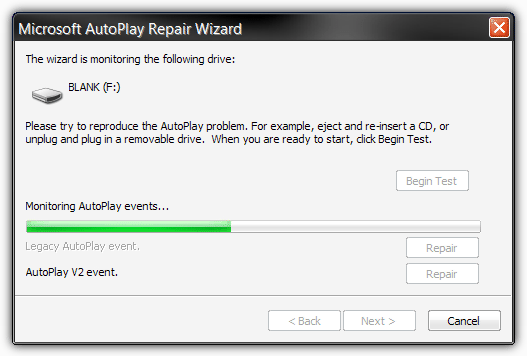
7. Click Next and this screen will monitor your device for a certain length of time to try and catch any issues. Click Begin Test, unplug and reinsert the drive, then wait for the monitor to finish. Hopefully there will be an event in need of repair that will fix the problem.
If the AutoPlay dialog box still doesn’t appear after this, then recheck the Autoplay setting for the device. Right click on the drive from step 4 in My Computer -> Properties -> AutoPlay tab and select “Prompt me each time to choose an action”, then click OK.
Checking the Shell Hardware Detection Service
A not likely but possible cause for Autoplay not working at all is a problem with Shell Hardware Detection Service. As it provides the Autoplay notifications, the service needs to be running and if the startup type has been changed from Automatic, it might not be started and therefore you won’t get any Autoplay. To check the Shell Hardware Detection Service is running do the following, the procedure is the same for Windows XP, Vista and 7:
1. Press Win key+R, type services.msc and hit Enter.
2. In the list of services find Shell Hardware Detection and see if its Status is Started and Startup Type is Automatic.
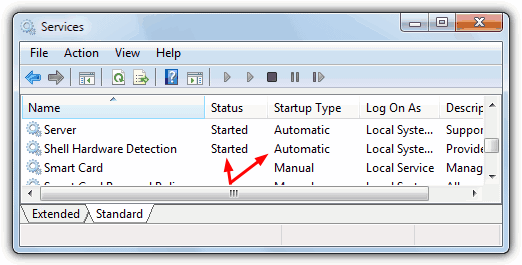
3. If the Startup Type isn’t set to Automatic, double click on the entry and in the Startup type: drop down select Automatic. Click OK and click Start the Service if it isn’t running.
Then try (re)plugging in your device to see if it gets recognized by Autoplay.
Autoplay Repair
This last tool doesn’t really fix the AutoPlay dialog problem, but it can help you repair your AutoPlay handlers and disable / enable individual drive letters from Autoplay.
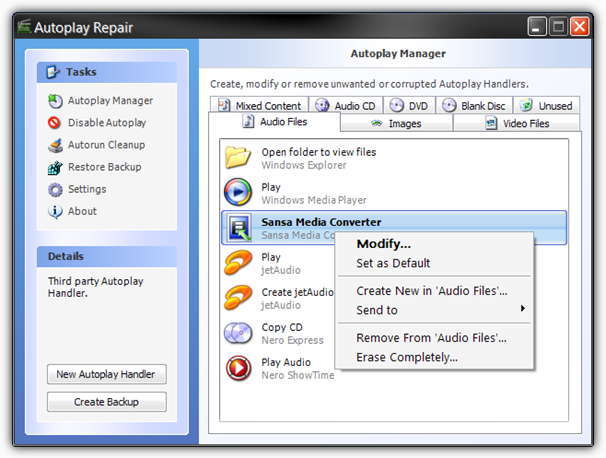
As an example, if you plug in your USB flash drive and the AutoPlay dialog box appears but is cluttered up with old entries from uninstalled software or ones which just don’t work, the Autoplay Repair tool can help. You can easily delete those invalid entries, modify them or even create new ones. There’s also an option to delete Autoplay on selected drives which is similar to the NoDriveAutorun registry option above, and also a basic startup manager.
The program requires .NET v2, is designed for Windows XP only and doesn’t show all the Autoplay entries in Vista or 7 correctly if you try to use it on those operating systems.

Thanks so much for helping fix this elusive problem. Regedit 91 cured it!
Thank you very much for the existence of this mystery solution. I stumbled around with this for days since it was such a part of what I like in Windows. You have a great place for all frustration to end!
David
Thanks Hal,
This was driving me crazy. I went to the search box and typed in Autoplay. Opened it and it gives you a list of everything that can be available, After installing the latest MS updates, it quit working. The option for Autoplay was unchecked. Checked the box and now everything is back to normal.
Thanks Again,
Hello,
I’m not a computer expert by a long way but this worked for me on windows 7 64 bit.
After a clean out of the computer, autoplay no longer worked for flash drives and HDDs through USB.
Added the two registry files as this help explained seeing they were missing, rebooted the computer, works fine now.
Many thanks.
what if this only happens with a certain USB external hard drive and not the others? I called Western Digital to explain the situation and was told that it was a windows problem. I have Windows 7 64 bit, but I don’t think this is the issue. It seems to take the drive a long time to load up. It does appear in Disk Management after some time but not right away. At least 5 minutes of waiting. Other USB drive seems to boot right up and be recognized right away and I get autoplay menu with it also. I did not have any items shown in your fix, by the way to correct.
thanks for any help
Greg
Thank u so much problem exclusively solved.we people who are helpful to others making their faces bright.thnks once again.
Thank you so much! It worked like a dream!
The only one I needed to change was the
HKLM\Software\Microsoft\Windows\CurrentVersion\Policies\Explorer
Put it back to 91 and works like a dream – thanks
Hi Peter
is you oper system WIN 8.1?
I am having problems only with my mobile connected via usb and auto play does not appear, but does with my portable hard drive…I am running on Win8.1
Thanks. You rae genius. For me Shell Hardware detection only worked.
THANK YOU! I’ve been trying to fix the Autoplay Box not appearing ever since I updated to Windows 10 and your regedit fix nailed it. Many thanks!
Thanks, works also for windows 10
When I try this, I cannot locate HKCU path, only several folders beginning HKEY/….
Are you able to help me further? Thanks
Problem solve..thank you sir..great
I’m so glad I finally found a solution. Thanks a million.
Finally!!! I’ve been trying to fix this for over a year and this is the only article that had a real working solution.
THANKS!!
I can’t believe it. It’s working on windows 8.1 x64
Thank u very much
OMG it worked on Windows 8.1 x64 too :-)
That info about the registry key was so helpful, thanks for that. You solved a problem that has been bugging my business partner ever since we upgraded to a Win7 PC. The registry key did not exist, your comments suggested it was not neccessary, but as the auto run was not working I created the key, re-started & bingo, autorun worked like magic. Thanks for sharing your knowledge ~ RT
Fixed it for me. Many thanks
Thank you very much! I followed your instructions and edited the registry settings: it worked out :-)
I would like to add solution that worked for me – AutoPlay didn’t run only for one flash drive (other drives worked): opening flash drive’s window by clicking on it’s icon in Computer; under “Folder options” in Windows Explorer I’ve checked “Show hidden files…” and unchecked “Hide protected operating system files” (click “Yes” in warning window”, and then deleted hidden file “autorun.info” from that flash drive. When reinserting drive AutoPlay popped up again.
THANKS SIR, I AM ABLE TO FIX THIS AUTO PLAY BY APPLYING YOUR IDEAS….
Thanks matte….The Registry fix just solved my problem :)
Thank you very much.
I have been trying that for years. I followed your step 1 to 4 and now it works again.
Microsoft AutoPlay Repair Wizard not working for my vista.
Thank you! No relevant registry keys, downloaded and added the Local Machine one, and now get an autoplay box for my CDs, at long last.
Wonder why setting everything to “ask me” in the control panel autoplay options had not worked?
thanks buddy…it works…
Hello, this worked like a charm, why in the first place would the Registry entry get changed by using some other programs, even though the solution worked beautifully.
I solved my problem editing manually the registry as explained in step 4
Thanks
Thank you very much. now work my auto play option.
Thank you. I solved my problem editing manually the registry as explained in step 4
Thank You!! I had to edit the registry key…… everything is working again!
Thanks! The registry info did the trick.
Thank you Raymond, I have been chasing this for nearly 2 years now. Even a “repair” install didn’t fix it.
BTW it was the “HKLM\Software\Microsoft\Windows\CurrentVersion\Policies\Explorer” key set to ‘ff’ what was the problem.
Thanks very much it works
Yes! Autoplay dialogbox is now appearing. thanks a lot.
Thank you!!!! Works in Windows 7
it worked for me! thanks a lot.
Absolutely wonderful — autofix help sovled my autoplay dialog box problems. Thanks a million !
it worked for me! thanks a lot.
Thanks – the first procedure fixed the issue I was having with my flash drive.
Hey, thank u VERY MUCH!!! This amazin’ little proggy (Microsoft AutoPlay Repair Wizard) did just the trick for me! My USB-dongle is ALIVE again! YAHOO!!!
thanks a lot man it really work……
Hey Ray, you are really a genius…the AutoFix.exe fixed my problems…thanks a ton or say 1000000000 times…but still incomplete to say thank u.
thank you very much it really worked with me
Ha. That did it! You are a genius. Thanks for the info.