3 Free Ways to Password Protect Video File
We all obviously have to be careful with our security and privacy these days, both online and offline. One of the most common forms of security is using a password to protect your data. That can be online passwords for website logins and payments or protecting your private and personal files on the local computer. While your files might not contain anything harmful or malicious, they could contain something which is confidential or private to certain individuals.
Not everybody will need to protect a video file with a password, but there may be times when you only want specific people to be able to access and play it. While you can simply add the video file to a password protected archive, such as a zip file, it still means other people can easily duplicate or edit the video if they want to. A better solution is to protect the video with a password, automatically play it, then remove the video from the system once playback has finished.
Here we show you 3 different ways in which you can password protect a video with automatic playback once the password has been entered.
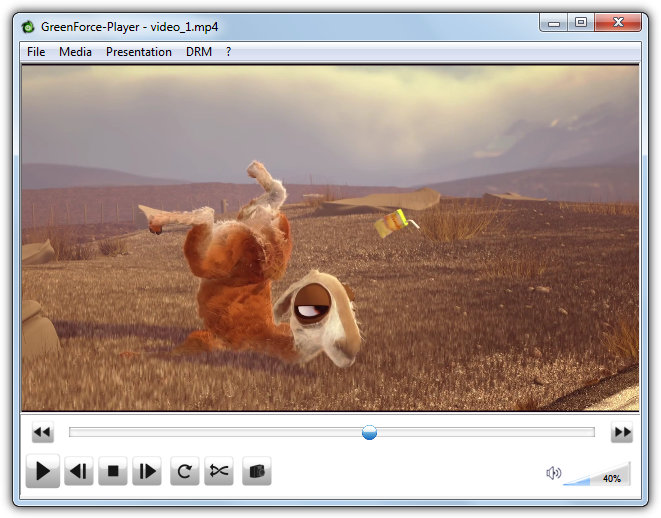
1. GreenForce-PlayerGreenForce-Player is possibly unique among free media playing software with its option to password protect a video file. It also offers some quite interesting additional security measures, including screenshot protection, an expiration date and only allowing the video to play on a specific computer. As a media player it’s not feature rich but there are functions like CD player, DVD player, load from URL, playlists, subtitles, coverflow player and a snapshot option.
The major drawback is the program is not self contained so relies on external codecs to play the video files. This is a problem with password protected videos as any other computer that wants to play it must also have the correct codecs installed. The Help menu and error window points you to the K-Lite Codec Pack although other codec packs can be used. There is an option to add a codec direct from a URL to a protected video but there is no help or information about how to use it.
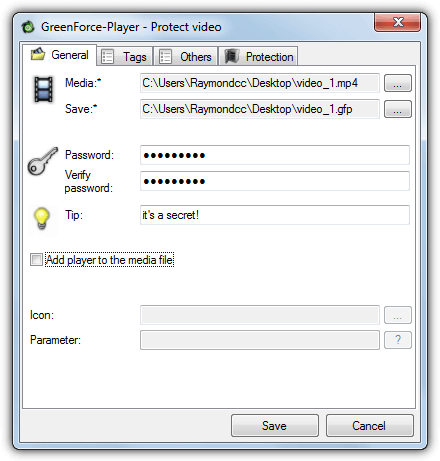
Adding basic video protection is easy and everything is in the DRM menu. Click Protect video and browse for a video or use the one already playing, enter the password twice, add an optional hint and click Save. The file will save in the GreenForce-Player .GFP file format. Double clicking the video opens it in GreenForce-Player which needs to be present on the system playing the video.
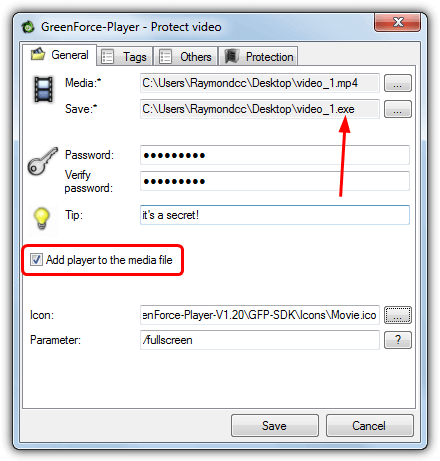
An issue with this method is it always told us the correct codecs weren’t installed when they were and the unprotected video played fine in GreenForce. To get around this and also allow the video to be played on systems without GreenForce installed, use the Add player to the media file option. This embeds GreenForce-Player and the video into a standard executable file which can run on any system. You still need the required codecs installed on the system playing the video.
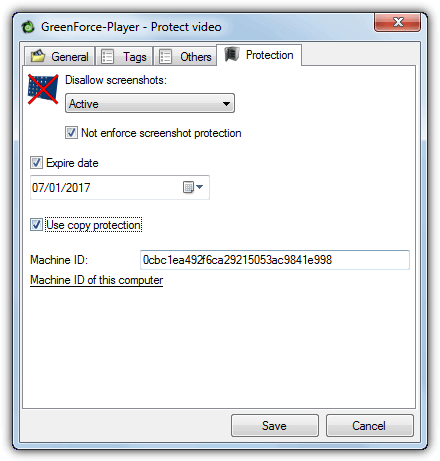
The Protection tab in the protect video window has the extra options to increase security further. This includes disallowing screenshots with the added ability to prevent the video being played in virtual machines. You can also set an expiry date so the video will not play after it or use copy protection which stops the video being played on any computer that doesn’t match the unique machine ID. You can also add a custom icon and command line arguments to the video file.
One of GreenForce-Players best security measures is the fact the protected video does not get extracted to the drive and resides only in memory, so it can’t be copied. Sadly there have been no official updates since 2012 but there is a GreenForce-Player project page at GitHub with updates as recent as 2016. There has not been a public release of this newer version but you can download the package that contains both the source code and updated program.
2. Create Password Protected Video Using a Bat to Exe Converter
This next method uses a couple of different programs to create a video file that extracts and plays itself after the correct password has been entered. An external self contained video player is used so you don’t need to worry about whether the right codecs are installed on the computer playing the file.
The process is quite simple, create a small batch file that tells the player to open the video. Then pack the .BAT file, the video file and the player exe into a single password protected executable. This may sound a bit of an odd way to do things, but everything works as intended.
1. Download Mpv Player. This is an open source media player based on MPlayer. We are using Mpv because it’s a standalone portable executable and easy to use for this purpose. Extract the archive.
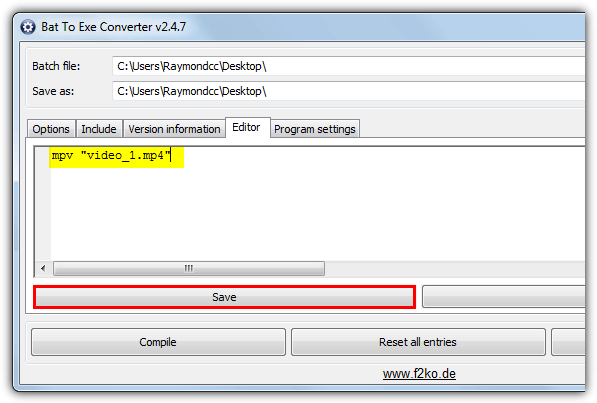
2. Download Bat To Exe Converter, extract the Zip and run the the portable version. Click on the Editor tab and type Mpv “videofile.ext”. Make sure to use quotes if the video name contains spaces. Click Save and choose a name for the .BAT file, this will also be the name of your video executable.
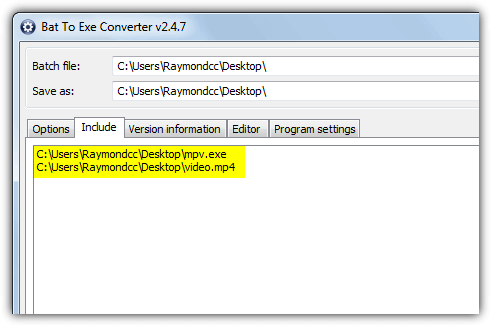
3. Click the Include tab, drag and drop mpv.exe and the video file onto the window which will add them to the executable.
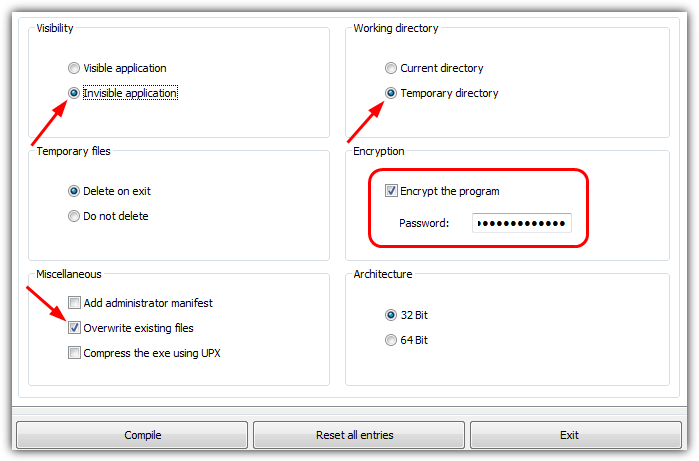
4. Go to the Options tab and select Invisible application, Temporary directory and Overwrite existing files. Then check Encrypt the program and enter the password needed to play the video. Finally click Compile to create the executable.
If you want to add multiple videos simply add a new line in the Editor tab of mpv video.file and add the video file in the Include tab. The files will then play one after the other. You can also use another portable video player like VLC or MPC-HC to play the files, just adjust the batch lines and included files to accommodate the preferred player.
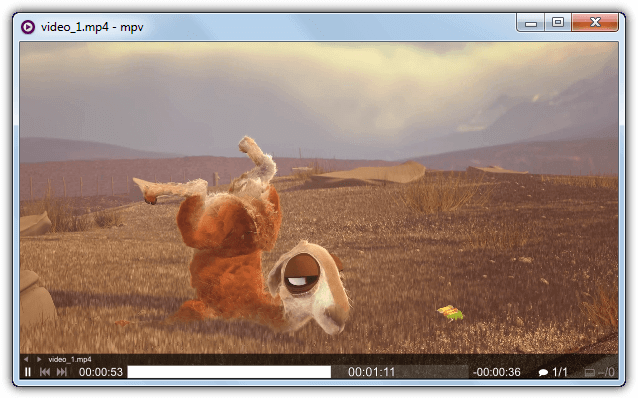
When the new exe file is double clicked on, it will ask for the password. If the correct password is provided the video file and Mpv.exe will be extracted to the Windows Temp folder, then Mpv will play the video. For a small amount of added security the video and player will be automatically deleted from Temp when the player is closed.
This method is a little slow and uses a lot of CPU/RAM resources to extract the files from the exe. It also does not have any form of progress meter when working with larger files, so you don’t know what is happening. For these reasons we would recommend this method for smaller video files less than 100MB or so.
3. Create A Password Protected Video File With An Archiver
As we mentioned at the beginning, most people would recommend placing the video inside an archive such as a Zip file. This is fine for many uses but will not auto launch the video file and you can easily extract it where you like once the password is entered. Here we will go a bit further and create an executable archive similar to the bat to exe method above.
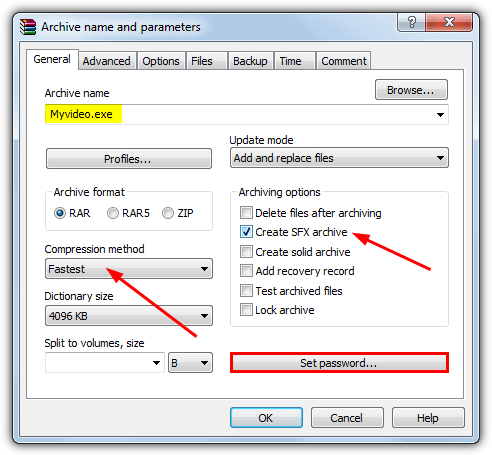
1. Download WinRAR Archiver and install it. Although WinRAR is shareware you can still use it after the trial expires with a nag screen being the only restriction. Sadly a free archiver such as 7-Zip cannot do this sort of thing as easily. Also download Mpv Player and extract it.
2. Place the video file and Mpv.exe in the same folder, select both and right click > WinRAR > Add to archive…
3. In the archive window check the box for Create SFX archive, change the Compression method to Fastest and click the Set password button. Enter a password and optionally check the Encrypt file names box, press OK. Also enter the required name for the file so it will be filename.exe.
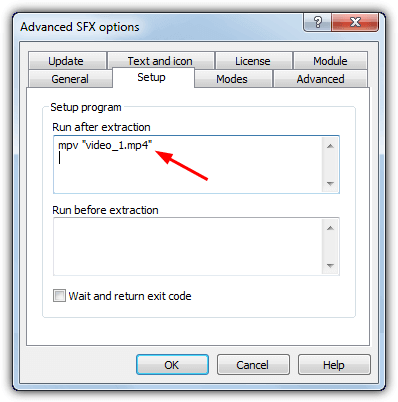
4. Click the Advanced tab and press SFX options. In the required tabs edit the settings as below.
Setup – In Run after extraction enter the command to run the player and video, e.g. mpv “video.file”.
Modes – Check Unpack to temporary folder and select Hide start dialog.
Update – Select Overwrite all files.
Text and icon – This is optional but you can change the window title, such as “Extracting video…”
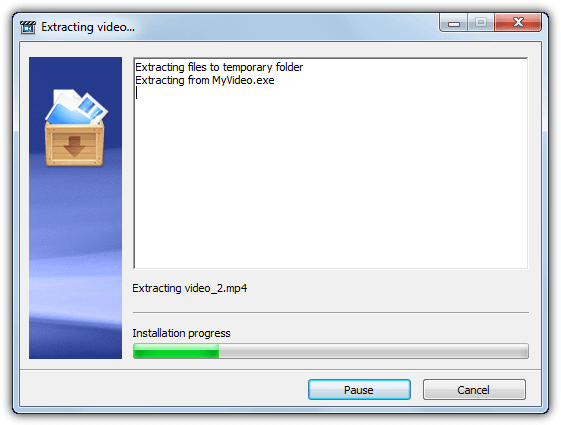
5. Click OK and wait for the archive to be created. While extracting, the window will show a progress window which is better when dealing with larger video files, it’s also faster than the Bat to exe tool. After the video player is closed the video file and player will be deleted from the Temp folder.
This and the Bat to Exe method are not totally secure because they extract the video to the Temp folder. However, it offers enough protection to stop the average user from getting hold of the video file after they’ve entered the correct password.
Important Note: Please be aware that opening video file executables can be dangerous if you do not trust the source 100%. Creating a music or video exe file and tempting you to download it is a common way of spreading malware online. Even if you get the file from a friend, relative or other trusted person, it’s still recommended to scan the file with your antivirus before playing it.
You might also like:
 8 Ways to Write Protect USB Drive: Quick Guide
Vimeo also has password protection for video… and the free account may be enough for some people.
thanks a lot. it really working good.
archive via winrar is the great method.
thank you.
There is now GFP v2.0 which include codecs.