How to Hide Files Inside Files [Images, Folder]
Apart from password protecting data with an archiver or an encryption tool like VeraCrypt, another effective way of securing your files is hiding them inside other files so nobody actually knows they exist. The practice of hiding data inside other data has amazingly been around for thousands of years and is called Steganography. With computer based steganography, you can hide messages, text files, archives and almost any type of data inside images, audio files, video files, and etc.
There are also varying levels of security for steganography on your computer. These range from simply appending one file to another to full on encryption, compression, and obfuscation. If you are sending files containing hidden data to others, the recipients would need to know how to retrieve it, such as knowing passwords and the software used.
Here are 7 ways to perform steganography from your PC, all were tested on Windows 7 and 10 64-bit.
1. OpenPuffOpenPuff is one of the few steganography tools that is relatively up to date. Many other tools work fine but were abandoned years ago. It’s also a more complicated and a far more advanced program than the others here. OpenPuff is probably the most powerful free steganography tool around, it also doesn’t need installing and is completely portable.
The steps to hide a file are numbered 1 – 4. By default, OpenPuff requires three separate passwords to encrypt the data. This can be reduced to two or a single password by unchecking the boxes. At step 2 browse for any type of file to hide and then at step 3 add a carrier file. Sixteen file formats are supported including MP4, MP3, MPEG2, PDF, FLV, VOB and common image and audio files.
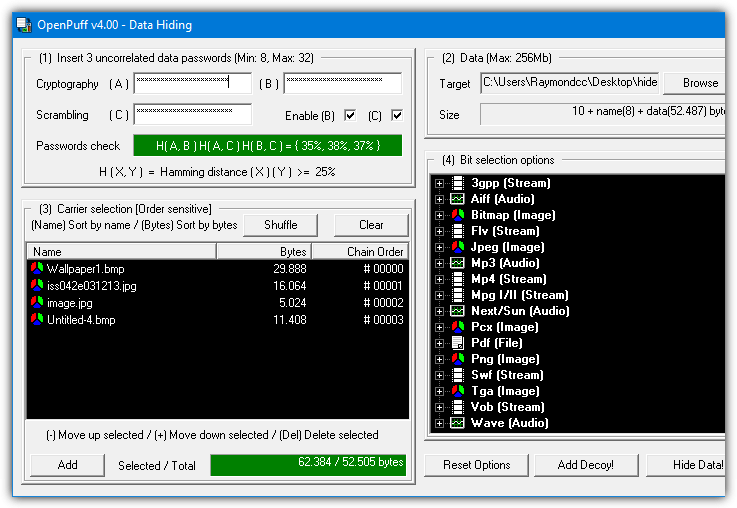
You can also spread the hidden data file across several different carrier files, just add as many as you need (add more if the bar is red). For added security, a decoy file can even be used which will unhide the decoy instead of the real hidden data if someone actually knew how to unlock your file. The Step 4 Bit Select options are probably best left alone unless you read up on how they work.
To unhide the data file you have to supply all the passwords and put the carrier files in the correct order. OpenPuff also includes a marking feature which is useful for digitally watermarking or copyrighting your own files.
2. Our Secret
Our Secret has been discontinued and the website is now gone. However, the program itself still works fine in the latest Windows. Use the portable standalone executable link provided below as the official installer elsewhere on the internet no longer works. The last version of Our Secret was 2.5 from 2012.
Hiding files in Our Secret is set out in three distinct steps. Firstly, browse for the file to carry the hidden data. The good thing is this can be any type of file you like, but obviously, small or text based files are not going to work too well. At the next step, pressing Add will give the option of entering plain text or browsing for a file to hide, a mixture and multiple entries can be included. Enter a password and finally press the Hide button.
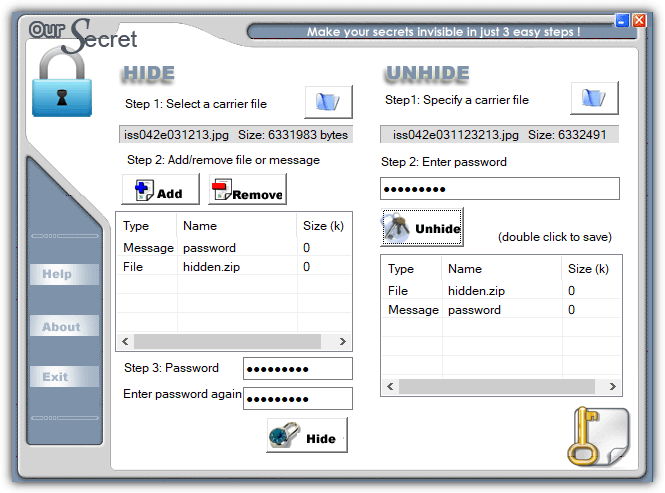
Unhiding data is done from the main window and is simply a reversal of hiding. Specify the carrier file, enter the optional password and any hidden files or text will appear in the box. Double click the entry to save the file or view the text and then optionally save as a text file.
3. SilentEye
While SilentEye looks very easy to use when you first launch it, things get more advanced during the process of embedding the data in the carrier file. It’s not too difficult though and the average user can leave most settings they don’t understand at the defaults. The number of formats that can carry the hidden data is limited to JPG, PNG, BMP, TIFF and WAV but that should be enough for hiding small files and plain text messages.
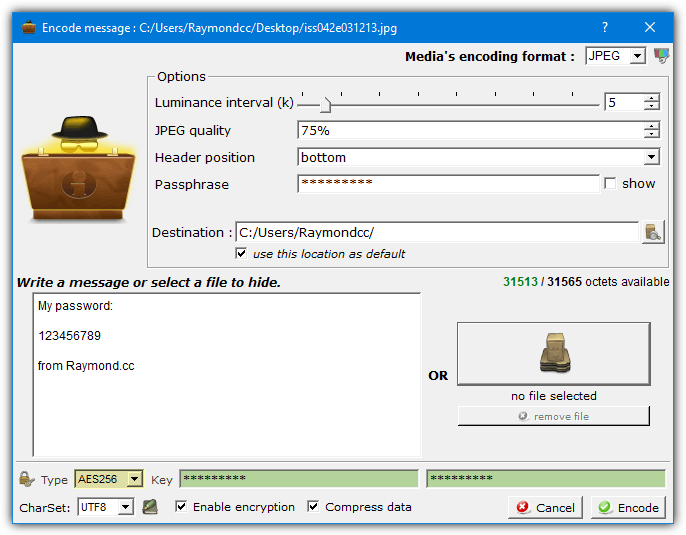
Simply drop a supported media file onto the main window and press Encode. The upper half of the encode window differs depending on whether you are using an image or audio file. The media options can be left alone if you are unsure what they do, just change the destination folder. Type a short message into the box or add any type of file by pressing the large button. Optional AES encryption is enabled by checking the box at the bottom and entering the password twice.
Drop the media file onto the window and press Decode if you want to retrieve the hidden data. Make sure to use the same options and password (if used) or the hidden data will not be extracted.
4. Clotho
Unfortunately, Clotho is another program that is no longer supported or updated. Like OurSecret, the last version is from 2012 but it does work fine when used in the latest Windows. To install this program make sure that you right click and run the setup installer as administrator. Alternatively, unpack the installer with 7Zip or Universal Extractor as only the Cloth.exe is required.
What makes Clotho interesting is you can select a complete folder full of files to hide in one go. Obviously, the carrier file has to be large enough to effectively hide a folder’s worth of data. The interface is self explanatory, select the file to use as the mask (carrier), select the file or folder to hide, choose a save as name and optional parameters and press Pack. Most common types of file can be used as a carrier, including image, audio, video, archive and executable.
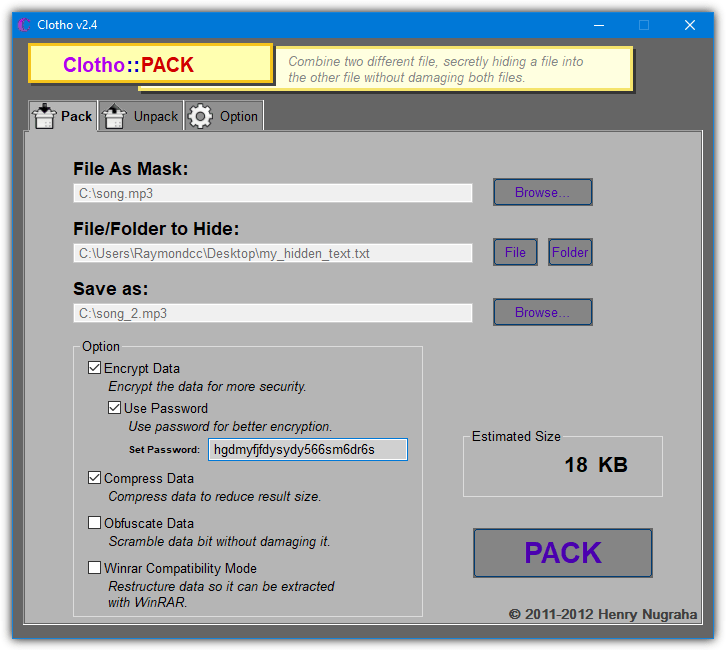
The options include adding a password and/or encryption, compressing the output file, performing extra obfuscation methods and making the hidden file(s) extractable with WinRAR. None of those options are enabled by default. A useful unpack option is cleaning the source file of hidden data so it is restored back to a normal file.
Download Clotho (via Softpedia)
5. Steganography Tools (Online)
Steganography Tools is one of a few websites that can hide data inside a file by doing the encoding online. Once the process completes, the file containing the hidden data is downloaded. Underneath, the website is using the Steghide command line tool to perform the encoding and decoding. The website uses HTTPS which makes it safer when transferring more sensitive data.
On the main page, select Encode an image, click Choose file to browse for a JPG image or AU/WAV audio file and enter an optional password. Then, enter text into the box or select the file payload option to upload a file. Press the button and the processed file can be downloaded. The “Just find capacity of this file” option will tell you roughly how much data can be safely hidden inside the file.
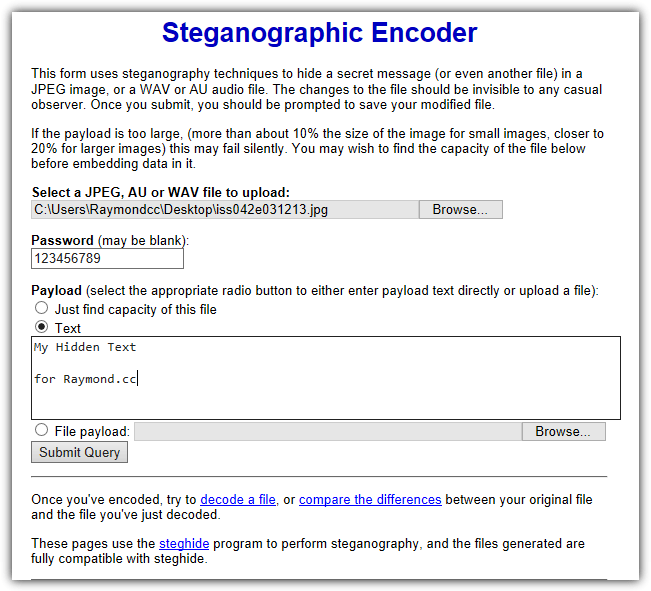
While the decoding process on the “Decode an image” page is mostly straightforward, it’s not too smart in knowing exactly what you encoded in the first place. If it was plain text, it’s easy. If it was something else like an archive you may have to rename the file correctly once downloaded. The Compare two images page shows before and after images side by side showing you roughly where on the image the hidden data is situated.
6. Steghide UI 3
Steghide UI is a user interface frontend for the same Steghide command line tool used on the webpage above. The Steghide tool itself hasn’t been updated since 2003 but this open source frontend program dates to 2011. Both work fine on the latest versions of Windows. Two image formats (JPG, BMP) and two audio formats (WAV, AU) are supported
The whole process is quite simple, browse for the Cover file (media file to hide the data in), browse for the embed file (the file to hide), choose an output location and filename. There are several password encryption types available although Rijndael 128/192/256 should be fine (commonly known as AES encryption). Optionally add a compression level of 1 – 9 to compress the embed file and finally press the Embed button.
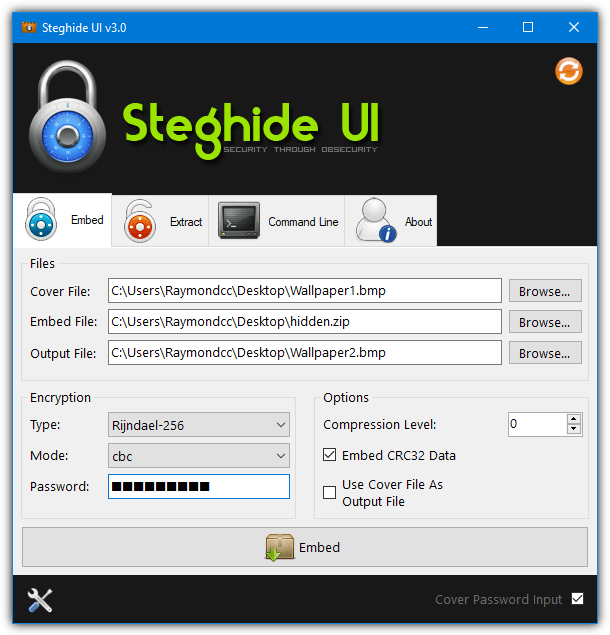
Extracting the hidden data is very simple. Supply the media filename, the output filename and a password if the data was hidden using one. There is also a command line tab if you know how to use Steghide commands manually. The Options window can add a context menu entry into Explorer, set the default encryption type, compression level, and output folder.
7. Using Built-in Windows Commands
It’s possible to perform simple steganography by using nothing more than the included tools found in Windows. While it’s not the most secure method, the process works and no third party software is needed. Hiding data inside files this way is done through the Command prompt using the Windows Copy command.
In addition to transfers, Copy can also join files together, which is how this process works. The hidden file is not encrypted or compressed by Copy, so you should archive the file to ZIP, 7ZIP or RAR first using a password. Then add that as the hidden file to the carrier file. The command syntax is as follows:
Copy Carrierfile /b + Hiddenfile /b Outputfile
The /b argument tells Copy it is dealing with binary files. As an example, to attach Hidden.zip to Song.mp3 and save a file called Hiddeninsong.mp3, you would use:
Copy Song.mp3 /b + Hidden.zip /b Hiddeninsong.mp3
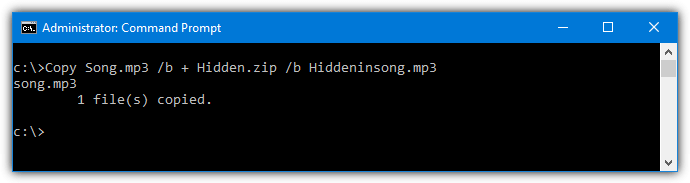
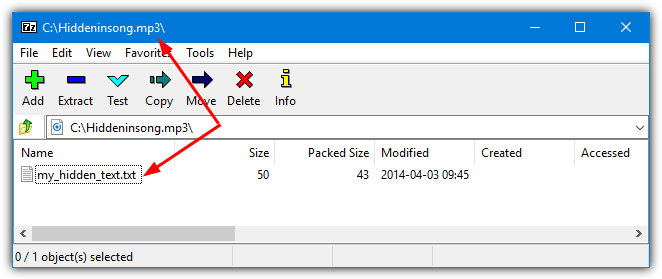
The output file is playable in a music player like Windows Media Player, but the hidden file will also open in an archiver such as 7-Zip or WinRAR if you know the password.
You can also use an image or even an executable as the carrier file. However, video files do not work using this method.

How do you hide and retrieve information on the same interface in 3 different ways?
Now I see why Everybody Love Raymond!
Open source forensics tools such as Autopsy or commercial tools such as X-Ways Forensics will find all these hidden file types.
Is there any way to detect if files have been combined, like in the method #5 description?