How to Add Subtitles to AVI: Step-by-Step Guide
A while back we wrote a guide on how to include subtitles in downloaded movies by finding and placing the SUB or SRT subtitle file together with the AVI movie file. You must also have DirectVobSub installed, otherwise it won’t read the subtitle file. However, this works only if viewing the video file on your computer. What if you want to burn your favorite weekly TV episode to DVD and watch it on your LCD, LED or plasma screen TV? Where many modern players can simply read an AVI file from a data disc, the problem with older DVD players is they can’t read the AVI format and subtitles as well. They can often only read the DVD VOB format.
You will need to embed the SRT/SUB subtitle file inside the AVI movie file permanently, then convert and burn it to DVD using your favorite disc burning software. There are several ways of doing that and we will show you four different methods. They range from the easiest and most basic way which does the job with the minimum of fuss, to a couple of other easy ways with some more control over the subtitles, to the more advanced method using one of the most popular video editing tools around. Just follow the instructions below on how to burn AVI to AVI or AVI to DVD with subtitles.
Make sure the AVI video file can be played on your computer WITH subtitles. If the downloaded AVI video can’t be played, just install K-Lite Codec Pack. For a subtitle file to be recognized by most video software etc, it needs to be exactly the same name as the video file apart from the extension. E.g. If your AVI is called videofile123.AVI, the subtitle file should be videofile123.SRT.Method 1: Using Freemake Video Converter
This way of getting the subtitles into the AVI file or burnt out to DVD is definitely the easiest of the 4 and only requires the installation of the Freemake program. The slight downside is you don’t get any control over the subtitle such as placement, font or colors etc.
1. Download Freemake Video Converter and install it. Take care during the install process as the installer contains adware options. Run the program when ready.
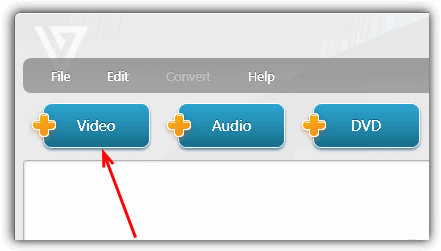
2. Click on the Add Video button and load your AVI video file. At this point you can actually load many other different types of video file not just AVI, including MP4, MKV, Youtube clips etc.
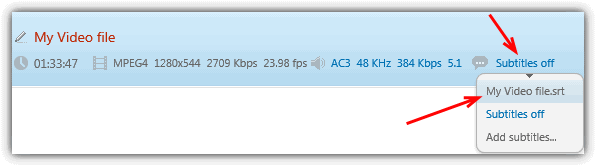
3. Click on where it says “Subtitles off” on your video file and select the subtitle file. If it’s differently named to the video file, you can locate it by clicking on “Add subtitles…”.
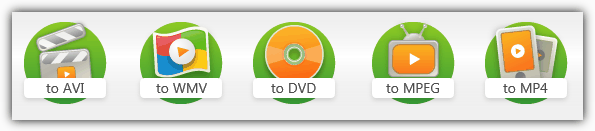
4. You have a choice next of whether just to embed the subtitles and re-encode the AVI or another different video format, or you can burn it straight out to DVD.
Burning to DVD
4a. To burn out to DVD, ISO file or to a selected folder, click the “to DVD” button across the bottom.
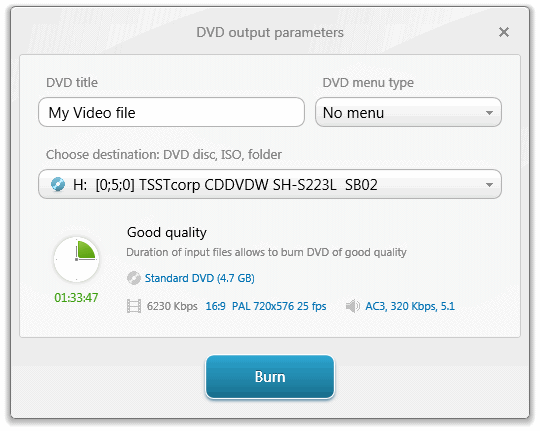
Now simply choose the options of whether you want a menu and the destination type of burn to disc, save to folder, or save as ISO. Depending on the input video, there maybe options available to change the aspect ratio and surround or stereo audio. Then hit the Blue button and wait. Make sure you have a DVD inserted if you are burning straight to disc.
Re-encoding the Video File
4b. To convert the video file back to AVI, click the “to AVI” button across the bottom.
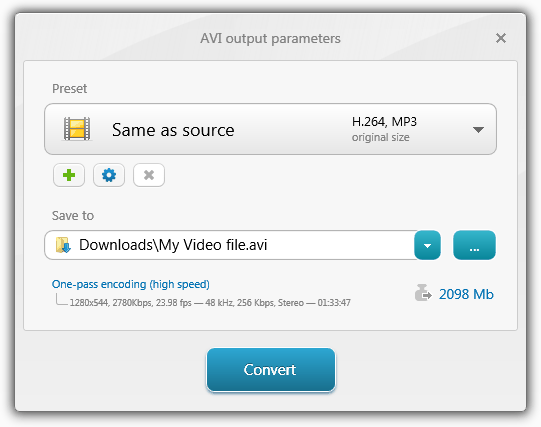
You barely have to do anything in this window. Choosing the “Same as source” preset will output the video with the same settings as the input file, and “One-pass encoding speed” and the output size will increase or decrease the quality of the output. Simply hit Convert and wait for the process to complete.
You can now burn the resulting subtitled AVI file to disc using your favorite disc burning software such as Nero. This method is easy, works well and the results are very good. If you want some more control over the subtitles, try method 2.
Method 2: Using Format Factory
Format Factory is another very easy program to embed subtitles into AVI and other format video files, but has a few more options than Freemake such as support for 4 subtitle formats SRT/SSA/ASS/IDX, color, size and font editing. It cannot though burn the video straight out to DVD.
1. Download Format Factory, extract the zip file, then install and launch it.
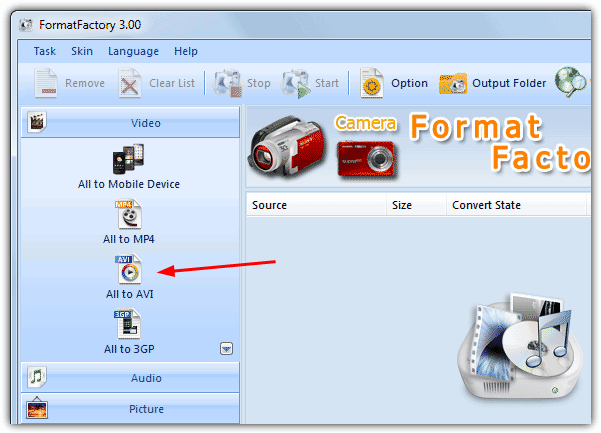
2. Click on All to AVI in the Video tab on the left of the window. In the next window, click Add File and locate the video file.
3. Still in the All to AVI window, click Output Setting. From here you can select the output quality from the drop down menu, obviously Medium or High are preferable. The green icons are for XVID and the blue are for DIVX which is down to your personal preference. Or if you prefer, you can also use AVC.
4. To add the subtitle file, double click on Additional Subtitle in the settings list, then click on the line “Additional Subtitle (srt;ass;ssa;idx)” and a small icon will appear which you can press to locate the subtitle file. The size of the subtitle can be altered from 2 – 6 (default is 4), the other settings shouldn’t need touching. Click OK -> OK.

5. Then simply click on the Start button to encode the subtitles into the video. If you go into the program’s Options there is the ability to change the subtitle font and also the font color and its outline color.
If you want to create a DVD video from your AVI file, Format Factory cannot convert and burn for you directly, but can create a file in the VOB format which when burned to a data disc should be readable by just about every DVD player. The procedure is the same as above apart from choosing All to VOB in the Video tab instead of All to AVI from step 2. Then simply burn the file to disc using your favorite software.
Method 3: Using Any Video Converter Free version
Any Video Converter is another free program that can easily convert an AVI file to AVI + subtitles as well as being able to burn the result straight to DVD.
1. Download Any Video Converter Free and install it, watch for the adware. Then run the program.
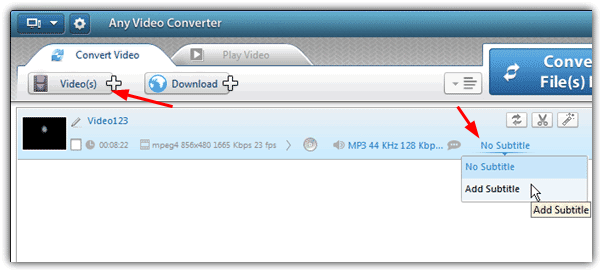
2. Click on the Add Video button and find your AVI video file. Then click on “No Subtitle” on the video entry in the window, select Add and find the subtitle file.
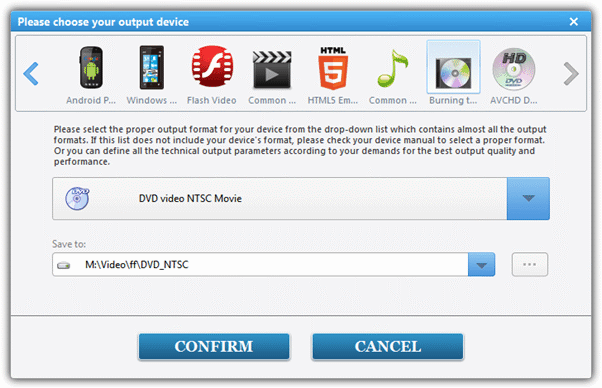
3. The good thing about Any Video Converter is there are loads of preset profiles for mobile phones, tablets, MP4 players, consoles and DVD. Click on the Output Preset button or the drop down menu to its right and find what matches the output you want. If you’re converting back to AVI some settings such as resolution and bitrate can be configured from the bottom right in the main window, and aspect ratio for DVD. Select Original settings where possible to output a file close to the original AVI.
4. Then simply click on the button to convert. If you have selected the “Burning to DVD” output preset, when the encoding has completed there will be a disc burning dialog where you insert the DVD, select the speed and label, then write the disc.
Any Video Converter Free has some configuration settings for subtitles in its Options window (small cog wheel top left) which will allow you to change the default encoding for foreign languages, change the font and its size on screen, and also the ability to move the default subtitle position on the screen up or down.
Method 4: Using VirtualDub and VobSub
This method is a little more manual than the above one, but users who have played around with video editing before will likely know VirtualDub and VobSub quite well.
1. Download VirtualDub and VobSub.
2. Extract the VirtualDub zip to C:\VirtualDub.
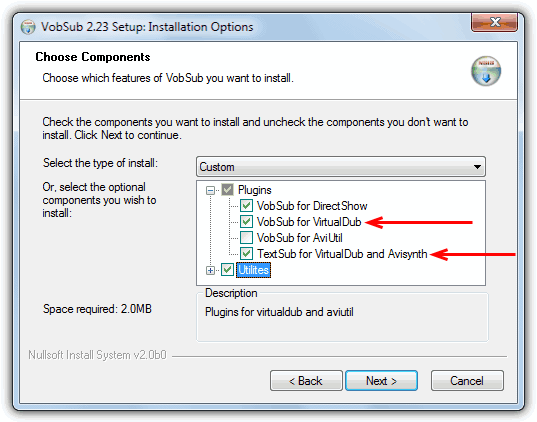
3. During the install of VobSub, expand Plugins and select “VobSub for VirtualDub” and “TextSub for VirtualDub and Avisynth”.
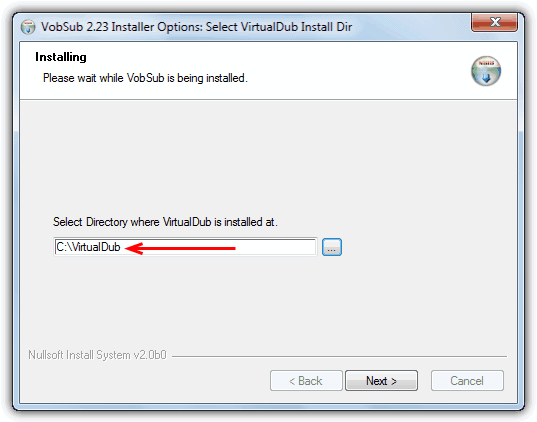
4. When asked to select the directory where VirtualDub is installed at, browse to C:\VirtualDub.
5. After you finish installing VobSub, run VirtualDub.exe from C:\VirtualDub
6. Go to File -> Open Video File and select the AVI.
7. Go to Video on menu bar, select Filters (or press Control+F)
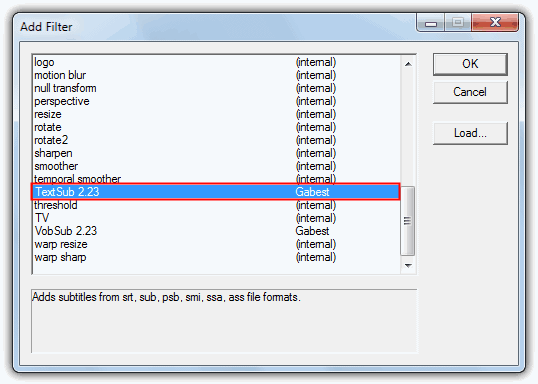
8. Click the Add button, select TextSub 2.23 and click OK.
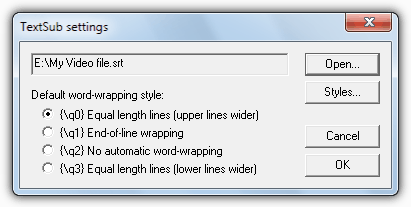
9. In TextSub settings, click the Open button and look for the SRT or SUB subtitle file. In the file dialog there are two options that need setting; Character set can be used if you are trying to embed non English characters such as Chinese or Russian etc. Set the FPS to match that of your video file. Click OK and OK.
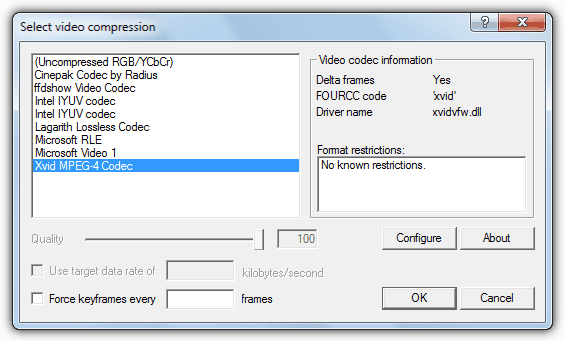
10. Go to Video on the menu bar and make sure that Full processing mode is selected. In the same menu select Compression (or press Control+P) and choose the video compression that you’d like to use, use DivX or xVid.
12. Finally, click File and select Save as AVI (or press F7), and wait for it to compress.
You will then have a new AVI file with subtitles embedded into it. Burn it to VCD or DVD using your favorite disc burning software such as Nero. If you have a DVD player that can support DivX, you can directly burn the AVI file to the disc without converting it to DVD or VCD format. That’s the advantage of using DivX/xVid as video compression.
It looks like a lot of steps but it’s actually quite easy when you’ve got used to it. Do be aware that because the AVI format is lossy meaning the quality of the video degrades through compression, a re-encoded video’s quality might be slightly less than the original. You can counteract this somewhat and make sure the difference is as small as possible by selecting a high quality preset of the output file, or a target size of around the same or slightly larger than the original.
Thankyou so very much, I was struggling for 2-3 days for hard burning subtitles on my videos. Freemake, handbrake etc. weren’t working, dot net issues. But I am done with anyvideo convertor, surprisingly I was already having avc but dont know it works on subtitling.
For old versions of FREEMAKE, look here:
oldversion.com/windows/freemake/
This was really informative. Thanks. I need to take it a step further, however. I only want a few clips/scenes from several movies for a presentation. Are there any simple (or complicated) Windows programs that can edit as well as hardcode SRT files simultaneously? My editing needs are very simple: mostly just cutting out unwanted footage and maybe some pasting as well. I’d hate to waste time encoding an entire movie and then edit out the clips afterwards. THANKS and Happy 2019!.
MKVToolNix is the best and fast of all.
I think you’ve completely misunderstood what this article is about. Parse an AVI video through MKVToolnix and you end up with AVI contained inside an MKV file, not a standard AVI file.
thanks very much this was what i was looking for. Used this software sometime ago and it was very productive. i actually forgot the name this time. thanks yh
I’ve tried just about all kinds of “free subtitle editors” for testing with an mp4 movie stored in my PC but none seemed to work, for one reason or another. Even tried typing subtitles using Word text format and some sort of “punch-in” feature, but to no avail. I suspect there’s a hidden fee should you actually wish to accomplish anything (despite their claiming they’re “free”), isn’t there? In other words, they’re all your typical “catch 22”, aren’t they >:( ?
Anybody can easily create subtitle files for free, all you need is Windows Notepad. Hundreds of guides out there to help you. Just opening any subtitle file will give a great idea how it works.
For a simple SRT subtitle file, all you need is three lines, a) subtitle number, b) time to display on the screen, and c) text to display.
I used to be a Freemake user, but I think it is flawed in adding subtitles to AVI videos. The subtitles I added will be out of sync with the video. I am using WonderFox HD pro, which is a software similar to handbrake. In addition to converting audio and video, it is also very good at adding subtitles to the video.
freemake now asks for payment……
It’s a pity cause it was quite user-friendly.
I’ll try the others, thanx!
It’s a shame really, Freemake used to be my goto converter a while back, but having to buy different licenses to unlock different parts of the software ruined it.
I have a gold license and still have to pay to unlock other functions!
I use format factory. I burned the subtitle. And make doube sub on the movie. Mine and another one. How can I use only.my sub?
Thank you so much, freemake helped me a lot.
Raymond you are the Master, I’m long time you follower :D
In freemake Video Converter, you mentioned;
” You have a choice next of whether just to embed the subtitles and re-encode the AVI or another different video format ”
I don’t see any option of embedding without encoding. Can you clarify me that.
Thanks.
The quote means you can embed the subtitle into another video format besides AVI if you wish. This article is about embedding AVI subtitles specifically but Freemake allows other video formats as well.
the method using VirtualDub is super! is that exactly what I was looking for. thank you!!
I used Subtitle Workshop to create the SRT file and I’m using Format Factory to merge the video and the SRT files. The subtitles are for a documentary so I need to add the names of the people speaking, I used this code {\an8} at the front of the text to make it appear at the top, while what the people are saying appears on the bottom of the screen. It works fine when the video and SRT files are separate and I play the video on VLC for instance, but when merging the files using Format Factory the subtitle at the top just flicks for like a second and it doesn’t stay on the screen for the time I configured on Subtitle Workshop……
Any suggestions?
Freemake VC did the job for me, very easy, thank you for the tutorial
I used Format Factory and it works great,thank you so much.
I tried with format factory and succeed. Happy that I landed here and got what I want. Thank you very much.
thnkz buddy.!!
Is there any program for android that ads permanently srt file to video?
Hi
Just wanted to let you know that FormatFactory did the job! All my subtitles showed up exactly as the way they were in the srt file, lost some formatting such as color and font size but overall the best outcome of all the other s/w I tried including Any Video Converter and HandBrake.
Again, thank you for your post!
just want to say “thanks” . a huge help
Thank you! You helped me!
Option 2 using Format Factory and an SRT file, going from MP4 to MP4, did not work for me — I have tried it twice. The first time I kept the default setting of “Type – Automatic” but after that did not work I switched it to “Type – Embedded.” I have not tried the other options.
I was able to embed the SRT file into an MP4 using HandBrake, but the subtitles FAQ on HandBrake says that it is not possible to burn in SRT subtitles (or at least HandBrake cannot do that). I saw on another blog instructions for burning in SRT subtitles using VLC, but several responses to that blog said that it did not work for the people who tried it, and it did not work for me, either. Someone else suggested playing the MP4 back with subtitles and then using the Record function in VLC. I tried that, too, and it did not work either. Everything thing I try I end up with just the video and no subtitles.
Frustrated.
just wonder if i can change the font type .. thanks for the methods were rly helpful ;)
Any Video Converter can do this I believe in the options window (top left), Format Factory might be able to as well but I’m not 100% sure on that.
I’ve no issue while converting this AVI file to DVD.
But one is my question, why after I burned to DVD and played to my DVD player, the font of subtitle is quite small?
Can we make it bigger?
I burn by using freemake video converter.
thanks Ray.
Methods #2 and #3 can alter the size of the subtitle on the screen to make it bigger, Freemake can’t do that if I remember.
Ohh…that’s why I can’t find the way to increase the fonts size. Thanks a lot for your replied Hal :))))
I’ll try another methods.
thank u!
wow this works perfectly! Thanks Raymond! you are the man!!!!!
hey pal, it works perfectly. Thanks a lot! Was hunting for burning subtitles on DVD since long.
oh my god, that was SO HELPFUL. thank you so much for posting this. i’ve spent the last hour trying to get these programs to work, and now i can finally turn my soft subs into hard subs. thank you so much for taking the time to post this. much much appreciated!
It works well,thanks!
Just adding subs onto my first film.Looking at both screens it doesn’t look as if I lost any quality and the subs look in sync with the scenes. Thanks for a great article.
Thanks a lot Raymond. Very useful guide
I FOLLOWED ALL THE STEPS IN THE TUTORIAL AND IT WORKED PERFECTLY!! THANKS RAYMOND. I could finally put my Spanish subtitles into an English movie.
THANKS!!! My Chinese subtitles are finally hardcoded successfully to my AVI file! :D
Thanks again for this great tutorial.
Raymond,
Thank you so much for this tutorial, you are awesome. I’ve been looking high and low for a tutorial such as yours for months and finally, I am able to burn avi movies with subtitles.
THANK YOU!!!
Thanks a lot Raymond, your post is awesome. I tried those steps and it works fine :D. Videos with same quality and legends are OK.
Hi. Thanks for the tutorial.
I have successfully done it.
I’ve been waiting for a tutorial like this one, I always been trying to burn movies with subtitles but i never could so thanks a lot for this, you’re winning your little piece of heaven!