How To Burn Downloaded Windows Vista to DVD or USB

We might almost be on the latest version 10 of Microsoft Windows, but there are still a lot of people around that have Windows Vista installed on their machines, especially laptops. Although it received criticism in the early days, in reality a fully patched and updated Windows Vista isn’t that bad and is still a perfectly usable operating system. Don’t forget, Windows 7 and 8 are in part based on Vista so it did in fact get a number of things right.
Whether you purchased your copy of Windows Vista direct from the Windows Marketplace or it came pre-installed on your machine, the chances are you won’t have a bootable DVD around with clean Vista installation files on it. The Marketplace version was available as a “Digital Locker Download” which gave you access to download 3 files, 2 Windows Image Format (WIM) files and an executable. Unlike Windows 7 and 8 which can be downloaded direct from Microsoft as an ordinary ISO file, Vista needs a bit of work to create an ISO image which you can burn and then install from.
Users who received Windows Vista already installed on their machine will likely only have a rather old and bloated recovery partition to fall back on. And as you hopefully still have a readable Vista product key on a sticker on the casing of your computer, it’s useful to have the facility to perform a clean install once in a while. If you have a legitimate Vista product key, it doesn’t take too much effort to download the 3 files concerned and convert them into an ISO which can be burned or written to USB and Vista installed from.
Sadly Microsoft never seemed to release these files with Service Pack 2 integrated so that has to be installed manually after you install Vista. The following downloads are direct from Microsoft’s official distribution partner Digital River, you need the 3 files from either version to create the ISO file. Unfortunately, there are very few languages available, so here are just the English versions. These distro’s contain the following versions of Vista:
Starter, Home Basic, Home Premium, Business, Ultimate, Home Basic N, Business N
Windows Vista Service Pack 1 English 32-bit
SHA1: 3B1A5E4B44CA2C15C327CD3DFB028833E0036FA8
SHA1: CE5F498008BC71ABF14494F3F4A13D7A9BAA2309
Install.wim (2,783,166,763 bytes)
SHA1: 487726AAC8AAFE9FFFCE3F4C42463BB13A8E9C3E
Windows Vista Service Pack 1 English 64-bit
SHA1: 111CBBCCA3087CEE8B35BDF7745E478E3F92C2F5
SHA1: A0E41E47FAE3D5D0A2A3E5EFA12087AF1E002186
Install.wim (3,587,141,686 bytes)
SHA1: FD3DDD67071373542D195209AC5E5B1702C18C4C
As it’s a large file, make sure that the downloaded Install.wim is the correct size and the SHA1 checksum matches to verify its integrity. You can find 10 MD5/SHA1 hash checking tools in this article. After downloading the required files you’re ready to create the ISO or write the files directly to USB. This is how you can burn your own Windows Vista DVD or create your own bootable USB flash drive from the 3 files you’ve downloaded.
Extract the Vista Installation Files
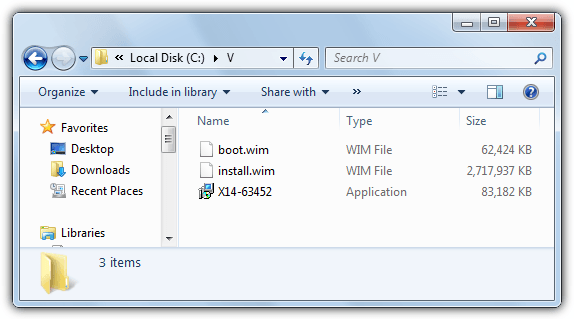
1. Place the 3 files you downloaded (boot.wim, install.wim and X14-63452.exe or X14-63453.exe ) in the same folder on your computer. In this example, we’re simply using a folder called “V” in the root of the C drive (“C:\V”).
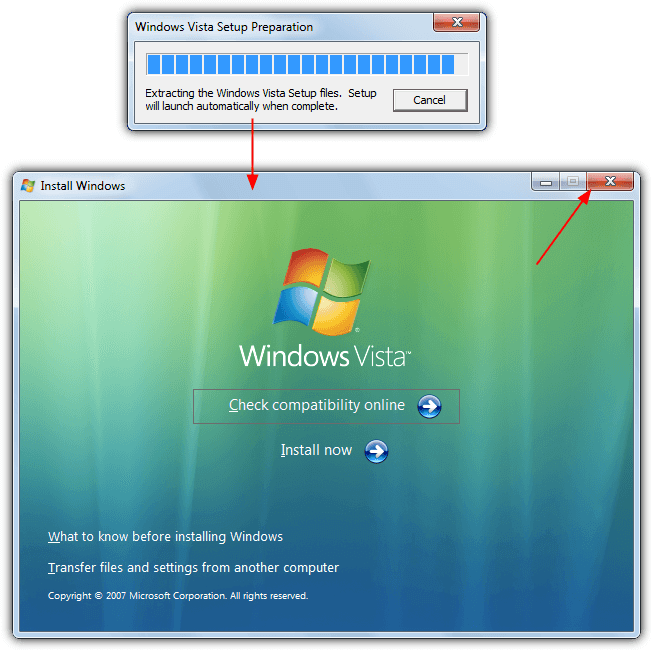
2. Run the executable file (X14-63452.exe or X14-63453.exe) and it will auto extract the needed files to a new folder called Vista. When you get to the Vista install window shown below, don’t press any buttons and close it.
The files are now extracted in the {Drive}:\{Path}\Vista folder ready to be written to USB or burned to DVD.
Create a Bootable Vista Installation USB Flash Drive
Creating a Vista installation USB is not only easier than creating an ISO, but it can also increase the speed at which the operating system installs.
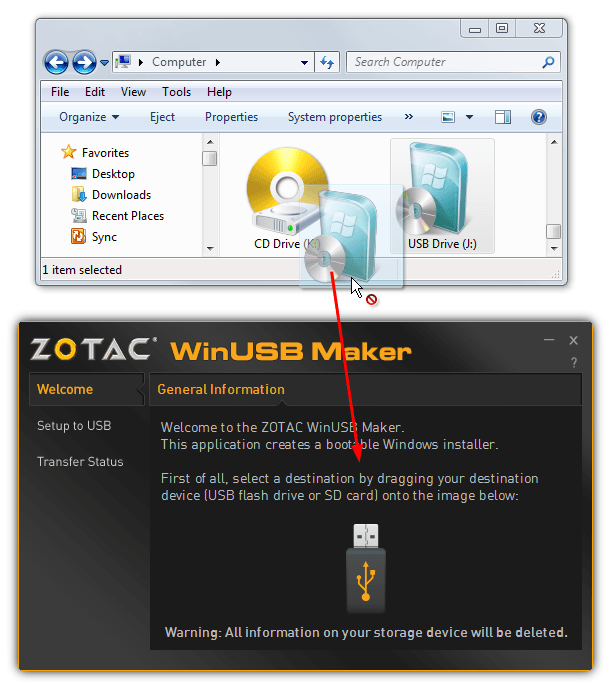
1. Download WinUSB Maker from Josh Cell Softwares. Inside the zip you’ll find a single executable, run it to start the program.
2. Make sure your USB drive is inserted and open Windows Explorer, then drag and drop the flash drive icon from Explorer onto the WinUSB Maker window.
3. In Explorer navigate to the folder which contains the 3 downloaded files and the extracted Vista folder, drag and drop the Vista folder onto the WinUSB Maker window. Do not drop the parent folder containing the Vista folder or the individual contents of the Vista folder, only drop the Vista folder itself, the rest is done automatically. The Detected OS should show Windows 6.x.

4. Click the Make USB Bootable button and accept the warning that the drive contents are going to be overwritten.
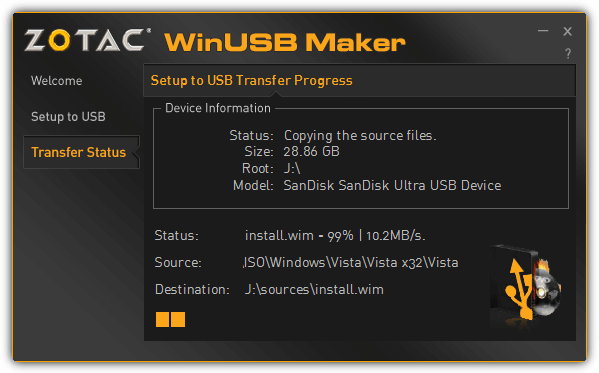
In a few minutes your USB drive will be ready and can be booted to install Windows Vista.
Create a Bootable Vista Installation ISO Image
This method has a dual purpose because creating an ISO image means it can either be burned to a DVD or written out to a USB drive using the tool above.
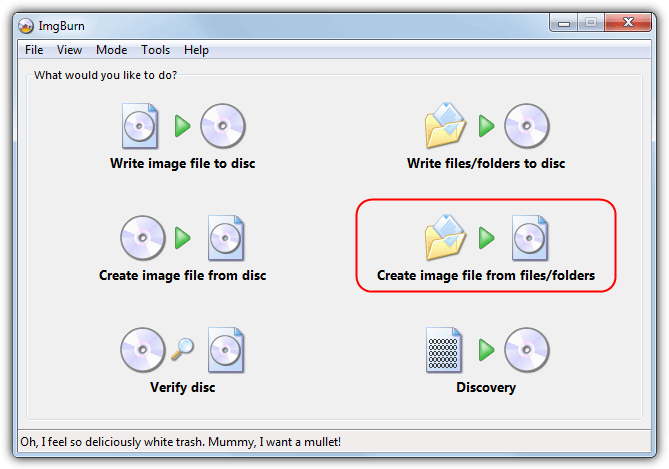
1. Download and install ImgBurn which is the ISO burning tool we’ll be using. Watch out for the offer of adware during install. Launch Imgburn and select “Create image file from files/folders“.
Note: Several users have had issues where they haven’t been aware or inadvertently installed the adware present in ImgBurn. Using a portable version of ImgBurn provided by Softpedia will allow you to create the Vista DVD without installing ImgBurn or its related adware.
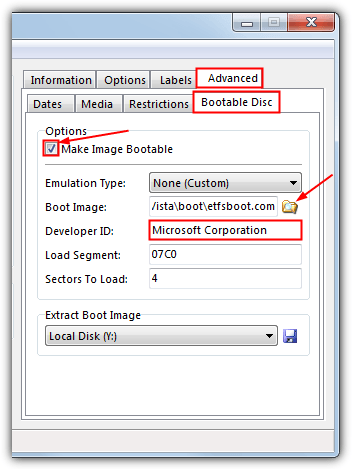
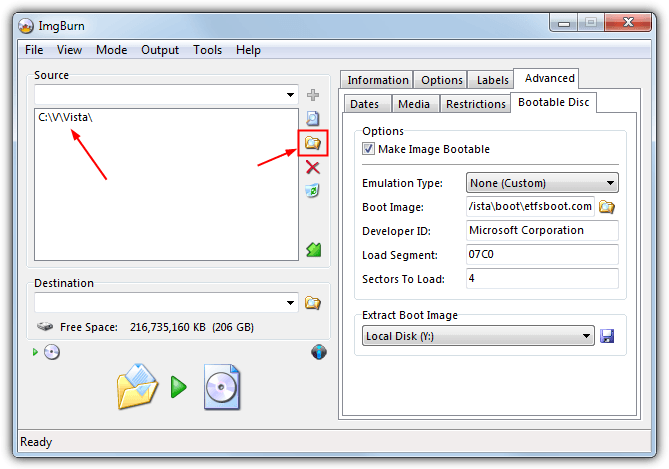
2. On the right, click the Advanced tab and then the Bootable Disc tab which appears underneath, tick the “Make Image Bootable” box to enable the options. Click on the browse for a file icon next to “Boot Image:” and select the etfsboot.com file in the {Drive}:\{path}\Vista\Boot folder. You may need to select “All files…” in the file requester drop down if the etfsboot.com file doesn’t show.
Type “Microsoft Corporation” into the “Developer ID:” box. “Load segment:” should already be 07C0 and “Sectors to load:” should be 4, if they aren’t, change them.
3. In the same window, click the browse for folder button and select the Vista folder that was automatically created earlier. Then click on the Build button at the bottom and give the ISO a name when asked. The program may ask to alter the file system of the ISO to UDF and also will auto suggest a label. You can simply confirm the suggested option both times.
After a minute or two your ISO will now be created and you can simply burn the resulting ISO file using the ImgBurn program or another ISO burning tool from our list. For a more successful burn, it’s always safer to use a write speed of 8x or under as Windows install discs are prone to being a bit inconsistent when burned at higher speeds. Alternatively use a Windows ISO to USB tool to put the image on a pen stick.
Unfortunately, Service Pack 2 can be integrated but it’s a lengthy process and actually involves installing Vista and then SP2, and re-imaging back to DVD. Trying to use vlite to slipstream doesn’t work either. You might as well just install SP2 after installing the SP1 install DVD. If you don’t already have Vista Service Pack 2, you can download it here:

Improve this guide

User forum
0 messages