3 Free Norton Ghost Alternatives to Create a Full Windows Image Backup

If you’re constantly testing software, trying out new Windows settings or tweaks or even purposely infecting your own machine with malware, it’s essential to have a complete copy of your Windows partition to hand so you can quickly restore it to its exact state to before you started messing around.
Even if you don’t use your computer very often or for those things, a full backup could save you time and money, reinstalling Windows and all your applications again would be a long, laborious and possibly expensive process.
Norton Ghost used to be the go to piece of drive imaging software if you wanted to create full backups of your entire Windows system. Backup Images have an advantage over backing up files and folders because they make a complete copy of everything in the Windows partition.
Although it was good, Norton Ghost wasn’t free and has long since been discontinued. Thankfully things are different now and even Windows can create basic full image backups of your system, although it can be slightly inflexible.
Here we’ll show you 3 free applications that can make full backups of your entire Windows install and how to create an image of your system with each one.
Macrium Reflect Free
The free version of Macrium Reflect has become one of the most reliable and respected pieces of imaging software around. There are paid versions which offer more functions such as incremental backups, email notifications, scripting and password encryption, but the free version creates full backup images with ease, works fast and could be all you need.
Creating a Macrium Reflect Backup
When you download Macrium Reflect Free from the official source, CNET, it downloads an executable where you choose which distro you want and it downloads the latest version to the specified folder. Make sure to click Options and select a 32-bit or 64-bit version to match the architecture for the computer you are going to install it on.
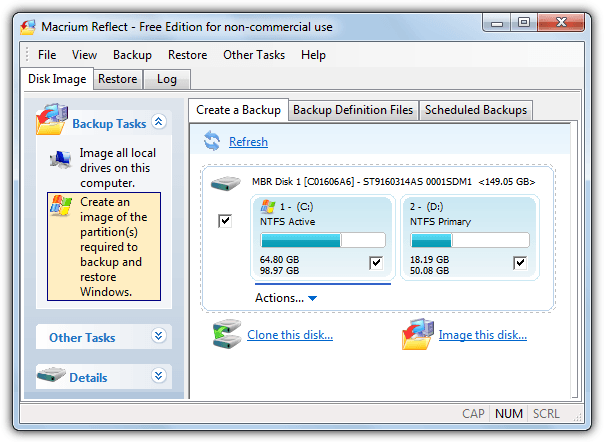
1. Download Macrium Reflect Free Edition, install and launch.
2. From the Backup Tasks on the left, select “Create an image of the partition(s) required to backup and restore Windows.” This will auto select all the partitions that Windows needs to run, including the hidden system reserved partition created on some Windows systems.
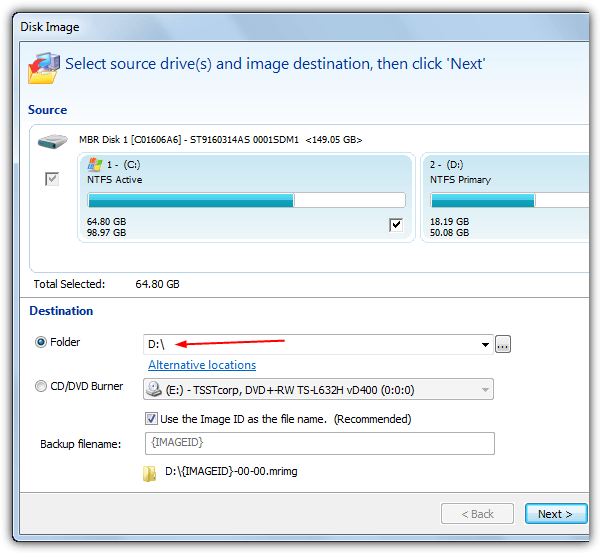
3. If for instance the boot files for this install are on another Windows partition which is part of a multiboot system, you can choose to disable it from being backed up here. Browse to the folder or network location, or select the CD/DVD/BDR drive to save the backup files to and click Next.
4. A summary screen will show where you can also change a things like compression level via the Advanced Options button, but the default settings are usually good enough. Click Finish.
5. The final window gives the option to run the backup now and also to save the backup task as an XML file so you can run this task in future with a simple double click. Just click OK to do both.
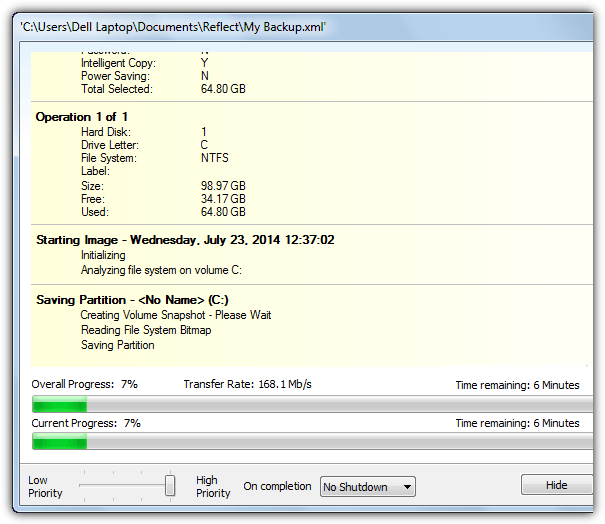
When the imaging completes, you should have a file with random letters and numbers with the extension .mrimg at your chosen target location.
Create a Macrium Reflect Rescue Media
The Macrium program will nag you every time you run it until you choose to create a rescue media, this is with good reason because you cannot recover your system image without the rescue disc.
1. If you previously disabled the rescue media reminder, go to “Other Tasks” > “Create Rescue Media“.
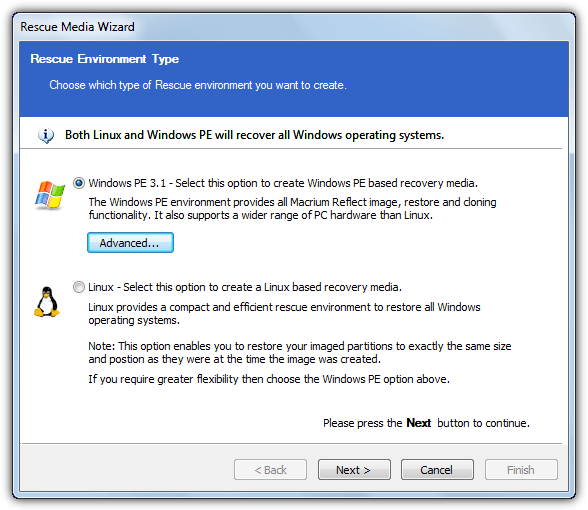
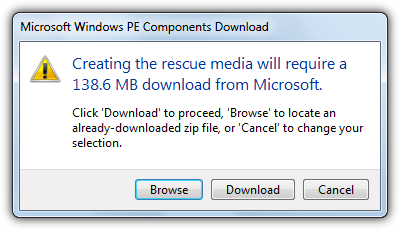
2. You have the option of creating either a Windows based rescue disc or a Linux based one. The Windows media is more flexible but requires an extra 100MB+ of files to download. We’ll choose the Windows PE rescue media.
3. At the next window, select a 32-bit or 64-bit rescue disc and click Next. The option will appear that you can download or browse for the extra PE files if you don’t already have them.
4. Finally you will be at the media selection screen, leave the check boxes at the defaults and choose whether to write the rescue disc out to CD/DVD or USB, and click Finish to let the media be written.

When Windows needs restoring, you will have to start your PC using the rescue CD or USB. When inside the Macrium program, it should recognize your backup and you simply need to click “Restore Image” and follow the prompts. If your backup isn’t found, click “Browse for image file” to locate it manually. The Macrium boot media can also perform backups.
Acronis True Image WD Edition and Seagate DiscWizard
Acronis True Image is perhaps the gold standard in imaging software for home and small business use. It’s very well known and rock solid but Acronis themselves don’t have a free version of the software. There are however, special cutdown licensed versions created for hard drive manufacturers Western Digital and Seagate. As long as you have a drive by one of those companies installed on your system (internal or external), you can use the special version of True Image.
Create an Image Using Acronis Special Versions
The feature set is highly reduced from the full Acronis True Image but you can still backup and restore images, clone discs and mount images as virtual drives.
1. Download Acronis True Image WD Edition or Seagate DiscWizard.
2. Install and launch whichever version you have downloaded depending on your hardware. Make sure you’re in the “Backup and recovery” tab and click “Disk and partition backup”
3. All the options you require to backup are held in this window:
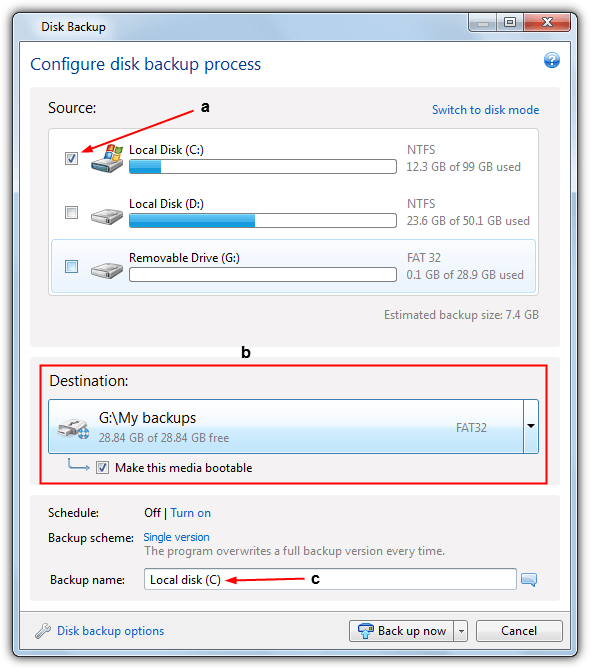
a) Select the Windows partition to backup, if you also have the system reserved partition it will pay to back that up too.
b) Choose a destination for the backup, this can be local drives, external devices like USB or CD/DVD, or network (including NAS). Presets are available in the drop down for the drives you already have attached.
The “Make this media bootable” option is valuable and you can backup your system to USB or optical drive and have it boot automatically to the version of Acronis you’re using. This means it’s the backup location and rescue media all in one so you don’t need to create a separate rescue disc.
c) Give the backup task a name if you want, the options button contains a number of settings like pre/post commands, validation, splitting, comments, screenshot and compression level, none of which need changing to create a basic backup.
4. Finally press the “Backup now” button to begin the process.
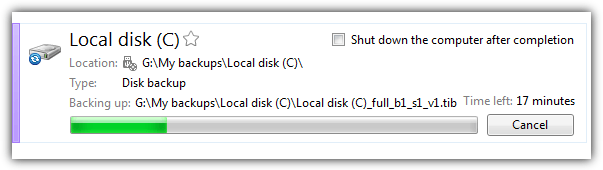
Backup images are created with the file extension of “.tib”.
Create an Acronis Rescue Media
If you enabled the “Make this media bootable” option in section b above, you don’t need to create a separate rescue media.
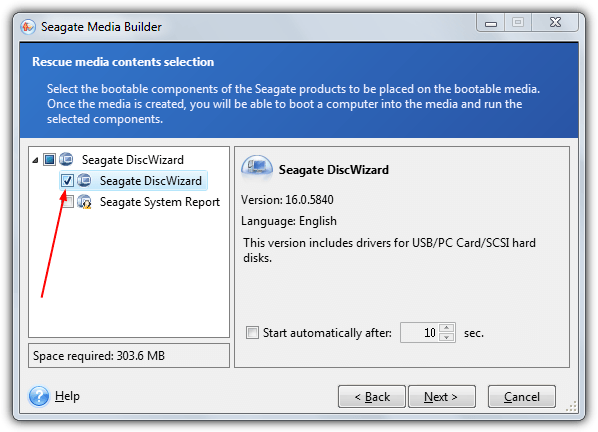
1. Run the program and in the “Backup and recovery” tab, click “Create bootable media“, then click Next.
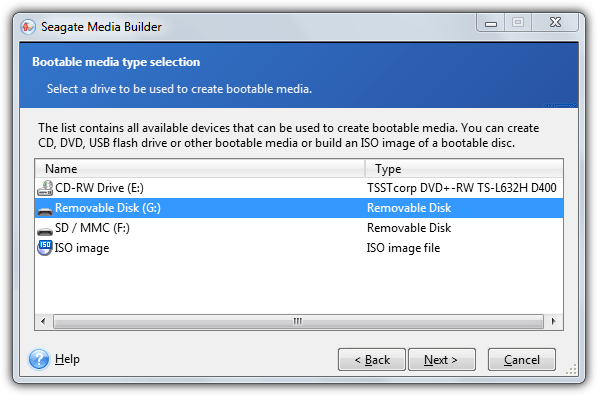
2. Put a tick in the second “Seagate DiscWizard” box, the option to include a system report isn’t required and adds another 140MB to the rescue media. Click Next > Next.
3. The media type selection screen gives you the option of writing the rescue disc to optical drive, USB flash drive/hard drive or creating an ISO image you can burn or write out later. Make sure your media is already inserted, click Next and then Proceed in the next window to write the rescue media.
When you need to, boot with the rescue media, select Recovery from the list on the left, click “Browse for backup” to find the image, then click “Disk Recovery” and go through the wizard to complete the process of restoration.
AOMEI Backupper
When we looked at Backupper for our imaging software speed and compression tests, we were mightily impressed. It wasn’t just the speed at which Backupper worked, but also the sheer amount of features the program has, such as differential and incremental backups, file/folder backup, cloning and encryption. On top of that, Backupper Standard is completely free for personal and commercial use.
Create a System Image With AOMEI Backupper
AOMEI has two versions of Backupper, one which works on Windows XP – 8.1, the other only works on Windows 7 – 8.1, but is 40 MB smaller in size.
1. Download AOMEI Backupper, install and run the program.
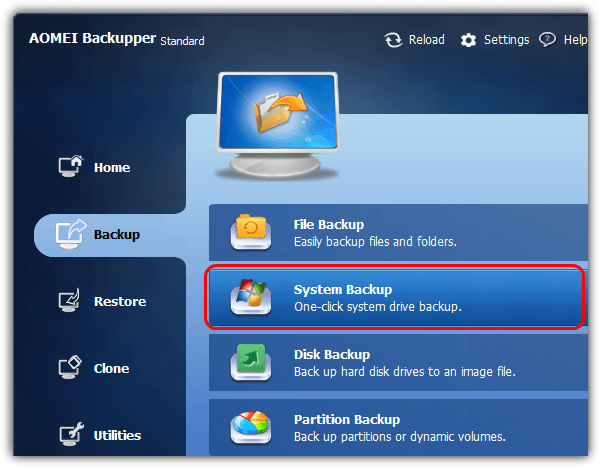
2. Click “Create a new backup” or the Backup tab on the left. Click “System Backup“.
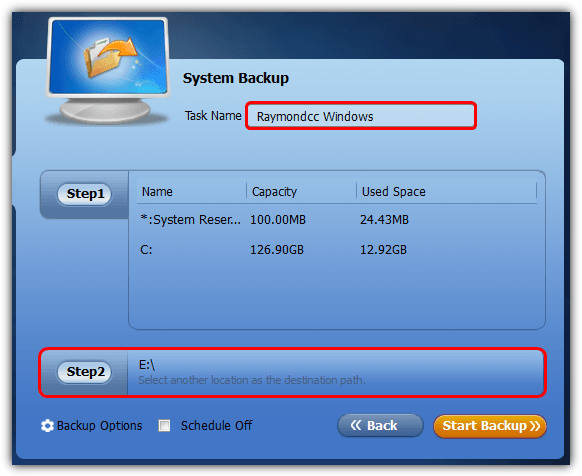
3. Give the task a proper name. System Backup chooses only the partitions required that enable Windows to boot for backup. If you have a system reserved partition, that will be included also. Click on “Step 2” and choose a local folder or a network share etc as the save location, extra options like encryption or file splitting can be configured from the Backup Options button. Click “Start Backup“.
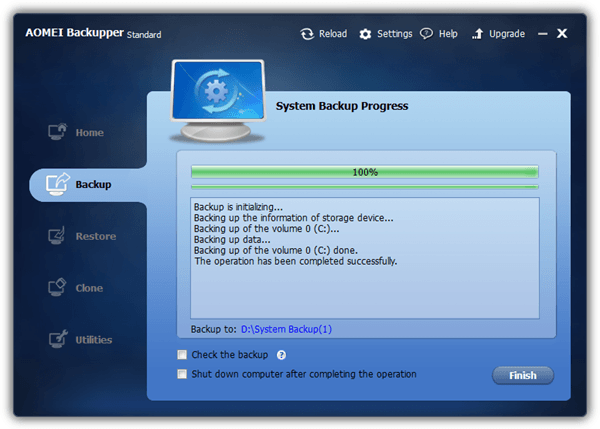
A tick box is available if you wish to verify the completed backup’s integrity. Once complete it will appear in backup tasks where you can add to it later on with a differential/incremental image or explore, edit or setup a schedule.
Create a Bootable Media in Backupper
The Windows 7/8 version of Backupper cannot create a Linux rescue media (it’s a separate download), so here we will create the Windows PE version.
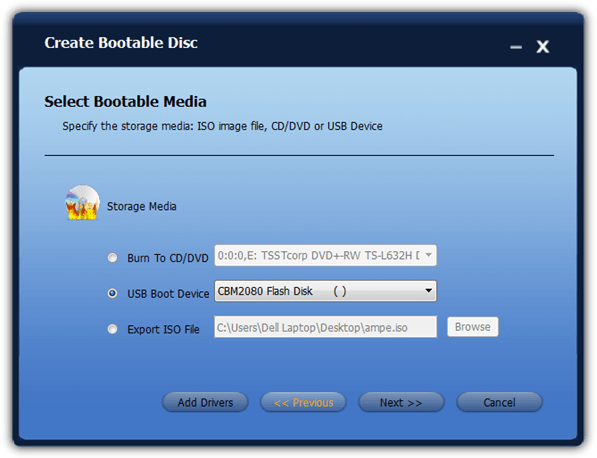
1. Launch Backupper and go to Utilities > “Create Bootable Media“.
2. Select the Windows PE option and click Next.
3. Backupper has three options for creating boot media; burn to CD/DVD, write to a USB flash drive or export the rescue disc as an ISO image so you can burn the ISO later on. Click the writing option you prefer and follow the prompts to complete the process.
The AOMEI rescue disc is actually the same program as you get on the desktop and it should also recognize your previous backup tasks. Simply Click Restore on the task, click Yes when asked if you want to restore a system image, highlight the backup file and click Start Restore. Because it’s the full program you can do everything the program offers from the boot media.
Note: For disaster recovery it’s always essential that you store the backup files on another drive completely and not in a separate partition on the same drive. If you backup partition C onto partition D for example, and they are both on the same physical hard drive, if the drive fails you will lose both partitions at the same time, and that includes the only backup you might have of partition C. This could be a costly and painful mistake.

Improve this guide

User forum
0 messages