8 Ways to Hide Drive Letters: Step-by-Step Guide
These days most computers come with at least 2 partitions on the hard drive although it’s quite common for you not to be able to see all of them because they have been hidden for various reasons. Windows normally creates a hidden boot partition of a few hundred Megabytes. OEM manufacturers will often install a recovery partition of a few Gigabytes which again is often hidden away so you don’t play with it.
If you are letting someone temporarily use your PC for a short period of time and would rather they didn’t have access to any of your personal files, one of the easy and quick ways to do it is to hide the drive or drive letter so it cannot be accessed from My Computer or Windows Explorer by the average user.
It’s also the case that sometimes the inexperienced user will poke around on other partitions and perhaps delete files without actually knowing what they’re for. One of the favorites is created backups from the Windows Vista and 7 backup function for example, which would obviously go on another partition or drive and an ordinary user might not realize what it is.
Hiding a chosen partition by removing the drive letter from it completely or simply hiding the drive letter from Windows Explorer but still making it accessible is easy to do and there is a variety of different ways to achieve it. Here’s a selection of 8 different ways to hide drive letters or partitions.1. Drive Manager
Drive Manager is a useful tool to perform several drive related functions, including getting drive information, checking drives, benchmarking, and ejecting/removing drives. One of its other features is being able to hide a selected drive from My Computer and Explorer for the current user. The program is also portable with an installer version available. Sadly, Drive Manager hasn’t been updated since 2012.

Run the program, click on the drive or partition to hide, and select Hide from the toolbar. Alternatively, right click and choose Hide Selected Drive from the context menu. After rebooting or logging off, the drive will be hidden but still accessible. Obviously, use the Unhide options to make the drive visible again. Make sure to right click and run Drive Manager as Administrator or the function won’t work.
2. NoDrives Manager
NoDrives Manager works in pretty much all versions of Windows dating back to XP and also comes with a couple of useful functions. Firstly, it hides the drives for all users and not just the currently logged on user, which is useful for hiding the drive from everybody. Secondly, it’s available either as a portable or setup installer program.
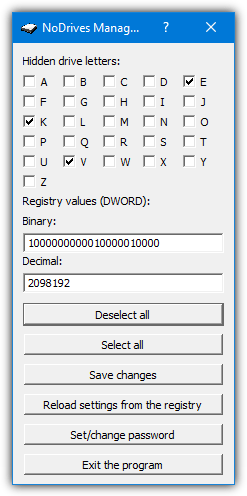
The program is pretty simple to operate, just check the relevant boxes for any drives you wish to hide. Uncheck an already checked box to unhide a currently hidden drive. Then press Save Changes. The password option asks for a password when you run the NoDrives Manager program which is enough to deter average users from enabling the drives again. Advanced users won’t have too much trouble bypassing it though as the password is simply stored as a value in the registry.
Once you have logged off and come back into Windows, the drive letter will be gone from My Computer and Explorer but still accessible from the address bar, Command Prompt, or the Run dialog, etc.
Note: Some other websites list editing the registry manually as an option for hiding drive letters. It involves adding drive letter code numbers together to add into the registry. In fact, it’s exactly the same as this tool but NoDrives Manager takes the hassle out of editing the registry, which could result in issues if you enter the wrong numbers. Editing the registry yourself is still viable, but this will do it easier and more safely.
3. Hide Drives
Hide Drives can do two separate things to a drive. It can disable access to the drive meaning you will see the drive letter in Explorer but cannot access the drive. Hide Drives also has an option to hide the drive letter in Explorer but still make it accessible if you type the drive letter into the Explorer address bar or Command Prompt, etc.
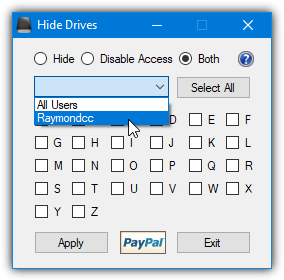
Both options can be used together meaning you cannot see or access the drive at all. Upon starting the program, select whether to use the hide option, disable option, or both together, and then select whether to apply it to all users or a specific user from the drop down menu. Finally, check the corresponding box of any drives that you want to process and press Apply. A logoff/restart will be required for the changes to take effect.
Note that if you run Hide Drives again it will offer to restore any hide/disable options you have supplied previously. Use this if you go wrong or just wish to reset all drive options back to defaults.
4. Simple Run Blocker
The main goal of Sordum’s Simple Run Blocker is actually to block specific programs or applications from being launched. However, it does also have built in options to hide a drive letter from Explorer or deny access to a drive so it cannot be used at all. The “Hide Or Lock Drives” function is not found in the main user interface but in the Options menu (Purple cog icon).
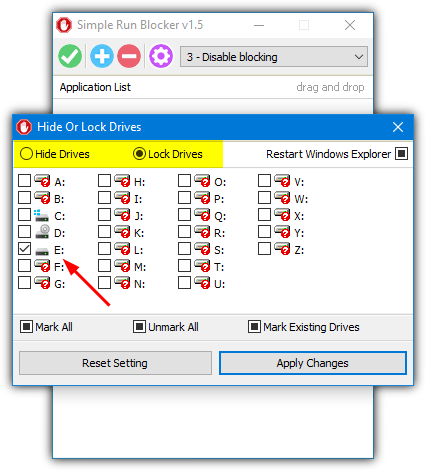
All you have to do is select either the lock or hide option, check which drives to apply the action to, then click Apply Changes. The Restart Windows Explorer button at the top right does away with the need to reboot or log out for the changes to take effect. You can’t perform both lock and hide in one action so simply go through the process again using the other lock/hide option to do both. Simple Run Blocker is portable.
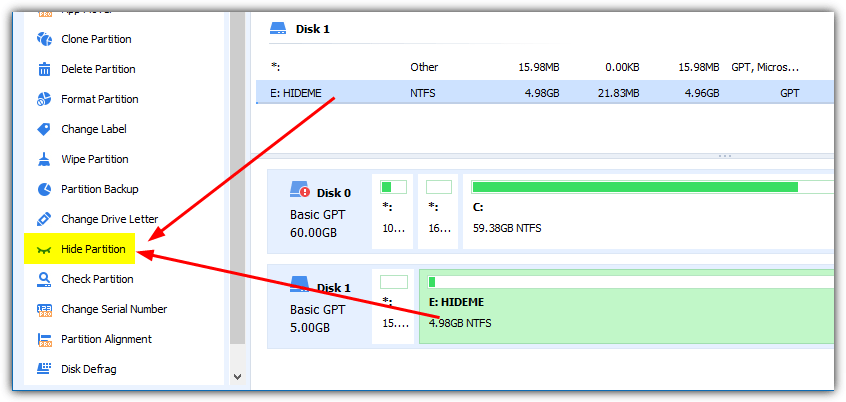
5. Hide Drives Using Partition Manager Software
Using a piece of partition manager software to mark the partition as hidden is more secure than using the Computer Management console. That’s because once you have done this, Computer Management cannot access the partition at all. You can still see the partition but right clicking on it will not allow you to add a drive letter to make it accessible.
There are many free partition management tools available such as Parted Magic, EaseUS Partition Master Home Edition, and Partition Wizard Home Edition. For the purposes of this guide, we’re using AOMEI Partition Assistant Standard. The method to hide a partition is broadly the same whichever software you choose.
1. Download and install AOMEI Partition Assistant Standard.
2. Click on the partition in the upper list or graphical layout and select Hide Partition from the sidebar. Alternatively, right click on the target partition and select Advanced > Hide partition. Then click Apply when you’re ready to proceed.
To unhide the partition again, simply reverse the procedure using the Unhide option.
6. The Computer Management Console
This method uses the process of removing the drive letter from the drive or partition completely. This renders it unusable by anyone until the drive letter is restored. A drawback of this method is that any software or applications you run that require the drive to be available won’t work.
1. Type “Computer Management” or “compmgmt.msc” into Start. Alternatively, right click on This PC on the desktop and select Manage, then click on Disk Management under Storage.
2. Find the partition you want to hide using the list or graphical layouts, right click on it, and select Change Drive Letter and Paths.
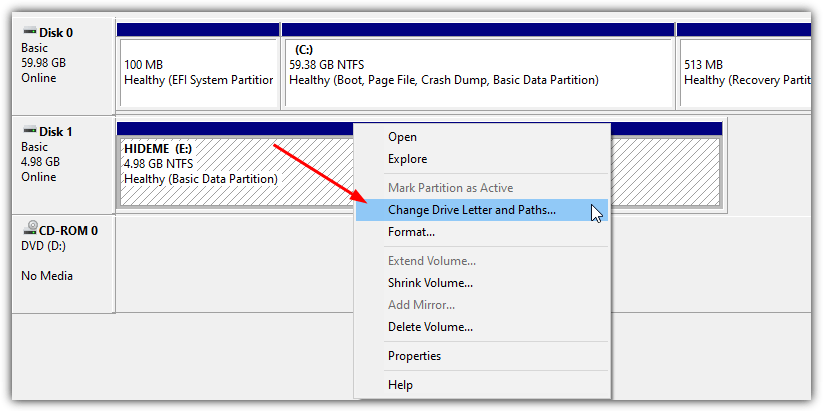
3. Make sure the drive letter is highlighted in the box and click the Remove button, then click OK.
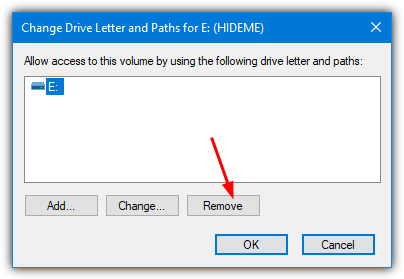
To add the drive letter back to the partition, follow steps 1 and 2 and then click the Add button. Make sure “Assign the following drive letter” is selected and there is a letter in the drop down which you can change if you want to, and click OK to finish.
7. Hide Drives Using a Group Policy
The Group Policy editor in windows is able to hide drives from Explorer but has a couple of drawbacks. Firstly, it’s not available in Home versions of Windows, and secondly, only drive letters A to D can be hidden unless you use the All Drives option.
1. Press Win key+R to get the Run dialog, type gpedit.msc, then press Enter.
2. Navigate to User Configuration > Administrative Templates > Windows Components and click on File Explorer. Double click on “Hide these specified drives in My Computer” in the right window pane.
3. Click the Enabled radio button and in the drop down box that appears below, select the combination that best matches your needs. Click OK when finished.
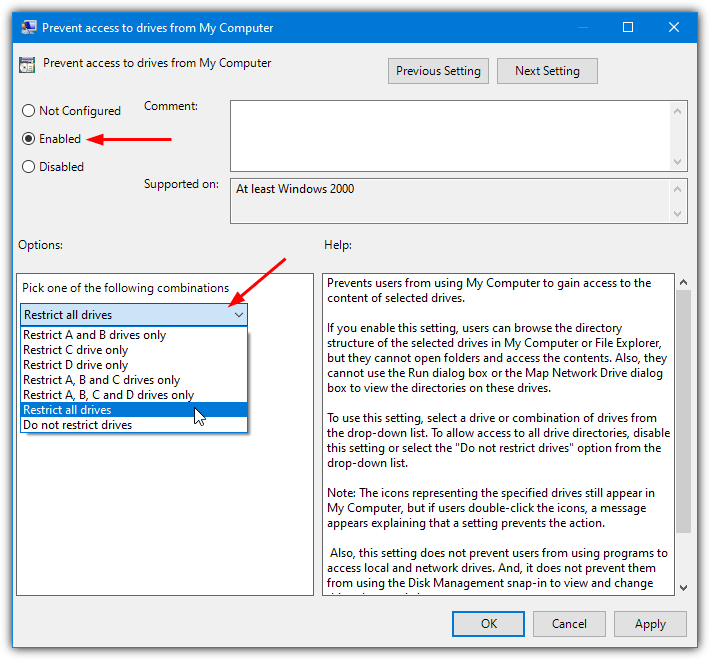
There is also another option called “Prevent access to drives from My Computer” where users can browse the folder structure of the selected drives in My Computer or Windows Explorer, but they cannot open folders and access the contents. However, this does again have the restriction of only going up to drive D unless you use the all drives option.
8. Hide a Drive Letter with Diskpart
Hiding a drive letter in this way is pretty much identical to using the Computer Management Console. The only difference is you’re using the Command Prompt to do it. This is maybe a more useful method for advanced users and command line fans.
1. Press Win+R for the Run dialog, type diskpart, and press Enter.
2. Type List Volume to get a list of all available partitions and make a note of the volume number you want to hide.

3. Type Select Volume [number] where the number is the volume number you noted from the previous step.
4. Now type Remove to remove the drive letter from the selected volume. If you type list volume again you should see the assigned letter in the Ltr column has now gone from the volume. Type Exit to quit Diskpart.
To get a drive letter back again using Diskpart, repeat steps 1-3 and then type Assign instead of Remove at step 4.
You might also like:
 6 Ways to Hide User Account from Windows 10 Login Screen
 4 Ways to Edit URLs at Internet Explorer Address Bar History
what happened to option 4, 5, 6, and 7?
There’s two pages to this article (hint, the black buttons)…
NoDrives Manager tool not working 64 bit for windows 7
Thanks raymond this is very usefull..
many thanks to you for some help:))))))))
Thanks Very Useful.
Had a Spywareinfection wihch hid my c: and d: drives. Tweakui brought them back!
Already had it installed but did not think of it :))
cool
useful tips for me…
thanks raymond
thank you for this information
Thank you very much raymond. I have been looking for this since past may days….I really appreciate you for this work…
thanks a lot
Hey Raymond thanks for that even i got many friends and relatives who try to snoop in my computer to view my stuffs….So this is very useful for me.
thanks ray, this is useful for me somehow