Windows USB Installation Tool: Best to Use in 2023
6. Universal USB Installer / YUMI
USB install support for: Windows Vista, 7 and 8.
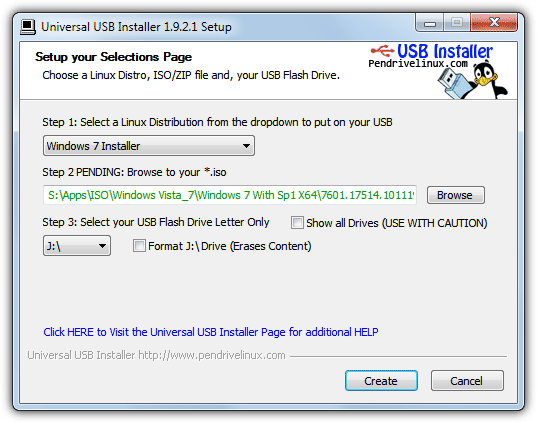
Universal USB Installer and YUMI are similar programs from Pendrivelinux.com, looking and working in a similar way. The main difference is YUMI has support for installing multiple ISO images onto a USB flash drive and Universal USB Installer can install one ISO image at a time. They both have options to install and also download a number of Linux operating system images and repair CD’s along with direct USB installer support for Vista, 7 and 8. These two tools are one of the few that is able to install Kon-Boot onto a USB. All you have to do is select which Windows to install from the Step 1 drop down (near the bottom), locate the ISO and choose the USB drive to install to. Formatting is optional. The YUMI interface is slightly more complicated due to the multiboot options. Both tools are entirely portable.
Download Universal USB Installer | Download YUMI
7. UNetbootin
USB install support for: None officially, Windows Vista, 7 and 8 worked for us.
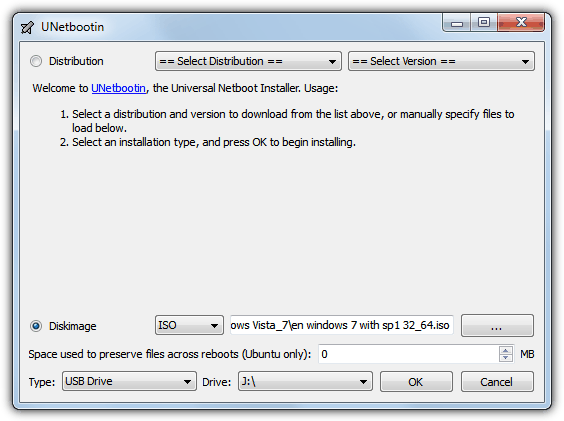
UNetbootin is a very popular tool for downloading and installing Linux distro’s onto USB. Although a lot of people try to use it for installing the Windows setup onto USB, the program doesn’t officially support this and it seems a look around the internet reveals there are as many failures as successes. We ran quick tests to install Windows Vista, 7 and 8 ISO’s to USB using UNetbootin and it seemed to work IF you format the flash drive to NTFS beforehand. Just select Diskimage and browse for the ISO file, then choose your USB drive. Because the other tools here are designed to work with Windows by their developers, it’s recommended to try them before UNetbootin.
8. RMPrepUSB
USB install support for: Windows XP, Vista, 2008, 7 and 8.
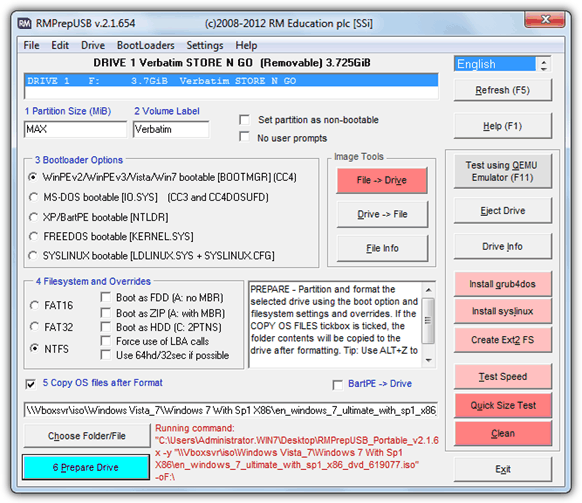
RMPrepUSB is quite a comprehensive tool and can look a bit complicated to use compared to most other USB installers. Unfortunately, although the website can be a great resource for tutorials on various ways to put windows setup files onto a USB drive, it also can be quite difficult to find your way around. If you’re confident or experienced enough, there are a number of useful features such as multiple bootloader options, several fixes and tweaks to help with compatibility, a backup and restore function, a speed tester and also a size tester which can help detect fake sized USB flash drives. RMPrepUSB runs you through a series of 6 steps to create the install Windows USB, the small help window will offer tips on the best options for your particular operating system. Installer and portable versions are available.
9. Koala
USB install support for: Windows Vista, Server 2008, 7 and 8.
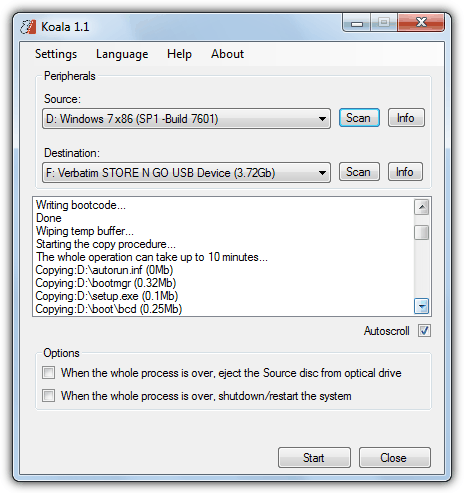
Koala is a small and portable utility that can get Windows Vista, 7 and 8 setup files onto USB stick, but does have a limitation which is only support for copying the files from drives and not ISO images or folders. You can however mount an ISO using virtual drive software such as Daemon Tools and do it that way. Simply make sure you have Windows inserted into some form of drive, plug in the USB flash drive and press the Scan buttons for both Source and Destination which should find your devices and populate the boxes. Then press Start to begin the process and wait for your USB Windows installer to be created. Koala needs the .NET Framework v2.0.
10. The Manual Way Using DiskPart
USB install support for: Windows Vista, 7 and 8.
This last method is for the Command Prompt lovers out there and uses the Diskpart tool built into Windows to prepare the USB flash drive for the files. This should be used with care because you could easily wipe the wrong drive and lose data if not selecting the drives correctly. This method was tested and confirmed working on Windows Vista, 7 and 8. You obviously need to press Enter after typing in each command.
1. Insert your USB flash drive.
2. Press Win key+R, type cmd.
3. Type diskpart.
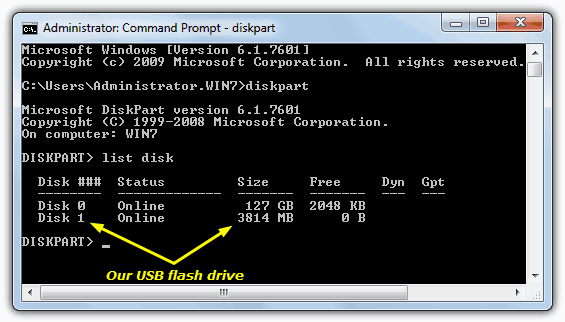
4. Type list disk, then identify the disk number for your USB flash drive. You MUST be very sure to find the correct number or you’ll end up formatting the wrong drive later on. If you have only one hard drive, then normally your USB flash drive will be disk 1.
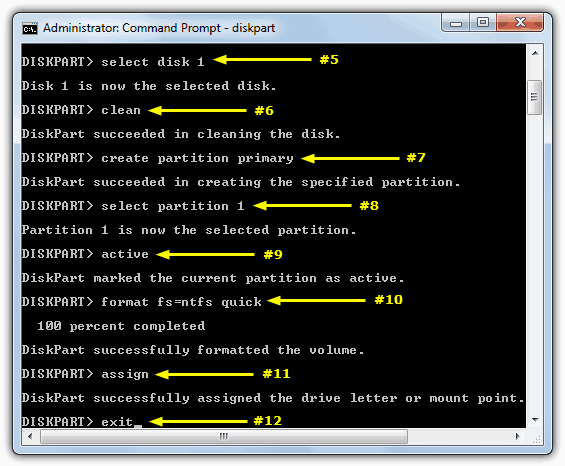
5. Type select disk [disk#].
6. Type clean.
7. Type create partition primary.
8. Type select partition [disk#].
9. Type active.
10. Type format fs=ntfs quick.
11. Type assign.
12. Type exit.
DiskPart Steps 5 -12 in Command Prompt:
13. Insert the Windows installation DVD disc, mount the ISO or open it with 7-Zip, or locate a folder containing the Windows files, and copy everything from there onto your USB flash drive.
Boot up your computer with the USB flash drive. As with all these tools, you will need to go into your BIOS and make sure it is set to boot from USB devices, or press a key such as F11 or F6 etc while the BIOS screen is visible to select the boot device. If you got it right, you should now be able to load and install Windows from your USB flash drive.
is there any software that can choose the 32bit win with 64bit version without ad
Hi All, Greets, My first choice is also RUFUS , ( although it can’t create multiboot drives and formats/ deletes everything else on the pen drive ! ) I think the most important setting/thing to know/choose about it, is selection of a partition scheme out of three : 1. BIOS + MBR or 2. UEFI + MBR : or 3. UEFI + GPT. ( System requirements : XP & above AND Support for XP & above installations ) Thanks & Regards
Id like to use rufus. its easy use.
Great article
But once you use rufus all those become a waste of time and effort
Its steps are easy for even novices
Thank you so much for this post! I just used Rufus to install Win Xp from a flash drive, and it worked like a charm. It’s as fast and easy as stated, and it saved me a lot of time. It’s a great program indeed! I wasted some major time following the directions of some others; and it just didn’t work. Many thanks again!!!
Hi, I used the YUMI to make my usb flash drive bootable and in him I have a linux SO, the Kaspersky Recover Disk, etc installed in the usb flash drive.
If I copy all files from Win7 DVD to root folder of flash drive, it will work?
Having just the files in the flash drive won’t work because the Windows setup boot loader must be present in the flash drive’s MBR.
Thanks for answer.
I used the ImgBurn to make a ISO of Win7DVDx64, but when I used the YUMI to make my usb flash drive bootable with the Win7, don’t worked. A only file README.txt are copied to the flash drive, with this text: “This disc contains a “UDF” file system and requires an operating system that supports the ISO-13346 “UDF” file system specification.”
Why? What wrong I’m do?
method 10, BOOTSECT.EXE operation needed?tq
You don’t need the Bootsect argument at all if you’re using Vista/7/8 to put Vista/7/8 install files onto USB, that’s why it’s noted in the article the listed method is for those operating systems only.
When Windows formats a USB drive it will install the correct bootsector for that Windows version already; Vista/7/8 will install nt60, XP will install nt52. The Bootsect.exe command only becomes useful if you’re on XP and trying to create a Vista/7/8 bootable USB or vice versa. But then you run into problems of needing extra discs and not being able to create a 64-bit USB from a 32-bit Windows etc…
In short, the “bootsect /nt60 [drive]” command is pointless when XP isn’t involved.
Thanks for this. It is really helpful. I have installed Windows 7 Ultimate on a Toshiba NB 305 :)
hai thanks dude
Thanks Raymond..as always you are the best.
Excellent info – saved me as most of my systems refuse to boot from the Win7 DVD though they can boot the Vista DVD. Need to boot from the installation DVD since I’d like to wipe the HDs (non-upgrade install) as part of the install. Your manual way with Win7’s DiskPart I’d not seen previously – nice and easily done (fast too). I was working with the older HP USB Formater utility – to make a boot USB but its formating was taking 2x as long. Found your post during its formating, started a second USB drive with your method – its done and the files are copied – HP Formater is still chugging along…… Thanks Again!
I just tried this and it worked 100%. You are a life saver man, I had wasted a lot of DVDs trying to burn windows 7, and I could never get them to work properly. I give this post 5 stars. Good work!!!
U THE MAN, works like a charm!
Thanks Ray
Wow nice to see the trick, really awesome…..i will try
a good tutorial ….. great share man!!
thanks man , worked a treat!
This tutorial is great!
just what i needed, thanks ray :D
This is really good to those who have windows 7 copy, does this works also on all windows vista.
thanks raymond
Great Job Raymond …[:D]
You did great job every time
Thanks for Such great tips …[:)]
I think using the Ultra ISO Premium is more ‘automatic’
The Steps are:
1) Download the free UltraISO trial-ezbsystems.com/ultraiso/download.htm
2) Start UltraISO as administrator (if Vista)
3) “Burn” the iso image to the USB stick by following these steps
With UltraISO:
– Open the image of Vista/Win7 with UltraISO
– Under BOOTABLE tab choose WRITE DISK IMAGE
– Choose your USB stick under “Disk Drive”
– Choose a method (It’s recommended to use USB-HDD+)
– Press Write
– Make sure to change your BOOT order in BIOS to boot from your USB drive first
THAT IS ALL!!!
i prefer UnetBootin… easier :) just few clicks and you are done flashing the ISO to the flash drive…
This is a good article indeed.
Indeed another spoiler right before Microsoft release this as their official move.
A very good source from CNET once told that Microsoft is planning to sell Windows7 on USB for the benefit of NetBook users.
the first method is the best i tried of my 4gb usb installed windows rtm 7600 of it installed so fast!!!! really cool recommend step 1 which is for experienced users only
Yet again, one of the best tips and utilities I have come across and lately most seem to be showing up here…..RAY you are the man!!!!…. :o)
thanks ray..it’s actually working for me,so thanks and keep up the good work..
Thanks Ray
i think the manual method will works for all windows~
Thanks Ray that is a good article.
great guide ray..i think it also can boot winxp and vista too
=)