How to Install SATA Drivers on Windows XP ISO [2 Ways]
One of the major problems that has plagued Windows XP is it’s never had the facility to install itself onto some newer hardware without the need for extra steps. Although SATA, AHCI and RAID enabled storage controllers have been around for several years, the Windows XP install CD never gained the ability to install directly onto this hardware, and you need a floppy disk with the necessary drivers for XP to be able to recognize your hard drives during setup. If you don’t use a driver floppy, you will get the dreaded “Setup did not find any hard disk drives installed in your computer” error.
Download a floppy SATA/RAID driver, extract it to floppy disk and then when installing XP, you need to press F6 at the specified time to install the driver. However, most desktop computers and all laptops don’t come with a floppy drive these days, and what makes it worse is you cannot use anything else such as a USB stick to put the drivers on, it MUST be a floppy drive. Although you can use an external USB floppy drive, it would be a waste to buy one just to use it for installing Windows XP. Recently we found a workaround that can enable you to install the SATA drivers from a USB flash drive after pressing F6, but this solution is known to be not 100% working on all computers.
In order to get around having to use a floppy drive, you can integrate the floppy SATA/RAID driver into the Windows XP CD yourself. This way, you can install Windows XP on a SATA hard drive without using a floppy drive at all because the driver is already present on the CD. You’ll need to have an XP CD or the source files contained on one stored on your hard drive, the floppy SATA/RAID driver which can be downloaded from the motherboard manufacturer’s website and a CD/DVD writer.
Here are 2 ways to integrate the SATA drivers into your Windows XP CD allowing installation without the need of a floppy drive.1: Integrate SATA drivers using nLite
This first method uses the update and driver integrating tool nLite to add the drivers to the Windows XP CD. Just about everyone looking to customize their Windows XP install CD has heard of this tool.
1. Download and install nLite.
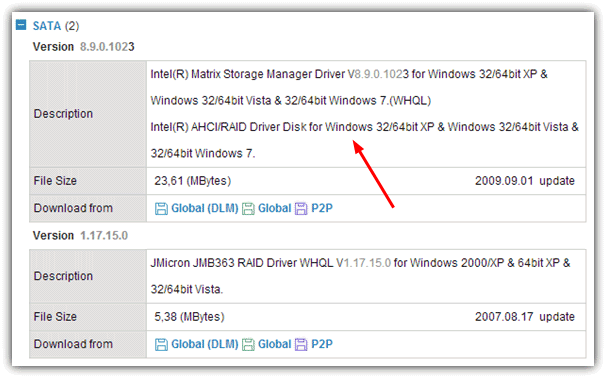
2. Download the SATA driver from the motherboard or laptop manufacturer’s website and extract it to a new folder. Alternatively, you might be able to download a newer driver from the SATA or RAID chipset manufacturer such as the drivers from the Intel website for their chipsets. Make sure to get a standalone floppy driver if available or a driver package that includes a floppy driver.
3. Run nLite and select the language to use. Next you need to specify where the Windows XP installation files are. If you already have a folder on you hard drive with the XP CD contents, point to that. If not, insert your XP CD and browse to your disc’s drive letter, select a folder location for it to save to and then wait for it to copy. Click Next once done, and Next again to skip the Presets screen.

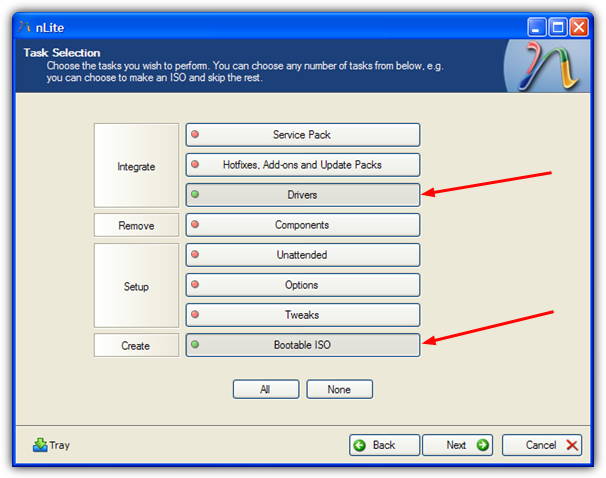
4. At Task Selection, click Drivers and Bootable ISO. Click Next.
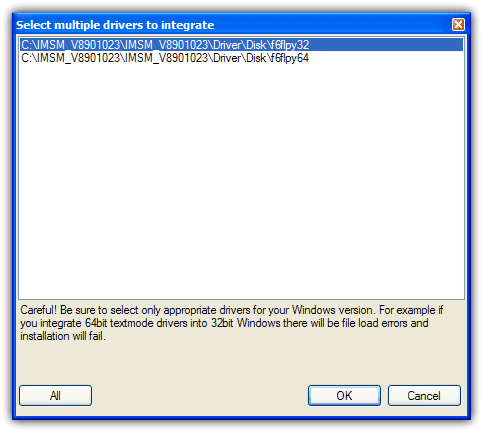
5. Now click the Insert button at the bottom and select “Multiple driver folder”, choose the folder where the extracted drivers are and click OK. If there are multiple choices, select the correct drivers to integrate. For example, do not select 64 bit drivers on a 32 bit Windows XP. Click OK when done selecting the drivers. Click Next.
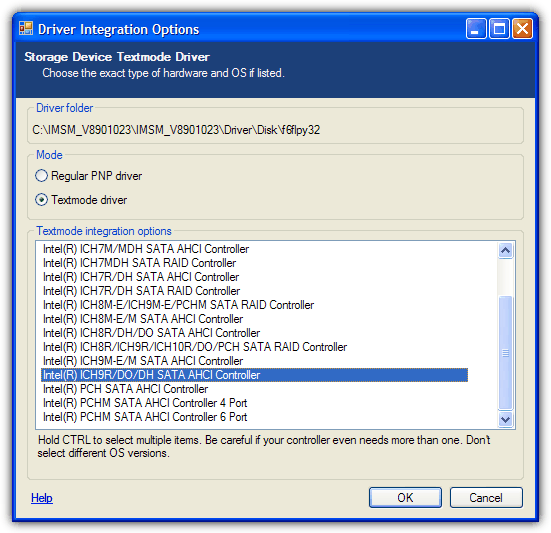
6. If this next screen doesn’t appear, you don’t have the correct driver. The driver needs to be of a Textmode type and not a PNP type to be included in the XP setup. Make sure Textmode driver is the selected mode and to choose the exact type of hardware chipset in your system. If you’re not sure, check the documentation or the manufacturers website. For our hardware below we want the Intel ICH9R chipset. Select the drivers you require and click OK and then click Next, and finally OK to start the process.
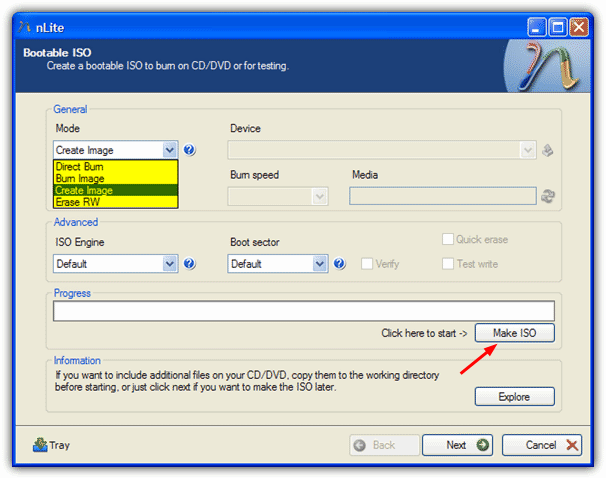
7. Once the integration has completed, click Next to be taken to the ISO creation and burning screen. You can create a bootable ISO to burn to CD later on, or even burn to CD directly using Direct Burn option. To create and save an ISO simply click the Create Image mode option and then Make ISO. With the help of an ISO file, you could then install Windows XP from a USB flash drive.
The next integration method on page 2 is far easier to get working if you can’t find the right floppy SATA/RAID driver because it makes a universal SATA Windows CD.
2: Integrate SATA/RAID Drivers using DriverPacks
DriverPacks is a well known solution for allowing the integration of a number of drivers onto your XP install CD or Vista / 7 DVD. Although it can include other drivers such as sound, video and network, for the purposes of this article we’re only interested in the Mass Storage drivers and getting them installed so you don’t need a floppy drive during XP’s setup. The big advantage here is this method doesn’t need you to find the exact driver for your storage controller, just about all the major brands are already included in the driverpack file you download.
You WILL need a folder on your hard drive with the contents of your XP CD copied into it for the drivers to be integrated.
1. Visit DriverPacks.net and download the latest DriverPacks BASE program. Run the SFX archive and extract it to the folder of your choice, then run the DPs_BASE.exe file.
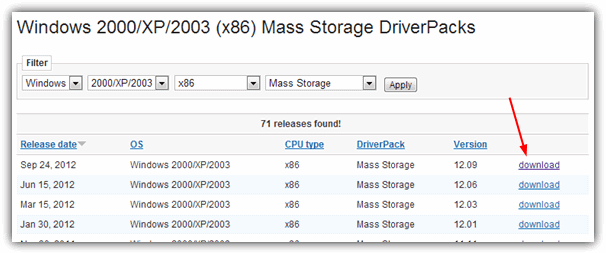
2. DriverPacks uses Bittorrent these days to distribute its driver archives and the updating function from within the program doesn’t work. Visit the Mass Storage XP drivers download page and download the torrent file. Then either add it in and download the file from your favorite torrent client, or use one of the methods such as BitLet from our article about downloading torrents without installing software. The file to download is around 8MB.
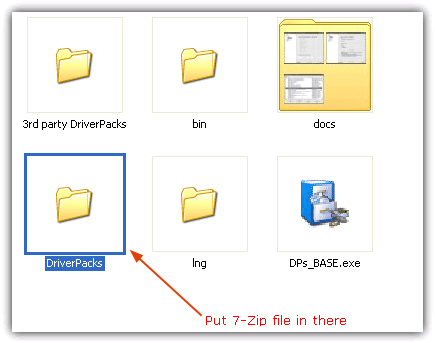
3. Copy the downloaded drivers 7z file to the DriverPacks folder inside the folder you extracted DPs_BASE to.
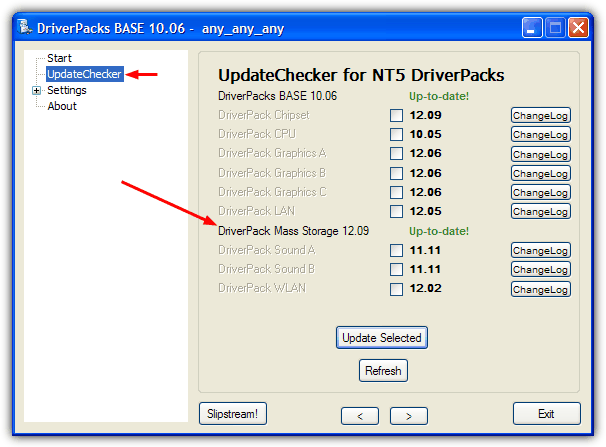
4. Go back to the DPs_BASE.exe program (or start it if you haven’t already) and click on UpdateChecker down the left. The “DriverPack Mass Storage xx.xx” should be visible and say it’s up to date. If it’s not there, check the folder you placed the 7z file in from step 3 and click Refresh.
5. Click the Next arrow a few times or click on Settings -> Location and click on the Browse button. Locate the folder containing the contents of the XP CD you should have copied over before starting the tutorial.
6. Navigate to Settings -> DriverPacks and put a tick next to “DriverPack Mass Storage xx.xx”. Make sure it has also put a tick next to “DriverPack Mass Storage text mode – Update ‘F6’ drivers”.
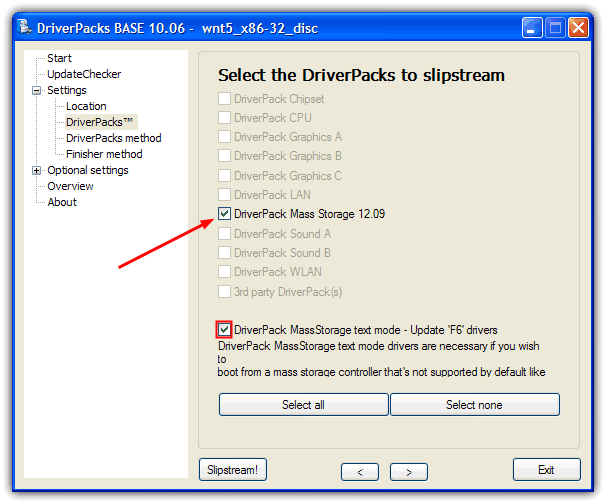
No other settings need to be configured so you can now press Slipstream! to begin the integration. Unfortunately, once complete the DriverPacks tool cannot create an ISO to be burned back to CD, you can either install nLite or download and run a useful portable tool called RyanVM Integrator.
7. Download the RyanVM Integrator tool, run it and click on the Make ISO tab.
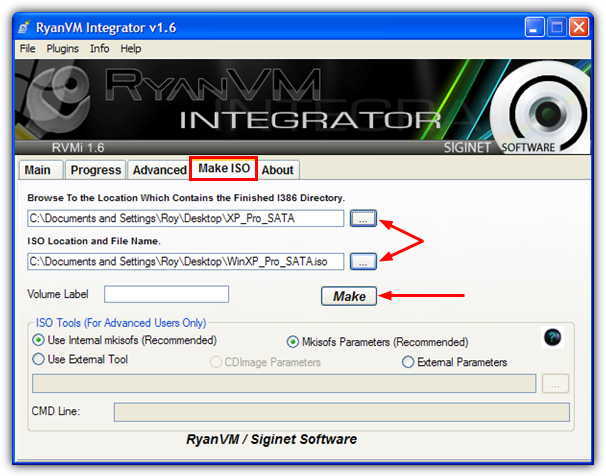
8. Use the top browse button to locate the XP folder on your hard drive, the next browse button for the ISO save name and location, and then press the Make button. The finished ISO will then be ready to be burned back to CD, use your favorite ISO burning software or choose one from our list of 10 free ISO burning tools. Or alternatively, write the XP ISO to USB for a faster Windows installation.
Now you have a new Windows XP CD/DVD that contains the SATA/RAID drivers needed to get your system running in AHCI/RAID mode without the need for a floppy drive. Boot your laptop or desktop with the new XP CD and install as normal without needing to press F6.

I am a novice.
I have a ASUS ROG Strix B450-F Gaming II AMD AM4 3rd Gen Ryzen ATX Gaming Motherboard.
ASUS does not have specific F6 floppy drivers for my motherboard.
I used Method 2 to slipstream generic drivers into an updated XP installation disk.
My problem is that this disk will not boot. I have tried multiple programs to create an ISO file and to burn ISO files to DVDs and CDs. None of them will work.
Do you have any suggestion to fix my booting problem???
Hi All, Thanks Ray, The extraction of ‘intel matrix’ was a little typical ( only intel tells/knows that ! ) It gave ‘win all’ > ‘driver’ & ‘driver64’ folders. There were 6-6 files in ‘driver’ & ‘driver64’. I chose ‘driver’ for 32 bit drivers & considered 6 files as F6 drivers & it worked !
Thank you, still working
(downloaded Intel “”STOR_Win7_XP_11.2.0.1006” driver to my desktop,
extracted it with 7 zip, and
updated driver from device manager)
and on restart changed BIOS from ata to ahci
2 minutes to fix something that Ive tried to fix for over a week !!!
Try this before anything else
5 STAR ! thanks again
Hi, I have tried both options (followed to the letter) on my CF-30 Toughbook but am still getting the I01_INITIALIZATION_FAILED error. Any other ideas ? Thanks
Raymond, I see that this tutorial has been here for many years, and I am certain that your advice here has been used many more times than you will ever know. So few people take the time to say thanks.
I’m not one of those people though. This page was a MASSIVE help to me.
I tried a few “fixes” which came to nothing, then I got to here.
Top quality tutorial, and it worked a treat.
Thank you a million times!
Bob
Thank you sir!! This is realy very usefull.Windows xp is the best operating system.
NLite seems to be good. The problem is that I can’t afford to pay out $45+ just so that I can use it for one installation.
There’s got to be an ISO file with the SATA drivers already on it, but every one I’ve downloaded doesn’t.
It’ll be easier to buy a second hand laptop with XP64 already on it.
Where did you get the idea NLite will cost money, it’s always been completely free?
Poster most likely confused NLite with Nuhi’s NTLite, targetted at Windows 7 and up, which had a price tag of $45 at one point (for the Home or Pro version).
That’s probably right, but if the user follows the link on this page it takes them straight to the nLite website, no need to go anywhere near NTLite.
OMG THANK YOU SOOOO MUCH!!!!!! Acidentally wiped hard drive, had windows vienna cd on usb, tryed to install,didn’t work, remembered i had some linux distros too on the usb, booted them, saw this and LITERALLY chanting “I’m gonna fix it! I’m gonna fix it” Me Being Crowd “He’s gonna fix it, he’s gonna fix it!” THANK YOU SOOOOO MUCH, and Thank god for that windows iso and Virtualbox installed :)
Thanks Dear,
I was looking for solution to slipstream the drivers.
My laptop HDD is crashed and its not available in the market (2.5″ 40Gb Ide) so I am planning to install Windows OS on Pen drive and I found Nlite solution very useful to add custom made driver’s in to Installation Disk.
I will update(post) tomorrow, once I done it !!
Thanks again.
Respect!
Your info help me overcome my XP installation problem
this is a very useful tool.. doing a xp install on an old pc and i needed some drivers, thanks for the tutorial
Finally, it’s working!!!
Yeah!! thanks!!
Super Guru!!!!
cool
Dude-you are genius!!!
Thank you so much for taking the time to help out others, and post screenshots and such
I hope you get blessed in return for your kindness, you deserve it.
Thanks again.
That was really helpful…. I almost spent half a day trying to sort it out, now it is working fine Thanks
I’ve tried to find the drivers for my PC but i couldn’t, then some guy sent me a link to some driver and i used your tutorial to integrate the drivers but windows couldn’t find the hard drive.
I could solve my problems with DriverPackage thanks to your tutorial.
I believe this is the best way to do this…
Thanks man!
Dear, you saved my time and my money by reading your post. This trick was very easy and helpful to me
Many thanks
Thank you so much for this great info. I was able to slipstream the drivers using Nlite and install XP Professional on my laptop. I have never done this before and it was really pretty easy and your instructions were excellent.
Thank you for your helpful
Your instructions to integrate raid drivers was easy and not hard to understand , thank you very much for all the information .
This was a lifesaver. Saved me lot of headache and pain. It worked flawlessly and I was able to integrate the SATA raid drivers into the xp install CD. What a relief!!!! I am absolutely amazed at the nlite software. It is wonderful free utility. I was almost going to buy a pack of floppy disk and external floppy drive. Saved me money! Excellent demonstration. You should definitely be compensated for saving all of us further headache and pain. I would not mind donating.
i’ve been searching all days in the net for good tutorial
and i’ve found this.. very easy to understand
thanks
very good, thank dude..for your information :D
man you saved me! thanks for your help.
Thanks for your attention to this questions.
Thank you for your instructions.
It helped having clear and concise directions. nLite is pretty simple but it is nice to know what to expect.
Was able to use this method to slipstream ICH10R RAID drivers into Windows Server 2003 Enterprise x64 using the driver files provided by Supermicro for my X8SAX.
I hope someone else in the same situation finds these directions.. I really didn’t want to install a floppy drive in my new server!
Very easy to understand, and do, hehe, even i could do it, and that says alot :)
great help for me, saved my day.
love and gratitude raymond….. long live
Hello Everyone specially the moderator & the one who gave advise, A million thanks to you… i can now sleep the whole night today because i already fix my acer laptop, im already planning to go to technician but it amazingly find your post…. thanks.
Hi.Everyone. Thanks a million. I am really happy. I dont know how to thank you. And by the way, good luck for you all. It really helps me much. Thank you again.
I just want to say thanks, your tutorial help me out with the headache i had.
It works fine
Thanks for your support
Wow, perfect tutorial. Wasted hours to try with a floppy disk, driver would load with F6 in setup, but wouldnt after the XP setup started to copy the files to the hard drive. I integrated the SATA driver with help of your tutorial, voila, worked at the second try, the first try i forgot to REMOVE the floppy disk.
Thanks for the help!
Excellent blog mate – I’ve just put it in my favorites.
Thanks Dude! Your Tutorial helped me cross the bridge.
raymond of all the tutorials ive found yours are the first one that really worked, thank you very much!
This article helped me tremendously. I had so much difficulties trying to install XP on a Sony Laptop that was purchased with Vista Home Edition and had a SATA hard drive.
Once I integrated the necessary driver and created my own boot CD, everything was a breeze.
Great job.
Sam
Simple, explicit, to the point and easy. Great work and thanks a lot.
Thanks Raymond, this is one of the best and rare tutorial I found.
Dharam
You are freaking awesome!!!! This worked perfectly!!! I can’t believe how easy this was. ThANK YOU!!!!
Great job, work 100%
thanks
Nice tutorial – works perfectly. Why couldn’t Microsoft have just included these drivers on SP2 discs, or offered an ISO download with up-to-date drivers? Anyway, thanks – I still have some hair left thanks to this.
I spent two days and 3 CD that ended being a coaster.
I found your guide and…
Yeah it worked. Thanks men for your detailed info.
i can’t still believe it!
you are the genius!
the best tutor in my life!
thank you
oh my god it worked…
its not that tough to do.
your tutorial rocks man… thanks a lot
god bless you
Great work Raymond,
……Thanks……
It’s working…………
Thanks !
Perfect… Thanks a lot for your article
great tutorials ray!
thanks a lot!
your blog really helpfull!!!
rock on dude!
Thanks Raymond, very helpfull!