How to use Wake-on-LAN Commands for Turning PC Remotely
Here are more Wake onLAN options…
Wake-on-LAN from the Command Line
Using the command Prompt or PowerShell to send Wake-on-LAN packets to another computer can be quite useful for business, and professional users, in batch scripts, and to make desktop shortcuts.
7. WakeUp
In terms of ease of use, a command line tool won’t come much simpler than this. WakeUp is very simple to use and only requires the MAC address of the remote computer as an argument. The MAC address has to be in the format of colon separators or no separators at all (e.g. aa:bb:11:55:a1 or aabb1155a1).
WakeUp MAC address
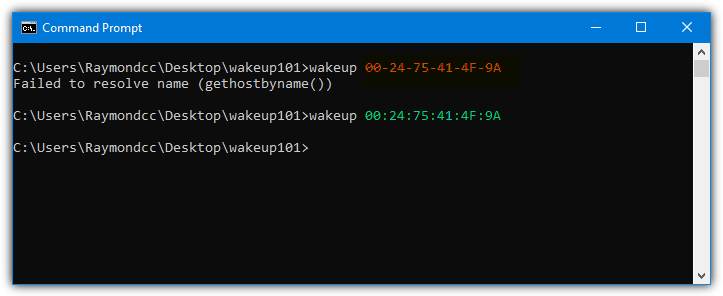
The tool or its website does not mention the actual port WakeUp uses, but we found that it was using port 40000.
8. Wake On Lan Command Line (WolCmd)
This tool is another entry in our list by Depicus and is a simple command line tool to send the Wake-on-LAN signal. The syntax is quite simple.
WolCmd [MAC address] [IP address] [Subnet mask] [Port]
An example would look like this:
wolcmd 26-63-A4-79-B8-12 192.168.0.40 255.255.255.0 9
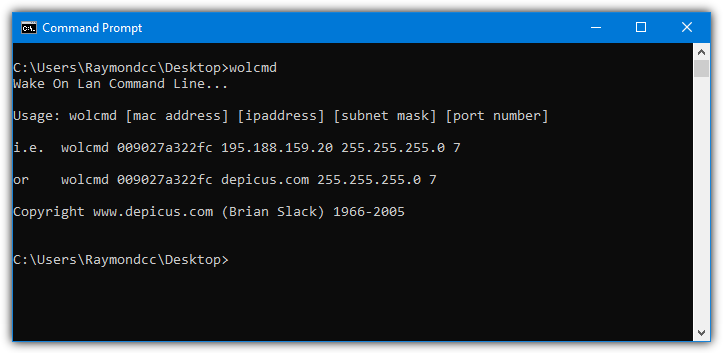
The MAC address, IP address, and subnet are required but the port will default to 7 if you don’t supply one. A version is also available for Mac OS.
Download Wake On Lan Command Line (WolCmd)
9. Gammadyne WOL
WOL is another relatively easy tool to use and it only requires supplying the MAC address of the target computer although more arguments can be supplied if required.
WOL MAC address [IP address] [port] [/pwd password] [/d subnet]
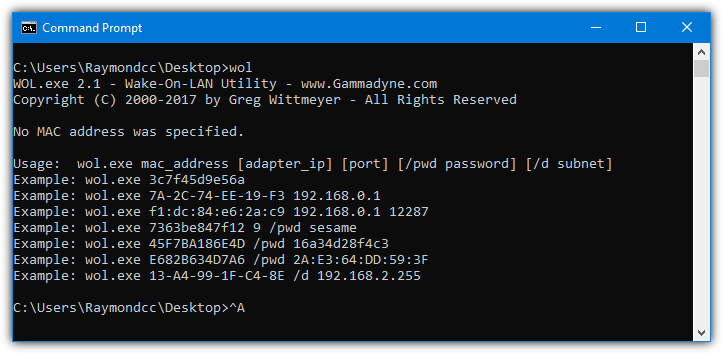
The IP address, port, and subnet are optional but may be required in some situations. Port 12287 will be used by default if nothing is added to the command. A password option is also available but you will have needed to set things up to accept a password.
Use Wake-on-LAN to Start a Computer From your Smartphone
If you are unable to send the magic packet to your PC from another computer, an alternative option is sending it from another device like a smartphone or tablet. There are loads of apps around and the Android app we’ll look at is free, popular, and does the job quite nicely.
10. Wake On Lan for Android
This app is quite easy to use because if the computer to start up remotely is switched on and available on the local network, you can find it automatically. Just press the add button and select the device from the list. Its IP and MAC addresses will be added so you don’t have to do anything else. If you are connecting from outside the LAN, replace the local IP with the external IP or add a new connection manually.
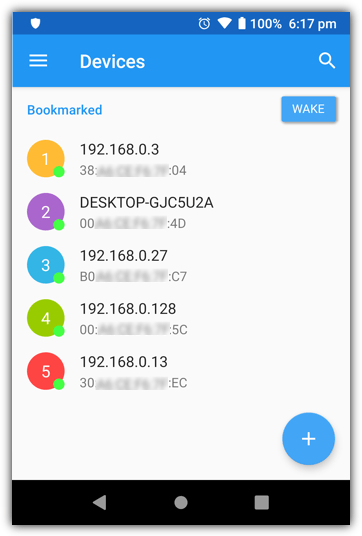
All you have to do is press one of the devices in the bookmarks list to start the computer remotely. A handy function is the ability to add a widget to your home screen that can send the packet data to a selected device just by pressing the icon. By default the magic packet is sent three times, it can be changed up or down in the app settings.
Download Wake On Lan for Android
Test Wake-on-LAN is Working in Windows
If Wake-on-LAN isn’t working or you just want to test to see if the remote computer is receiving the necessary magic packet data, try using one of the tools below.
Wake-on-LAN Sniffer
Wake-on-LAN Sniffer is a very simple to use and portable tool that will give you various bits of information about magic packet data being sent to the target computer. All you have to do is launch the program on the computer that will receive the Wake-on-LAN signal and it will watch all ports for the incoming data.
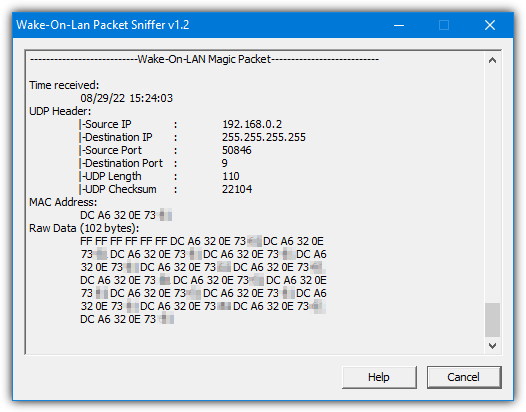
When valid data is received, details will be displayed for time, source/destination IP, source/destination port, UDP length and checksum, MAC address, and the magic packet data. You may have to manually add an exception for Wake-on-LAN Sniffer through your firewall if nothing is displayed.
Wake On Lan Monitor
Wake on Lan Monitor is another tool from Depicus software and it can be used to test if the magic packet is reaching the target computer. Launch the tool on the computer you want to send the WOL signal to, set the required port, and press Start.
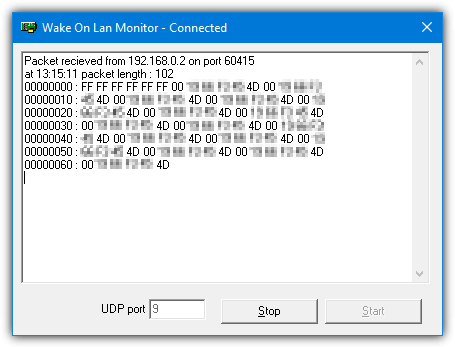
Note that different programs default to different ports when sending the magic packet. For instance, FUSION WakeUp on Lan and WakeMeOnLan default to port 40000 while WakeOnLANx defaults to port 7. The command line tools also default to different ports from each other. If you are not required to set a port in the program, make sure you know what its default is during testing.
Make Sure Your Computer is Wake-on-LAN Ready
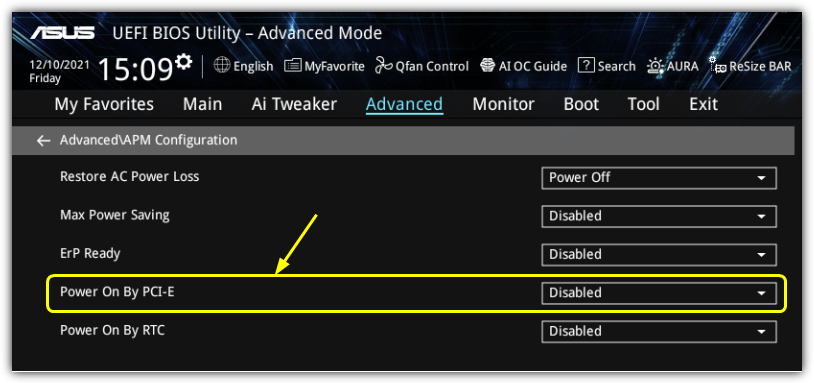
To enable the Wake-on-LAN feature, it first needs to be enabled in the BIOS. The option is usually quite obvious and should be easy to spot whether you have a more modern UEFI or a traditional BIOS.
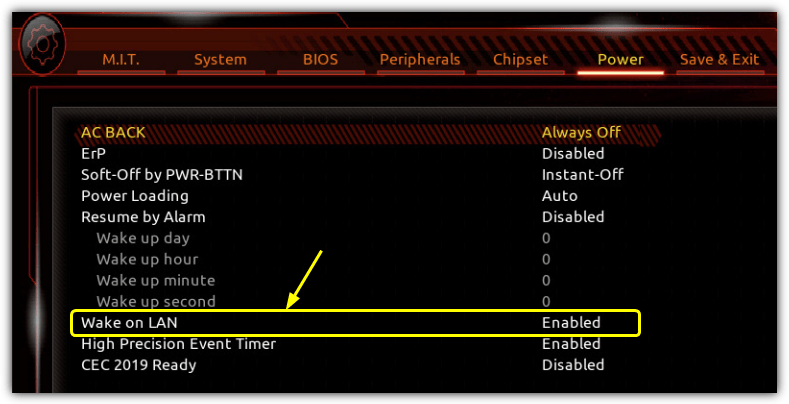
In addition to this, you may have to enable another option to get WOL working. It’s called “PCI Devices power on” or “Power On By PCI-E” in the ACPI/APM configuration or power management settings. Some motherboards may have a similar option called “Resume by PCI-E Device/Intel Onboard LAN”. If you are not sure, turn all related options on and work backward when turning them off.
You also need to make sure the LAN driver in Windows has the WOL feature enabled. Right click on (My) Computer > Manage > Device Manager > Network adapters. Double click on your Ethernet controller and look in the Advanced tab for “Wake on LAN”, “Wake from shutdown”, “Wake on Magic Packet” or similar.
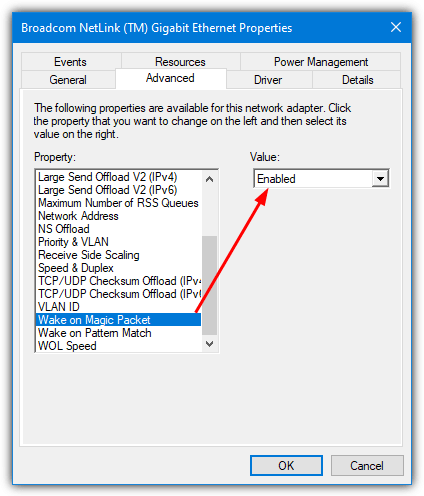
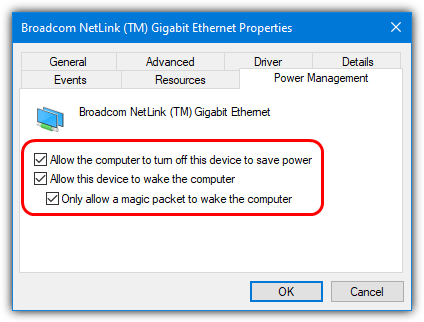
Make sure it’s enabled. Also, go into the Power Management tab and check “Allow the computer to turn off this device to save power”, “Allow this device to wake the computer”, and optionally “Only allow magic packets to wake the computer”.
While the system is switched off, make sure power is still getting to the network adapter by checking to see if the light is on near the connector on the motherboard or card. If not there is no power going to it then other settings may need adjusting.
Disabling Windows Fast Start-up
In addition to the BIOS and network adapter settings above, there is another option in Windows 8/10/11 that can stop Wake-on-LAN from working. And this can happen even if Wake on LAN Monitor has confirmed magic packets are being sent and received correctly.
The option is called “Fast start-up” by Windows which is like a modified hibernate. While it can speed up boot times from power down, the computer doesn’t listen for incoming magic packets in this mode. To get Wake-on-LAN to work, the option needs to be disabled.
Disable Fast Start-up From Control Panel
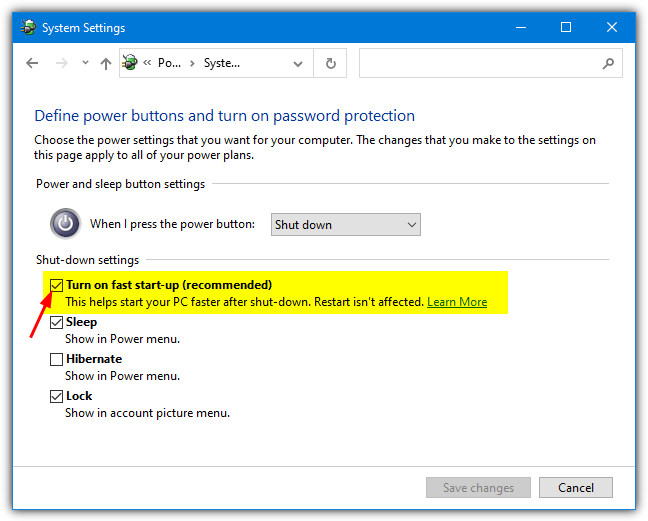
1. Open Control Panel and go to Power Options. On the left side of the window, click the blue “Choose what the power buttons do” link.
2. In the Shutdown settings section, you will see the “Turn on fast start-up (recommended)” option. If this is already unchecked, then it’s not causing a problem with your Wake-on-LAN. Simply uncheck the box and click Save changes.
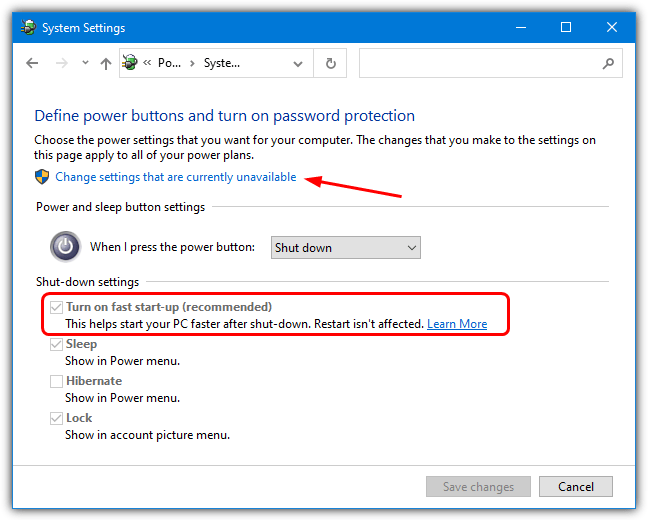
3. The option may be enabled but greyed out if you are not an administrator or have UAC turned on. If you find this is the case, simply click the “Change settings that are currently unavailable” link near the top. You can now turn off fast start-up.
Disable Fast Start-up From Command Prompt
This option will completely disable hibernation and therefore hybrid boot on your system and the fast start-up option will disappear from Control Panel’s power options.
Powercfg -h off
Open an administrator Command Prompt and enter the above command. If you tried the Control Panel option first and found the check box was not there, this is probably why. Changing off to on will obviously bring the option back.
Disable Fast Start-up From The Registry
This last method simply unchecks the fast start-up box in Power Options as if you went into Control Panel and unchecked it yourself. The only difference is you don’t need to open Command Prompt or Control Panel to do it. Simply download and double click on the Hiberboot_off.reg file to import the data.
Download Fast Start-up Registry Files
Another .REG file is included in the Zip archive to enable the option again should you wish to do so.

Despite it’s apparent complexity all above, Those methods are known and relatively easy to apply.
However, no one so far presents how to turn ON/OFF PC with simple electrical switch, or in other words:
“How to create a replica of PC ON/OFF switch with LED indicator using cable and whatever hardware connected to PC?”
“Does any body to know where to acquire such a hardware?”
Thank you in advance for useful information in this matter.
You can use a ESP-32 or ESP-8266 wired to your motherboard with a relay and control remotely to start and stop your computer without making it in waking.
There is no simple ‘DOS’ command like PING?
You would not want this. Providing a SECURE WOL solution is what makes it usable. If just anyone can wake up your computer, they can probably hack into it and cause all sorts of problems. You want WOL to be secure.
So, are these programs required on both devices? Because if not, I don’t feel like they add any real level of security. As anyone that would want to hack into you system would probably have their own version of a program like these.
Additionally, tools like Teamviewer, R-HUB remote support servers etc. also provide remotely turning on and accessing the computers. You can use the same.
I found ipowerany.com also can wake up over internet. You can user another computer like Teamviewer or Raspberry PI. Very easy to use it!
How you can wake up on LAN your PC if you’re not in the same network?
Page 2 might help you with that, those options can WOL over the internet which is essentially the same thing.
this is “8 programms to use wake-on-lan to turn your computer on” describing exactly ONE way (WOL) – it is not 8 ways to turn a computer on … grrr :-P
We called it 8 ways to… because there are not 8 programs or 8 websites, but a mixture. And you only have so many characters for a title.
turn on and wake up is 2 completely different things.. thats what he meant. Its clickbait in essence xD
Wake on LAN will “turn on” your computer from off, wake up brings the computer out of sleep/standby. Two different things but “wake” is used for both.
Also, the commenter above did not mean the difference between turn on and wake, he was unhappy that the title says “8 ways…” when he believes there’s only one way mentioned.
The PC that I wanted to start up has to be on Wi-Fi due to practicality. what I did was get one of those remote controlled smart outlets and set the BIOS to default to power on. I have a UPS and a gas generator so I’m not going to lose power to that PC otherwise. I just shut down the PC as normal then cut the power for about 30 seconds when I want to start it up.
if the power to the network adapter is off while the computer is off, you need to be able to send a broadcast to it to wake it up.
in order to do that, an always on 3rd party device is needed that is in your home network like a tablet or old phone.
for that i wrote an app called wol proxy for android which can do the broadcast for you and still allow you to wake the PC:
play.google.com/store/apps/details?id=com.bianco.wolproxy&hl=en
Hello, i am in brazil! Thanks ( Muito Obrigado!)
Super !!!!
Thanks a lot…
For Android users – small app to wake up your PC
play.google.com/store/apps/details?id=ru.freask.pcwakeup
Description here develop.freask.ru/android/vklyuchenie-kompyutera-udalyonno-so-smartfona-na-android.html
It works even in cases where the computer behind the router NAT and port forwarding does not work (and it does not help if the PC is turned off).
thanks
Thanks a lot for providing the information!
I really needed something like this so that I could manage turning on my desktop when I am in college, and fetching necessary files.
Cheers!
This is exactly what I was looking for for years. Thanks Raymond.
Excellent work! :)
We have been trying to implement this technology for our college project, and this article of yours was indeed helpful. :)
thank you i just recently know about wake on lan
one of the best articles i’ve read recently… thank you very much!
Ha I woke up all my school pcs by this thanks
Good article! I tested a WOL for my Asus system and it worked like a charm. Saved me driving an hour to turn the PC on!
Cheers!
You are just a genius ….
Jeez….crazy
wow friend damn good, great for guys like me (net administrators)
excellent ! & Thanks
Hi Raymond, this is really helpful. I was about to get a timer hardware to switch my office computer on and off at set timings. My only problem was I need to turn it on at times when the hardware is set to “off”. Have racked my brains over this…until I read what you’ve posted. A million thanks!
Thanks my friend, your post was of great help. It saved me a lot of money. I was going to buy a remote power switch and “ATX push to on” from Deltronix. Thanks again.
Very informative, thank you so much! I’ve been looking for a way to turn my computer on from school + use logmein =)
Hi, Ray
You are a great man.
WHAT A NICE THING!!!! YOU JUST SAVE ME LOT WORK HOURS, because someone have lost the keys of the server’s room, I had to work remotly, but, for a mistake turned off the server, but, I was able to turn it on again with the software Fusion WOL, thanks a lot for your advise.
Nice article, I already use VNC to control my machine but sometimes I forget to leave my PC on. This will help a lot, the only thing I need now is a decent router which supports dynDNS.
Very cool!!! I used the wake up from the internet entered my home IP and MAC addy from my office and Voila! My home computer turned on. I used a remote support proggy to turn computer off and access everything THANKS!!!!!
Great Post Buddy.
I blog it in my blog.
Thanks….
cool, thanks Ray!!
very helpful way Raymond good work
Well Mr Raymond,
Your site is really the Top!
I’ll be nearly 1 Year that I’m here as a member on this BLOG!
I’m really proud to be a member of Raymond blog.
Thanks for all!