How To Remove, Clear, Reveal, Unlock or Reset BIOS Security Password

Any amateur computer technician should know how to reset BIOS passwords that can be setup from within the BIOS because there are times when they need access to change some configuration options such as the boot order or disable functions like AHCI mode. If a password has been set, you cannot enter the BIOS or sometimes even boot the computer itself unless you know it, and this can be a real headache if nobody knows what the password is. It’s becoming increasingly common due to the amount of computers changing hands these days and previous owners have set a password and not passed on that information.
The most common way that most of us know for resetting or clearing the BIOS password is to physically remove the power from the computer by disconnecting all cables and removing the battery from the motherboard for a few minutes. Another way is to short the clear CMOS jumper on the motherboard itself if one is present. These methods work because on most desktop and a few laptop motherboards, a battery is used to sustain the BIOS/CMOS settings. By cutting off the power, the BIOS/CMOS settings and password will be erased.
If for some reason you’re unable to reset the computer’s BIOS security password by removing the battery or clearing the CMOS jumper, and you don’t know what the password is, here are several options which you can try out to clear it.
Generic Backdoor Default Passwords

Before using any tools that try to reset or make changes to your BIOS, it’s worth seeing if any of the well known backdoor or default passwords that have been around for some time work. Click on the link below to view the list, the passwords are case sensitive.
View BIOS Default Backdoor Passwords
If you can Boot into Windows
CMOS De-Animator is an up to date tool compared to the majority of BIOS hacking/resetting tools out there, and can reset the BIOS password from within Windows. The latest version 2 executable of CMOS De-Animator is compatible with both 32-bit and 64-bit operating systems.
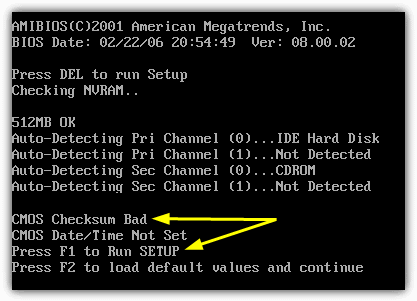
All you need to do is run the tool as administrator (right click -> “Run as administrator”) and click the Proceed button followed by restarting the computer. When your computer boots up, you should see a CMOS checksum error where it allows you to access the BIOS without a password. CMOS De-Animator works by invalidating the checksum of your system’s CMOS memory which resets all settings to default and clears any stored BIOS passwords upon reboot.
CMOS De-Animator also has a basic backup and restore option to give you that extra little bit of added security, the file will be stored with a .dea extension. Do take note of the authors warnings about the problematic nature of using the program on laptops and that usage of CMOS De-Animator is at your own risk. Because of its nature the program will sometimes trigger false positives in antivirus software and on sites like Virus Total.
If you Cannot Boot From Hard Drive or CD
Although disconnecting the power and removing the battery from the motherboard on desktop computers for a few minutes should remove the password, this is much less likely to work on laptops, but it’s still possible on some older models. For extra security the passwords for laptops are usually stored on a separate EEPROM chip which doesn’t rely on the BIOS battery and is unaffected by cutting the power.
If you enter the wrong password a few times on a laptop, there will be a message that the laptop is locked. You will be presented with something like a “System Disabled” or “Password check failed. System Halted” message with some numbers. If this message appears while entering the BIOS you can simply power off and on the computer to remove it and try again. Take note of the number because it’s a valuable piece of information and required to generate the BIOS backdoor password to get back into the laptop.

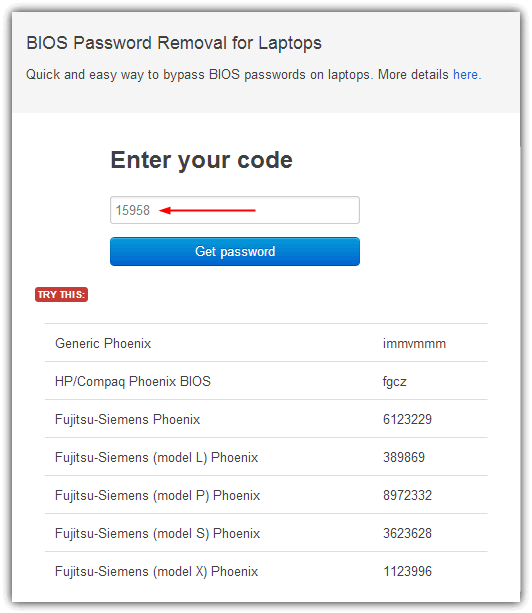
All you need to do is to have the number to hand and then visit the BIOS Master Password Generator webpage. This website has been setup to let you easily get the possible passwords based on the number entered, simply enter it and press the button. Then look at the results and note all the passwords which are close to your model of laptop.
Try the codes on the locked BIOS message to see if it works, depending on laptop models you may need to press Enter or Ctrl+Enter after entering the code. The codes used are based on the work of “Dogbert” who’s done a lot of research and created a number of small utilities and also Python scripts for unlocking several different brands of laptop.
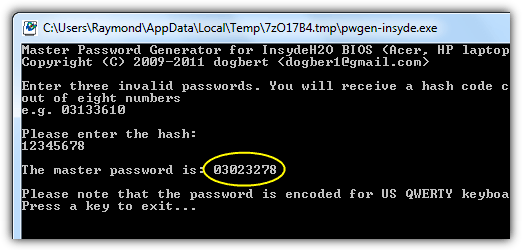
If the website above or its codes don’t work, visit Dogbert’s Blog where you will be able to find more details about your laptop brand and download a separate master password utility for it. To use one of the programs, simply download the correct one for your laptop and run it, then type in the number and hit enter. The master password will be displayed for you to try and unlock the computer.
You have to run the master password tool on a computer that can boot into Windows and has .NET installed. If you don’t know which tool to use, it’s safe to try all of them until you find the one that matches your laptop.
There are a number of other reset BIOS password solutions on page 2.
If you can boot from CD/USB
When Windows doesn’t boot properly and you cannot get into the BIOS to change the boot order, you could be lucky enough that booting to CD or USB might already be set at a higher priority than booting to Windows and simply inserting a CD or flash drive will boot to it automatically. It’s also possible that CD or USB booting could be just below hard drives in the order, in which case you would need to temporarily disconnect the hard drive(s).
If you can still access Windows, another solution to enable CD/USB booting is using a great tool called Plop Boot Manager. What it does is allow booting from these devices even if the system BIOS doesn’t support the function or the boot order is not accessible. Even if you don’t want it for this purpose, Plop is a great tool to know about for using on older computers.
Here are some tools which can be used by booting from the relevant CD or USB flash drive. Simply burn the downloaded ISO file to a disc or use one of these ISO to USB tools.
PC CMOS Cleaner

PC CMOS Cleaner is able to recover, remove, decode and display the user or supervisor password stored in the BIOS irrespective of the machine brand. Award, American Megatrends (AMI), Compaq, Phoenix, Samsung, IBM, Compaq, DTK, Thinkpad, Sony, Toshiba are all in the list of supported BIOSes so there’s a good chance your BIOS is included. PC CMOS Cleaner is a bootable Linux CD so you don’t have to worry about operating system compatibility. On launch the program will first try to decrypt and display a list of possible passwords. Failing that, you can choose to remove the password using two options, the second of which will completely reset the BIOS to defaults so you’ll have to go and reconfigure it afterwards.
CmosPwd by CGSecurity
This is one of the more up to date and popular CMOS decryption tools although it’s still quite old dating back to 2007. CmosPwd decrypts the password stored in the CMOS and displays it. The following BIOSes are supported:
- ACER/IBM BIOS
- AMI BIOS
- AMI WinBIOS 2.5
- Award 4.5x/4.6x/6.0
- Compaq (1992)
- Compaq (New version)
- IBM (PS/2, Activa, Thinkpad)
- Packard Bell
- Phoenix 1.00.09.AC0 (1994), a486 1.03, 1.04, 1.10 A03, 4.05 rev 1.02.943, 4.06 rev 1.13.1107
- Phoenix 4 release 6 (User)
- Gateway Solo – Phoenix 4.0 release 6
- Toshiba
- Zenith AMI
With CmosPwd, you can also backup, restore, erase or even kill the CMOS. CmosPwd is included in the Hirens Boot CD DOS programs menu. Select “9. Next” -> “2. BIOS/CMOS Tools” -> “2. BIOS Cracker 5.0 (cmospwd)”. There’s also a version you can run from within Windows which is available on the CGSecurity website along with some useful information.
!Bios by eleventh alliance
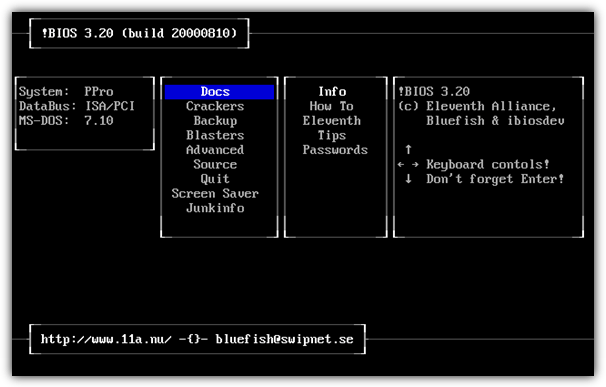
!Bios is a tool that was developed for a brute force attack on BIOS passwords. You can also backup and restore the BIOS and there’s even a Blaster option where can blank certain parts of the BIOS in the hope of removing the password, a powerful and potentially dangerous option because it could completely corrupt the BIOS. !Bios can try and crack the passwords used in some common BIOSes including various versions by IBM, American Megatrends (AMI), Award and also Phoenix. It’s a very old tool dating back to the late 90’s so is unlikely to work effectively on more recent computers.
Like CmosPwd, !Bios is also included in the Dos Programs menu of Hirens Boot CD. Select “9. Next” -> “2. BIOS/CMOS Tools” -> “4. !BIOS 3.20 (ibios)”. You can also download a separate !Bios Windows tool.
Invalidating the CMOS Checksum Manually
If you prefer to do it manually rather than relying on automated programs or the other tools like CMOS De-Animator aren’t working, it is possible to reset the BIOS password by using the debug.exe tool which will invalidate the CMOS checksum in a similar way to CMOS De-Animator. This can be achieved by typing two commands into the debug tool if you first boot up the computer in FreeDOS. Here are the instructions.
1. Install FreeDOS on a USB flash drive using Rufus or UNetbootin.
2. Download the debug.exe tool and save it to the root of your USB flash drive.
3. Boot up the computer with your USB flash drive and type the following commands: (take note that the second and third commands start with the letter O and not the number zero.)
debug
o 70 2E
o 71 FF
quit
4. Restart your computer with Ctrl + Alt + Del and you should encounter an error message like “CMOS checksum error” which is normal. You can now access the CMOS setup without entering a password.

Improve this guide

User forum
0 messages