7 Free Tools to Enable Two or More Mouse Cursors
Everybody knows that when using Windows and other desktop based point and click operating systems, a cursor appears on the screen. This tells you where the active area is to perform specific actions at any given point in time. There are several ways to move the cursor around, including laptop touchpads, trackballs, mice, and even keyboards.
Even if you plug in more than one device that can move the cursor around, you will only ever get one visible cursor on the screen. All the connected devices will then be able to move the single cursor. While this is by design, you might want to have more than one user interact with the desktop at the same time or have one user on one monitor and another have a separate cursor on a second monitor.
Functions like these are not possible in Windows without using third party software. Here we show you seven free programs that allow more than one mouse cursor on the screen at once. They were tested on Windows 10 64-bit.
1. TeamPlayer4 LiteTeamPlayer used to be an expensive piece of shareware but it now looks like the company has gone and the product is discontinued. Thankfully, there are a couple of free versions of TeamPlayer floating around the internet that still work. TeamPlayer4 Lite is from 2016 and allows for two mouse cursors on screen at once.
After install, the main window will open and all you have to do is press the “Start Session” button. If you have two mice already connected, their cursors will each turn a different color and you can start moving them independently. They are not truly independent because if one user is pressing a mouse button, the other user cannot press a button until the first user has finished, and the cursor turns into a cross.
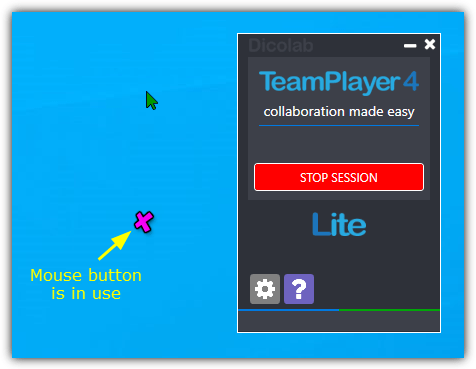
Just press Stop Session to revert back to a single mouse cursor. TeamPlayer4 has no settings to configure and both the options window and the about icon will simply send you to non existent web pages.
2. TeamPlayer 2.0.10 Free
This older beta version of TeamPlayer dates way back to 2008 but we tried it in the latest Windows 10 64-bit and it still works. It’s free for personal use, doesn’t expire and accepts up to three mouse/keyboard users at once. That’s a useful advantage over TeamPLayer4 Lite if you need the third user.
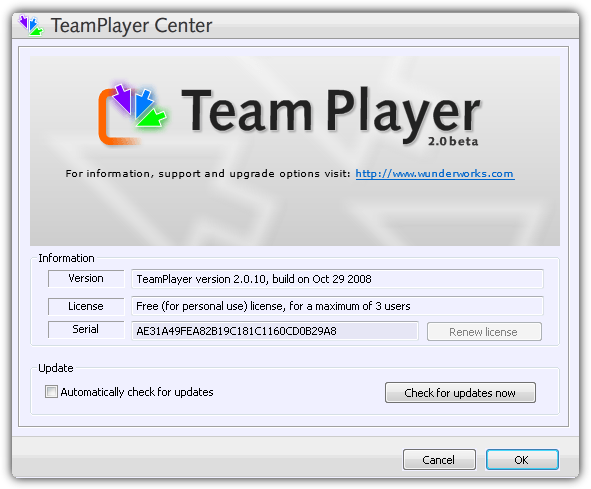
The one available checkbox in the user interface is to check for updates which doesn’t work. Make sure you have plugged in the mice and keyboards before launching this TeamPlayer as it doesn’t recognize new devices while running. During launch, 64-bit users will be shown a 64-bit beta warning which can be ignored.
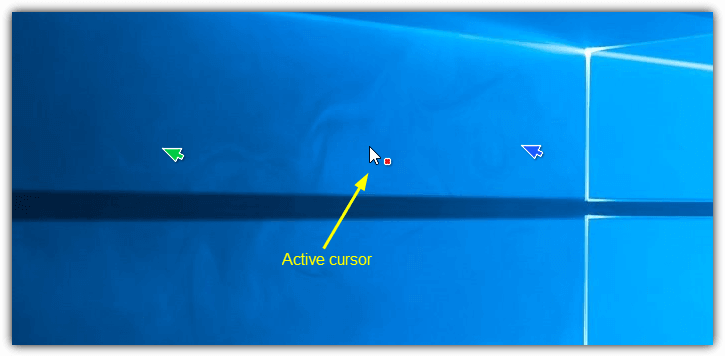
On screen there will be up to three mouse cursors, each with its own color. The white cursor with a colored square is active and can be used for left or right click actions. The other cursors can be moved freely and you simply left click to take control and make that mouse active. TeamPlayer 2 works reasonably well but we did encounter a few minor issues, which might be expected of a program this old.
Download TeamPlayer 2.0.10 Free
3. MouseMux
MouseMux is by a former lead engineer at TeamPlayer. Currently, MouseMux is still in beta and betas are free to use. However, we are unsure if the project is still ongoing as there has been no activity since May 2019. There are three different modes in MouseMux; Native Mode, Switched Input, and Multiplex Input.
Native is the Windows default of a single cursor. Switched input mode lets you have several cursors moving independently on screen but only one at a time has access to click actions (like TeamPlayer). Multiplex is experimental and tries to give all users access to cursor movement and left/right clicks.
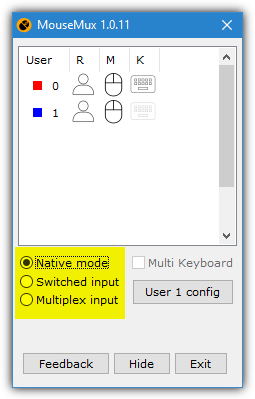
After installation, the small main window will open and you only really need to select the mode to use. We’d recommend Switched input as Multiplex is not stable and a disclaimer will warn you if you try to use it. While in Switched mode, the on screen cursors can be moved around as you wish and in Windows 10 any window under each cursor can use scrolling with the mouse wheel.
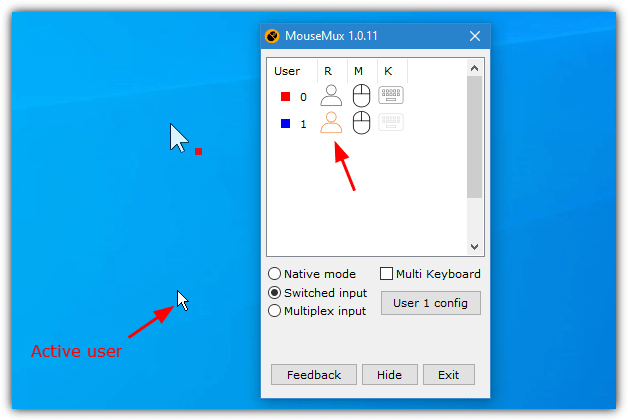
The active cursor will be the standard cursor while the cursors that don’t have control will be larger with a colored square. The user icon will be highlighted orange in the program window for which user has control. The mouse icon will also light up when a user moves the mouse. MouseMux does have a few options to configure each mouse, such as movement speed, right button as primary and double click speed.
4. EitherMouse
EitherMouse is created in the AutoHotKey scripting language and is primarily designed to have different settings for each mouse when you have more than one connected. The program is freeware and has portable and installer versions available for download. Do note the installer version can produce false positives in antivirus scanners and software which the developer is aware of.
The drawback of EitherMouse in this scenario is you can’t control more than one mouse cursor at a time. Operate mouse and cursor one, then stop and operate mouse and cursor two. Trying to move both at once will cause issues. It’s not really a fault of the program as we don’t think that was the intended goal.
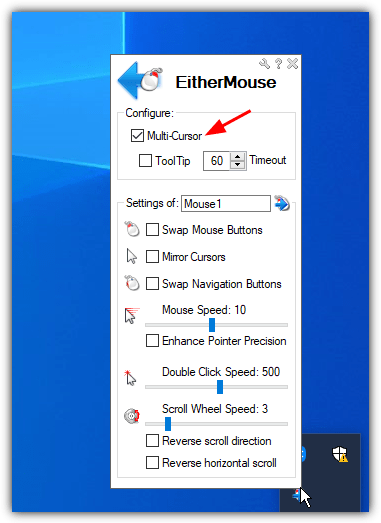
Once the program is installed or the portable executable is launched, all you have to do is click the icon in the system tray to open the settings. Click the top option of “Multi-Cursor” and a second cursor will appear on the screen. Whichever mouse is being used, the options window will show the individual settings for that mouse.
You can swap mouse buttons, mirror cursors, change pointer/click/scroll speeds and reverse scroll directions. A few more options are available from the menu when you click the spanner icon at the top of the window (including Exit). If you are someone that would like one mouse on the primary monitor and another on the secondary monitor to reduce physical movement, EitherMouse could be quite useful.
5. Pluralinput
Pluralinput is still in beta and has not had any updates since 2017. If it ever comes out of beta the program will be shareware. Sadly, there appears to be many bugs and issues with Pluralinput and the website has a disclaimer on its homepage saying as much. We highly recommend that you have system backups to hand. Note that Pluralinput installs and runs without confirmation when double clicking on the installer.
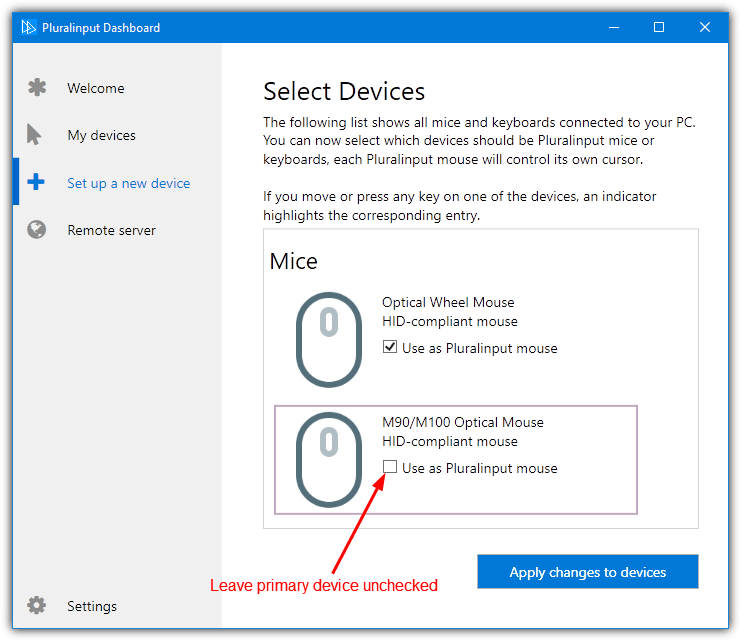
Insert extra mice and any keyboards you want to use before running the installer to make things easier. In the Pluralinput Dashboard, click on “Set up a new device” and it will show the connected devices. DO NOT check all boxes to use as a Pluralinput device. Check only the boxes for additional mice and leave your primary mouse alone. Including everything could render the system virtually unusable.
Pluralinput installs its own mouse and keyboard driver for the devices you have selected. The primary mouse will have its normal white cursor and the additional mice will have brightly colored cursors. Pluralinput controlled mice are quite buggy and many things cannot be clicked or right clicked on properly. It’s best to use it as a pointer only and nothing else where possible.
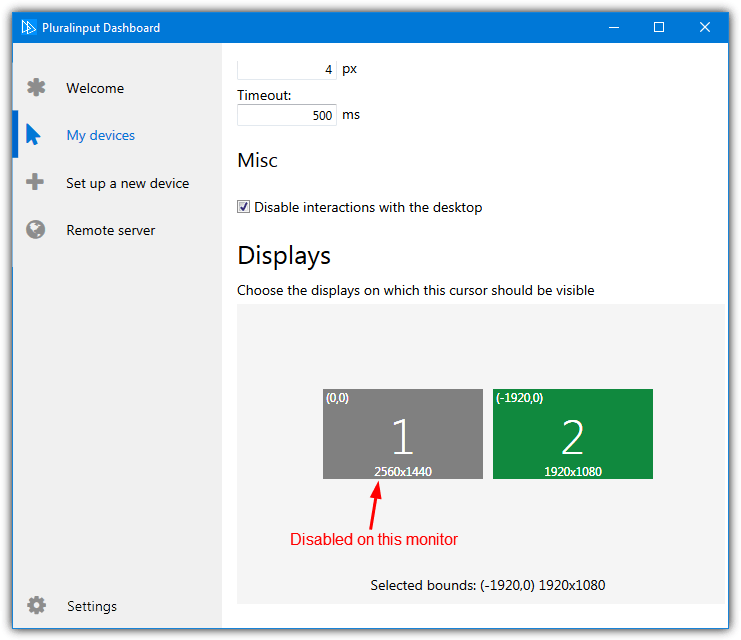
From the Preferences window, you can change pointer color and size, invert axis, swap or disable buttons, double click timeout, and display selection. This last option is useful because you can restrict the mouse cursor to only appear on specific monitors of a multi monitor setup.
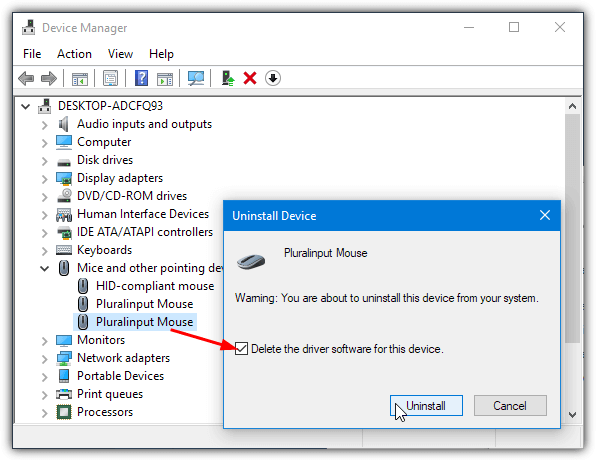
An issue when uninstalling the program is it doesn’t always uninstall the Pluralinput mouse or keyboard driver. You will need to go to Device Manager and manually uninstall the driver by also selecting the option to “Delete the driver software for this device”. Then scan for hardware changes or reconnect the devices. For more information how to do this, refer to the support article on the Pluralinput website.
Virtual Machine Software
These last two options are different from the others because they don’t control two mice on the same desktop. They allow two users to have two separate desktops and a separate mouse (and keyboard) to control each, but from a single computer.
When it’s set up, the second mouse and keyboard will operate only within the confines of the virtual machine. That makes it useful to open the virtual machine full screen on a second monitor and it will act as a separate PC with its own mouse and keyboard. Here’s how it’s done with the most popular free virtual machine software VirtualBox and VMWare WorkStation Player.
6. VirtualBox
Capturing a mouse to be used exclusively in VirtualBox is very easy and just a couple of clicks. Start the virtual machine, open the Devices menu, highlight USB and click on the mouse (or keyboard) to be captured. Alternatively, right click the USB icon at the bottom of the window and select the input device.
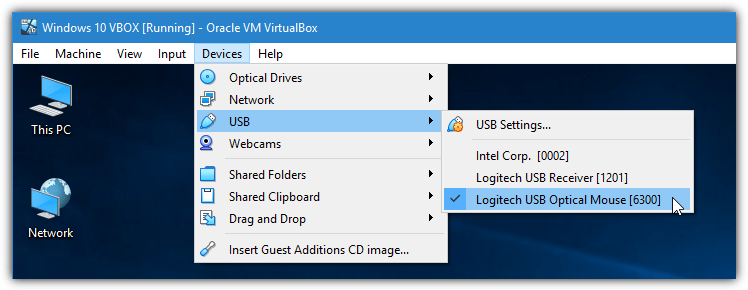
If your virtual machine has VirtualBox Guest Additions installed, go to the Input menu first and disable Mouse Integration. We’re not sure if it’s a bug or by design but we didn’t get a mouse pointer during testing if we connected a mouse while leaving mouse integration on.
It’s also possible to have a mouse connect to the VirtualBox virtual machine every time it starts. Click Devices > USB > “USB Settings…”, click the icon with a plus sign on the right and select the mouse (or keyboard).
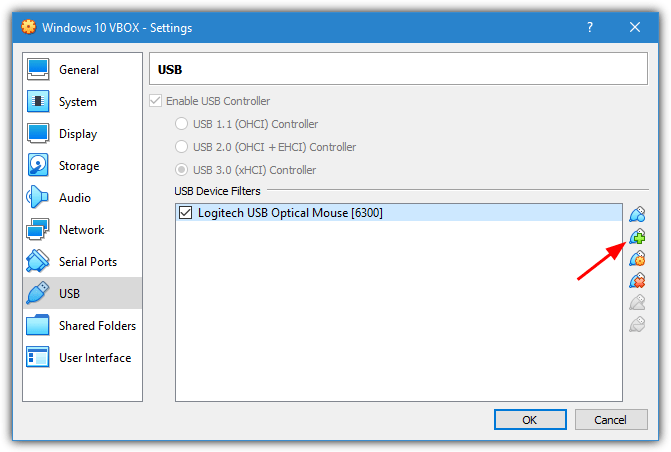
Next time the virtual machine is started, the mouse will automatically connect to the guest operating system. Because of the issue mention above, you still have to disable mouse integration manually each time or there won’t be a pointer in the virtual machine. You could uninstall Guest Additions but that obviously takes away advantages like shared folders/clipboard, better video, and etc.
7. VMWare WorkStation Player
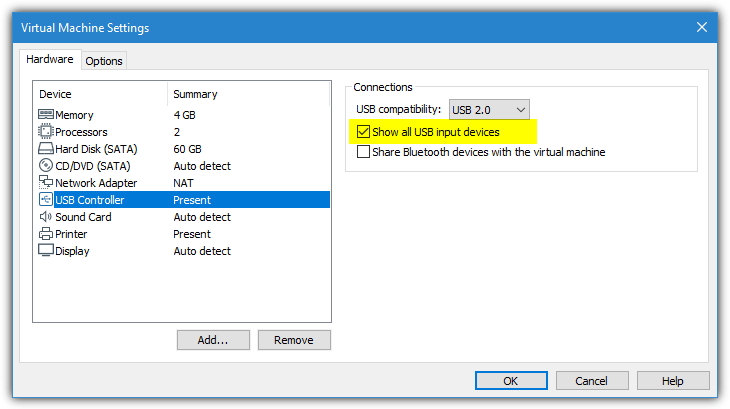
Before starting the virtual machine in VMWare WorkStation Player, an option has to be changed to show input devices as it’s not enabled by default.
Open the settings window of the virtual machine you want to use and go to the “USB Controller” device. Check the box “Show all USB input devices” and click OK. This option is greyed out if the virtual machine is not powered off.
Start the virtual machine with the second mouse (and keyboard) plugged in, open the Player menu > Removable Devices > Mouse name > “Connect (Disconnect from host)”. Alternatively, click “Show devices” near the top right, find the mouse by hovering over the icons, right click on it and select “Connect (Disconnect from host)”. Bluetooth is also an option if you have a Bluetooth keyboard.
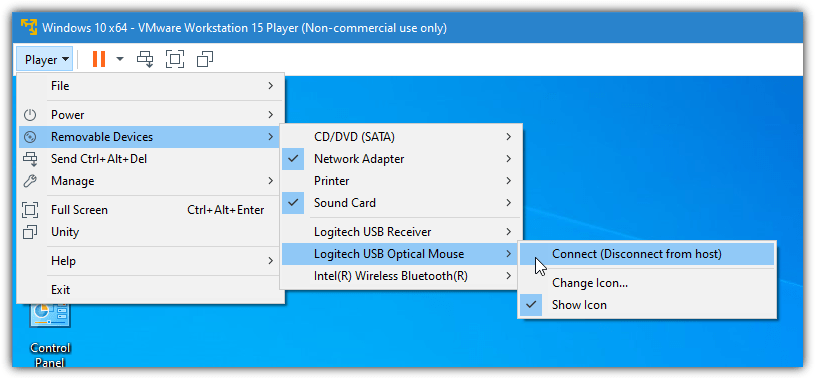
This option works well with dual input devices like the Logitech K400 Wireless Touch Keyboard as the keyboard and touchpad will both connect to the guest operating system by enabling just one device (Logitech USB Receiver). The Connect option will change to Disconnect if you want to do the reverse.
As far as we can tell, VMWare Player doesn’t allow you to permanently assign a second mouse to the virtual machine. You will have to attach it manually each time the virtual OS boots up.

I tried TeamPlayer 4 Lite as a means of fixing the problem with my secondary monitor which I use as a touchscreen. No joy unfortunately. The issue was that touching the touchscreen would cause the mouse pointer to move to the position touched. This is pretty annoying if you are using your touchscreen as a mix console and want to keep your mouse on your main monitor. Anyway there is a solution – use Touch Mouse Tools. It separates out your mouse and touch input so that you can use your touchscreen independently of your mouse. Here’s a link:
touchmousetools.com
I just released a new version of MouseMux! Many additional features and tons of bug fixes. Try it out! :) mousemux.com
Does anyone know any other software similar to Pluralinput?? I’m specifically looking to use one cursor for every monitor I have, and the “Display” option is very helpful…
i’m trying to play skyrim on one monitor on display port with a resolution of 1920×1080 and the 2nd on hdmi with a resolution of 1366×768
the mouse on the 2nd monitor disappears although you can still see the ‘hover’ trail. but even then, if you can figure out where your mouse is, it doesn’t ‘click’. so i cannot play either full screen or windowed mode skyrim on the d.p., and use the 2nd mouse to access the internet on the 2nd monitor
i’ve tried mousemux, teamplayer lite, teamplayer, and eithermouse. they all glitch. so now i either have to hook up a 2nd pc/mouse/keyboard to the 2nd monitor with 2nd set of ethernet/power cables, or purchase a 2nd d.p. monitor matching the first, and hope that the issue is with mismatched monitors
has anyone gotten these programs to work for gaming
How to use multiple keyboard on one PC
Use Keyboard Splitter Software
mouse mux
mouse muxtoo
Wait hold on a sec i mean like when your mouse moves there are tons of other mouses following that mouse
Each mouse has a different cursor on the screen, they don’t all control the same cursor.
I believe you are talking about “pointer trails” in windows mouse settings
I want to use 2 mouses as I use 2 hands. like multitouch. PC is too limited. :/ I’m ambi…
I want to find something similar. Have you solved this issue yet? :)
MouseMux rules! Thank you!
Thank you very much….
Hi guys!!!!!!!
I tried all of the programs in this page on windows 10. None of them worked fine!
This one works perfectly
mousemux.com
ENJOY!!!
You tried all the programs on this page and none of them worked, but you tried Mousemux and it worked perfectly?
It’s literally number 3 on our list, so one of your statements is clearly not true…
im looking similar program for a Mac computer…..
I remember there was a program that allowed to use 2 mouse, 2 keyboards, 2 screens and 2 soundcards in the same PC and each one will work on the pre-established group so the sound of one card will only work on the programs being displayed on that screen asigned for that group.
If I remeber correctly the name of the program was “between” but that was many years ago and I might be wrong in the spelling of the name.
why can’t operate two applications of WPF at the same time?
Try EitherMouse, free and works great. No need to install, there´s a zip option.
@Ian: Thanks. Looks like it’s also useful for switching hands. This hadn’t occurred to me as a way of protecting against repetative injuries.
Thanks also to RaymondCC for all the great articles over the years. Been lurking for a looooooong time.
Please help, whenever I use it there is an error sign next to my additional mouse, please help!
Try here:
download.cnet.com/TeamPlayer4-Lite/3001-2654_4-76476280.html
As far as I know, it supports two mice.
Nice ty
The main site has a download button right in the center of the page which pops up a small window to download the file. If you don’t see the small popup window it’s possible you have something in your browser blocking it.
Has anyone ever tried to connect this with the “keymouse” concept from a few years ago? I’m not a programmer, but having two cursors that can be controlled simultaneously while still using the keys would be amazing.
Thanks
So cool to see Teamplayer is still getting love. I was the lead engineer at the time and did most of the work on it. Unfortunately the CEO of the company killed all creative (and commercial) efforts fairly soon after and I think he’s still trying to sell the original Teamplayer (at 300$ or something, he seems to be deleting the negative google reviews :) Anway good old times. I was always fascinated by how to emulate multiple mice and wrote something new last year, it’s free and still in development but handles lots of stuff better than the good old rusty Teamplayer (in those years setups didn’t have per-monitor DPI and UWP etc). You can download it at mousemux.com – do let me know if you have questions or requests – I enjoy getting feedback from people who really feel it’s useful and want to have some specific feature.
Thanks for letting us know about your new software project.
Thanks, I will try this, the other apps above did not work for me.
I need a multi mouse app for use with multiple monitors.
Hello
Unfortunately, the install was halted by Awast. Can you confirm this is a false positive ?
Thanks
Thank you for picking up where Teamplayer left off, just installed your beta and its awesome! Exactly what I was looking for. I’m a left in a right-hand world and I’ve been using a right hand mouse most of my career, I have my home system set-up with one mouse/keyboard on a usb-switch to bounce between work and home laptops and now, thanks to mousemux when I am working on my home laptop I can control things on two different screens. It would be nice to have both mice have complete independent control, scrolling clicking independently, but I mean, I’m talking I just installed the software so I’m still learning and adjusting to this new fantastic ability!
@mcleods: Someone mentioned EitherMouse (free) here earlier. It allows you to swap settings automatically, swap hands, and use multiple cursors. You could try that. I haven’t tried it yet but I downloaded it today.
@RaymondCC: Please review Eithermouse and Mousemux for us. Thanks.
@Gibster
Thank you so much for both programs. These allow my husband and me to spend time together without buying another computer.
windows 10 64bit. Tried version 2 and 4 team player. Unable to get LBM to work on any set of mice. If i swap the left/right click on windows, then i can’t use the RMB.
For plurainput, yeah it just doesn’t show any mouse and i cant do anything. Uninstalling didn’t work. had to manually remove drivers using keyboard short cuts.
thanks.
Thank you so much for the article! This is what I wanted.
Hey, just wanted to say thanks for the article. I wanted to have 2 pointers so that I could have 1 per monitor, so that I don’t have to keep moving my mouse between monitors, and this worked well :)
Is there anyone to help how to config second Keyboard
on laptop?
I just gave this a try. It seems when you have multiple monitors it will not allow the mouse pointers to leave the primary screen. I’m running windows 7 64 bit.
With the advent of touch displays a lot of apps are becoming multi-touch so it only makes sense that an it be possible to use dual mouse pointers in the absence of a touch-screen display. I personally have found a need for this while using an Android emulator on windows 7. where the usual mouse functions like the zoom feature associated with the mouse wheel wont work. If I were using a tablet use dual touch to zoom in and out but without the use of a touch screen on my pc that simply wasn’t possible till I found this site. If my gratitude could be measured in cash you’d be a rich man. Thank you.
Thanks
One Question is how to put one mouse and one keyboard together as a pair
Is there any cons
Nice tip thanks
thanks raymond, i can use this during conference meeting. Very useful.
2 years ago i was looking something like this to play PES.now i found this on your blog.thanks raymond.Gotta try PES2009 right now!
I recently came accross your blog and have been reading along. I thought I would leave my first comment. I dont know what to say except that I have enjoyed reading. Nice blog. I will keep visiting this blog very often.
Barbara
This helps a lot…much thanks…
hi to all…thank you very much Raymond, this is good stuff…we are all grateful to you how you striving with us to be a good IT learners …..bye
thank you raymond.. for teaching how to work teamplayer…
Whoa!! Holy! This is brilliant! Just the thing I need, when I encountered this problem just yesterday; and I didnt know how to solve it. Thanx Ray!!
Thanks Raymond ..it’s very helpful
This was the software i was looking for! Thanks a lot man!
wow, nice i want that too
haha
thanks raymond
thank you very much
another great stuff and the animation is also fine
great tip ray but at the end where it says
We can can surely expect more features for TeamPlayer in future. you can see two cans
SERIOUS SAM split screen mutilplayer…finallyyyyy
Looks good
Wow!
This is Awesome! Thanks Raymond!
Excellent tip. Thanks Raymond