How to Speed Windows XP Boot: Quick Guide
One of the great things about XP is the the shear amount of configuration options and performance enhancing tweaks you can easily apply to it, with the ability to alter almost every part of the operation system if you want to. A well maintained XP installation can still boot pretty quick from a standard hard drive, even on lower spec machines, but users are always looking for ways to eek out those extra seconds to make it desktop usable even quicker. Highly used systems on the other hand, over time start to slow down and booting starts to take longer and longer.
As we know, claims by people that your PC could start 3 or 4 times quicker if you use their software is generally fanciful unless Windows has a severe problem in the first place. As XP is a tweakers paradise there are many tricks and techniques you can try yourself to help improve the time it takes to boot, possibly up to 50% or 60% in the right circumstances. And of course, this costs nothing but a bit of patience and your time!
Here’s a handful of useful tips and tricks to hopefully help get your Windows XP machine booting faster:Disabling Unnecessary Startup Programs
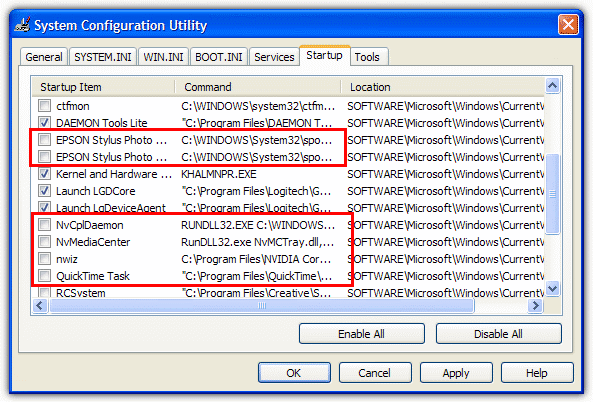
One of the most common ways of boosting startup performance is turning off many of the programs that start with Windows and usually appear in the system tray. A lot of software seems to try and install something that gets loaded during boot and a most of it is completely unnecessary for the software or hardware to function properly. To check your startup items:
Press Win key+R, type msconfig then press Enter. Go to the Startup tab and look at the items that have a tick beside them. Anything that you think you could do without, untick and then click OK. If you miss the program when you reboot and would like it back, simply go back to msconfig and tick the item again. A great cleaning tool that allows you to easily edit your startup items and much more besides, is CCleaner.
Stopping Windows Services you don’t need.
When Windows XP boots there are a number of background programs that also start called Services. A number of these services are loaded for tasks and features on your computer you may have no intention of ever using. As a result, turning these unneeded services off means they won’t try and start with Windows, reducing boot time and and memory used by the system.
Press Win key+R, type services.msc and press Enter. This will bring up the Services control panel and gives a useful description about the services and control over starting, stopping and disabling them.
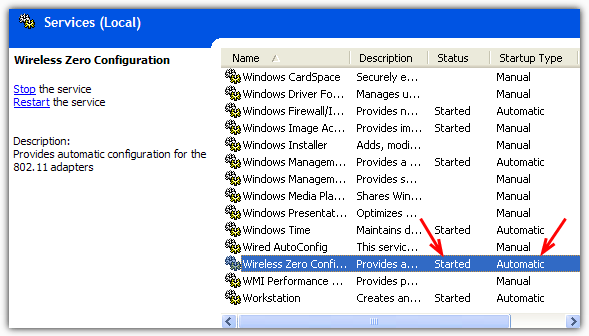
Services listed as “Automatic” are the ones that start with Windows, those listed as “Manual” are loaded only when required. Click on a service to get a brief description of its function. Look at the image above, the “Wireless Zero Configuration” service is running even though the system has no Wifi, so this service can be disabled. If you ever need to reset which services run and which don’t by default, have at look at out article on how to reset them.
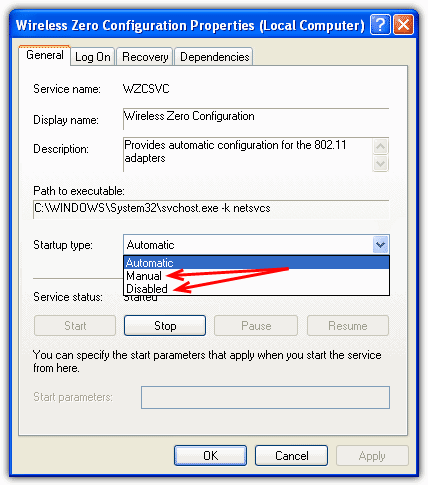
To disable a service, double click on it to open the properties window, click the “Startup Type” drop down, select Disabled, then Apply the change. On reboot the service won’t start. A great resource to get more information about Windows Services and what might be safe to disable is BlackViper’s Windows Service Configuration Guide. A useful compromise is if you’re not totally sure about whether the service will affect you, set it to Manual instead of disabled, this way the service will still load but only if called upon.
Turning off the Recent Documents History
By default Windows keeps track of all the documents, text files and pictures you open and shows you a list of the most recent in places such as the “My Recent Documents” option in the Start Menu. These lists are calculated during boot which adds a small amount of time to the boot process. If you can live without it, there’s no harm in disabling recent documents.
As this is controlled by an entry in the registry, we have made a couple of registry files which you just download, double click on and import. There’s 1 to disable recent documents, the other to enable again.
Download Disable Recent Documents Registry File
Download Enable Recent Documents Registry File
To do it manually open regedit and navigate to:
HKEY_CURRENT_USER\Software\Microsoft\Windows\CurrentVersion\Policies\Explorer
Right click Explorer -> New -> DWORD Value, and enter NoRecentDocsHistory as the name. Then double click on it and change the value to 1.
Rebooting the computer will cause the change to come into effect.
Disabling the Windows Logo Boot Screen
If you’re looking to squeeze every last second out of boot speed optimizing, disabling the boot logo will potentially save another few. The boot logo is the animated screen at the top of this article you see when booting. The only real downside to this is you won’t get to see secondary screens like the Windows Checkdisk screen if the system is trying to run a hard drive scan etc.
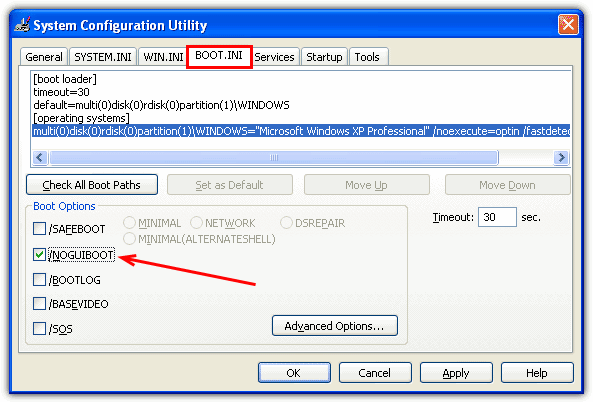
Turning the boot logo on and off is very easy, press Win key+R, type msconfig then press Enter. Go to the BOOT.INI tab and tick /NOGUIBOOT. Then press OK. Obviously, untick again to restore the boot logo.
Removing Old and Unneeded Fonts
Although this won’t save you huge chunks of time, having hundreds of fonts installed on your system increases the amount of time Windows needs to process and prepare them for use. If you have currently or previously installed software that makes a lot of use of fonts (Word, Publisher etc.) there could be loads of them that serve no purpose other than to slow things down a bit.
Simply create a new folder somewhere, on your Desktop for example, and open it. Go to Control Panel and open Fonts, now simply drag and drop the fonts you have no use for from Fonts in to the newly created folder.
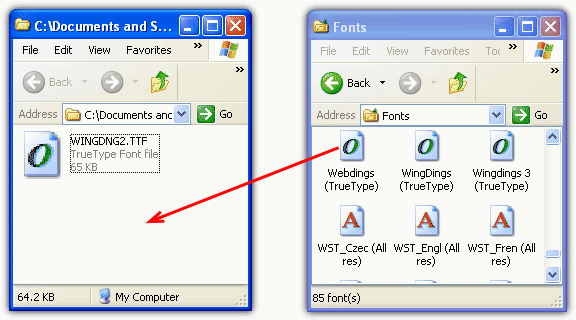
The reason for moving the fonts to another folder is just in case you find a program doesn’t function properly because a font was required, it can easily be copied back.
Disabling Remote Desktop and Remote Assistance
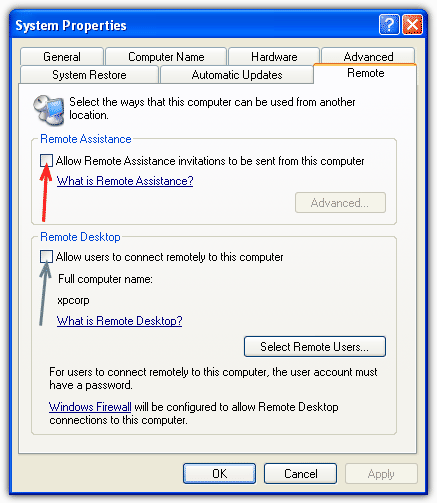
These 2 Windows features allow a Windows XP Professional user to take control of another Windows computer by gaining accessing its desktop, a valuable remote support tool. However, many users prefer these days to use 3rd party remote access software like Teamviewer or UltraVNC. If you have no need for these options, disabling them can save a tiny bit of time during boot. To do this, right click on “My Computer” either on the desktop or via the Start Menu, then click on the Remote tab.
Only XP Pro users will have the Remote Desktop option (grey arrow), both Pro and Home will have the Remote Assistance option (red arrow). Make sure all the boxes you have are unticked then click OK.
Removing the PPPoE Connection Delay
If you use a DSL router and connect via Ethernet you might experience a delay when Windows XP boots which can sometimes last up to 2 minutes. In that time you can’t open programs and windows, then eventually your network icon will pop into your tray and everything you have been clicking on appears all at once. This is due to a delay in Windows attempting to get an IP address for the network adapter.
To cure this problem, you need to set a manual IP address, if you don’t know how to do this, follow these simple steps to setup a manual address on a standard network. If your network is not a basic network, you might consider finding out more about setting a manual address to fit into your current configuration.
Right click on your tray network icon -> Status -> Support -> Details, and make a note of the IP Address, Subnet Mask, Default Gateway and DNS Server settings.

Click Close -> General tab -> Properties -> click on Internet Protocol (TCP/IP) in the box -> Properties button.
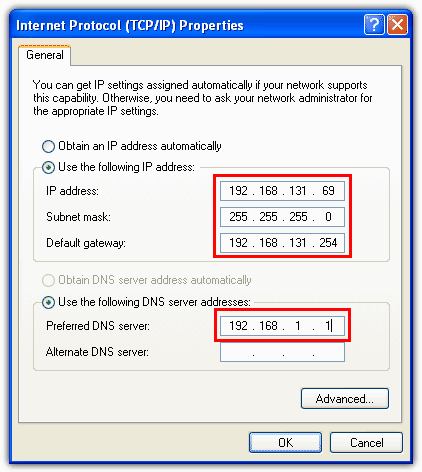
Click the “Use the following IP address” radio button and then enter the 4 sets of values you got from the Network Connection Details window. Click OK when done. If you have trouble accessing the internet, you may have done something wrong and will need to go back and check the settings or put them back to automatic. A tool to manage network settings with profiles is useful to try and make things a bit easier for you.
Even if you don’t have the PPPoE delay problem, setting a manual IP can help boot times anyway because Windows doesn’t have to spend time querying the network for an available IP address.
Reducing the Multi Boot Timeout
This last option is only if you use more than one operating system and use the Windows XP boot menu to select the o/s. The default timeout is 30 seconds but can be easily reduced. Right click “My Computer” -> Advanced tab -> Settings button in “Startup and Recovery” section
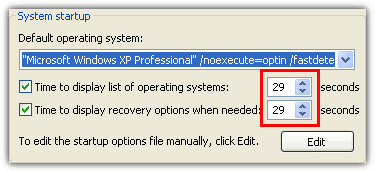
Simply change the top or both values to the desired amount and click OK when done.
Although this article has been written with Windows XP in mind, nearly all of these tips will work on Vista and 7 with only minor changes required.

Thank you so much
is it possible to apply a sort of this in Win Vista, 7, 8, 8.1 or 10
Yes, many of these will work with other versions of Windows besides XP.
Good article