Restore Unbootable Windows System using Offline System Restore
Every time you install new software such as applications, drivers, games, Windows updates and hotfixes onto your computer, changes are being made to the system files and registry. These changes are now and again not 100% successful and can cause problems. Sometimes an unstable piece of software or beta version, or even a Windows update can make your system misbehave and cause various performance or stability issues after installation.
Since Windows ME, there has been the function built into Windows called System Restore that allows you to easily go back to the way the system was before the problem occurred. This gives users the option of repairing Windows files and registry settings quickly if they don’t have sufficient time or knowledge to look for solutions to any problems. If you’re able to boot into Windows, then using System Restore to set your computer back is easily achieved by going to Start -> All Programs -> Accessories -> System Tools -> System Restore, and then selecting a restore point from before the issues started.
You might be unlucky enough for the problem to be severe enough for you not to be able to boot into Windows, and even Safe Mode doesn’t work. But before you think about restoring your PC completely using an image backup, the System restore option might get things going again. Getting to System Restore might not be that easy depending on your operating system. Windows Vista, 7 and 8 users have a few different ways to start a Restore if you can’t get into Windows, XP users have things slightly more difficult because System Restore isn’t officially available in an offline capacity.Here’s how you can restore your system from a restore point if you cannot boot into Windows at all. There are different methods for XP and Vista /7, and another for Windows 8.
Offline System Restore for Windows XP
Windows XP’s install CD has no options to perform a System Restore, but another Microsoft tool can. The Microsoft Diagnostics and Recovery Toolset (MSDaRT) is a bootable LiveCD that has a number of tools to perform various system repairs, an offline System Restore included. Some users may also know MSDaRT by another name, ERD Commander. This was on the popular Hiren’s Boot CD before they cleaned it up and took out the pirated commercial software.
1. Download and install the 30 day trial of MSDaRT. The program can only be downloaded from Microsoft themselves If you have a Technet or MSDN account, this supplied link is direct from Brothersoft but without their adware wrapper. MSDaRT has to be installed on a Windows XP/2000/2003 computer.
2. Once installed, go to C:\Program Files\Microsoft Diagnostics and Recovery Toolset\ and burn the erd50.iso image file to CD. Refer to our 10 Free Tools to Burn ISO Images article for software to do this.
3. Boot the computer using the disc that you’ve just burned. You may have to go into the BIOS and set the boot order so the computer can boot from CD/DVD.
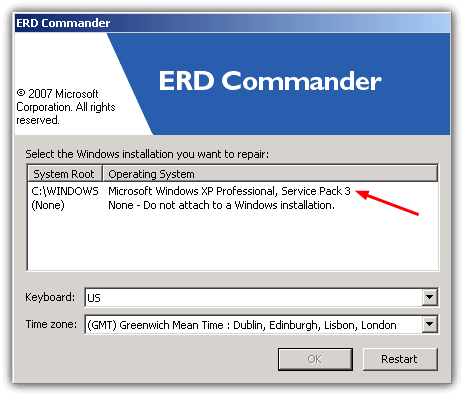
4. The network setup option can be skipped, you will then be asked to select the install, keyboard and timezone. Your Windows install with a root of C:\Windows should be available and highlighted, select it if not, then click OK.
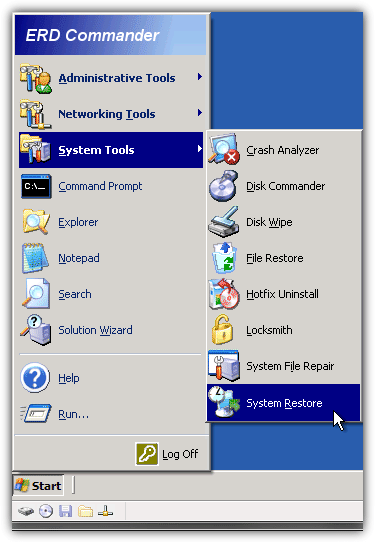
5. When ERD Commander has booted up to the desktop, click Start -> System Tools and run System Restore. Click Next on the first window.
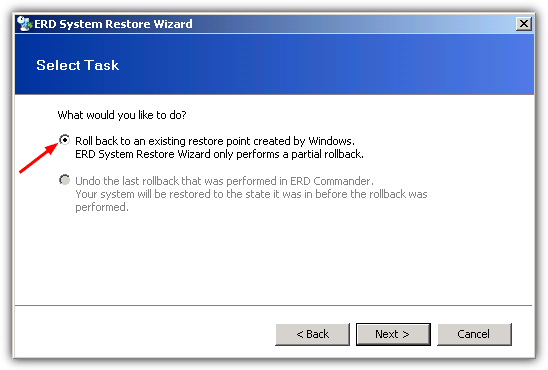
6. Select “Roll back to an existing restore point created by Windows” and click Next. Do note the sentence underneath this which states that a restore through ERD is a partial restore and not fully complete like you would get through Windows. If this is enough to get you into Windows, you can perform a more complete restore if needed later on.
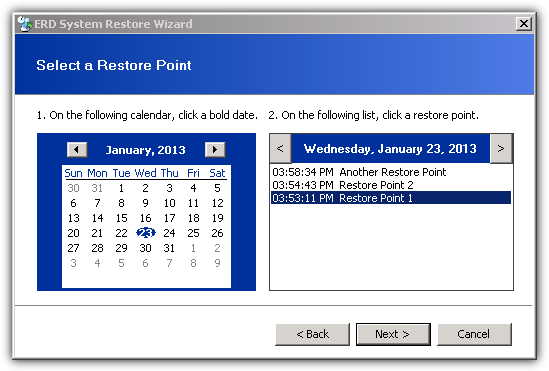
7. Select a restore point from the list available and click Next. The days or months can be changed using the arrows and calender display provided.
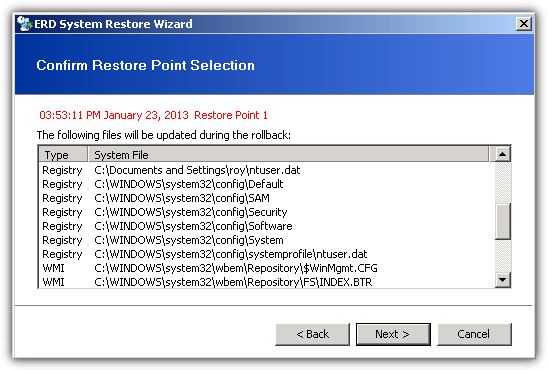
8. The next screen will display which areas of the system and registry will be restored, click Next and then Yes to confirm the rollback.
Once the ERD System Restore Wizard has completed, pressing the Finish button will restart your computer to complete the rollback process. Make sure to remove the CD or you could boot back into ERD.
If you want to perform an offline system restore for Windows Vista, 7 or Windows 8, refer to the guides on page 2.
Offline System Restore for Windows Vista and 7
Vista and 7 users have things slightly easier than XP users because an offline System Restore is available in 3 different options if the computer doesn’t boot. All of them are available either in the Advanced Boot options menu or from a Windows CD/DVD.
Using the Vista & 7 Advanced Boot Options menu
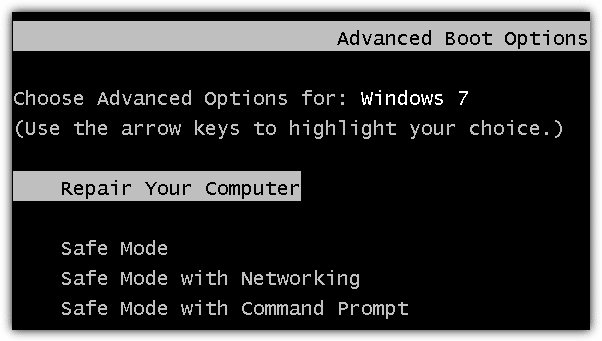
1. Press F8 during system boot, the same procedure if you’re going to Safe Mode. Then select Repair Your Computer. Not all systems will have this option, usually when you don’t let Windows create a 100MB hidden recovery partition during install. If not available, proceed to the CD/DVD solution.
2. When asked, select a keyboard layout, choose a username and enter a password if needed.
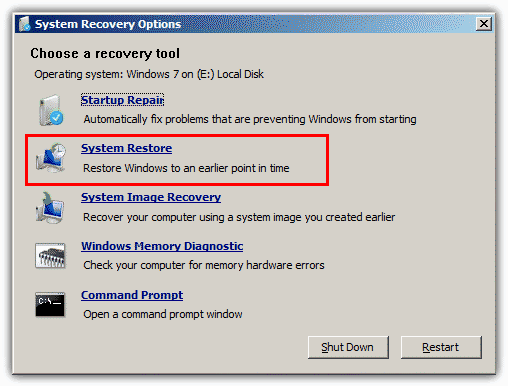
3. On the System Recovery Options menu, click System Restore then Next.
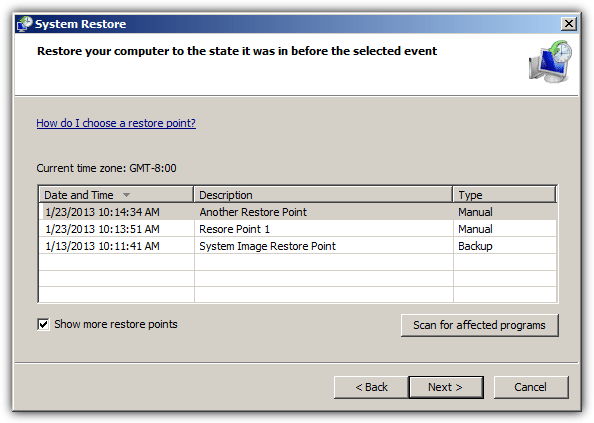
4. The option will then be available to select a restore point, select an appropriate point before the issue started and click Next. If you have any System Image backups available, they may also be listed here. The Type will be Backup and it should tell you in the description, they need to be avoided for now.
5. Check the information is correct in the confirmation window, click Finish and then Yes. After a successful restore, you will be asked to restart.
A Restore From a Windows Vista & 7 CD/DVD
If you can’t access or don’t have the option in the Advance Boot menu, you will need to start the computer with either a Windows system repair CD you created earlier from within Windows or a Windows install DVD. A Windows 7 ISO image can be downloaded if you need one. The ISO will then need burning to DVD or alternatively written onto USB flash drive.
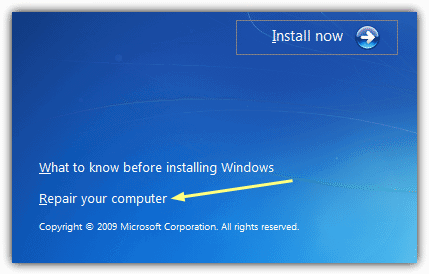
1. After booting your computer using the Windows disc or USB and after pressing any key, choose your language and keyboard layout, click Next and then click Repair your computer at the bottom.
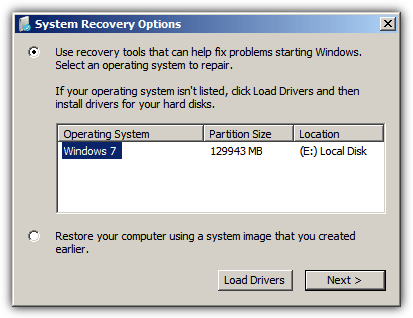
2. After the Windows install is searched for and detected, click on Next. You will now be at the System Recovery Options menu and can follow steps 3, 4 and 5 from the previous solution.
Offline System Restore for Windows 8
It seems Microsoft wasn’t content with confusing people in Windows itself, and they’ve also confused things when you try and get to System Restore and Safe Mode during boot. The timing window for when you need to press F8 has narrowed considerably and now you’ll miss it more often than not. Also, a large proportion of users seem to find Shift+F8 is needed to get there, not simply F8.
Windows 8 Boot Options
1. After you manage to press either F8 or the combination at the right time, you still cannot get straight to the options and Windows will try to diagnose and repair the system which could take considerable time if it wants to check your hard drive for errors. If you’re lucky, it might actually fix your problem, but always said it cannot repair the PC for us.
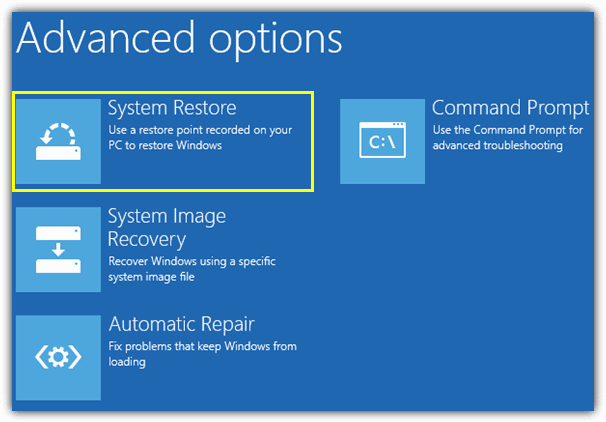
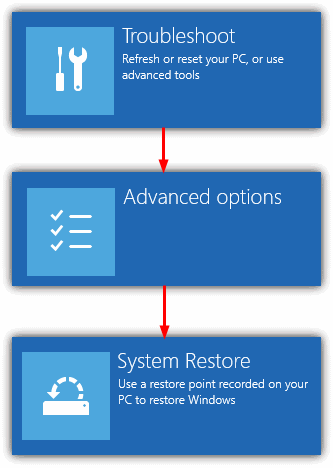
2. Eventually you should end up at a screen which offers Shutdown or Advanced options, press Advanced options -> Troubleshoot -> Advanced options -> System Restore.
3. Select an account and at the next screen enter a password if there is one. Click Next. From there, the procedure is the same as steps 4 and 5 in the “Using the Vista & 7 Advanced Boot Options menu” solution above.
The Windows 8 DVD / USB
1. Boot the computer using the Windows DVD or USB flash drive, make sure to press any key when prompted. Choose the language and keyboard layout, click Next and then click Repair your computer at the bottom.
2. Click Troubleshoot -> Advanced options -> System Restore.
3. Choose the target operating system of Windows 8 and click Next. Like the procedure above, follow steps 4 and 5 in the “Using the Vista & 7 Advanced Boot Options menu” solution.
Download the MSDaRT 5 TRIAL CD using Brothersoft Downloader and then carefully NOT INSTALL the Brothersoft Toolbar and NOT AGREE to use their Search and Homepage.
MSDaRT 5 is designed just for Windows 2000, Windows XP, Windows Server 2003.
Excellent article. Keep up the good work. Thank you.
thanks for it. you are really good.
Thanks. Work also with sata hd.
Once again Thanks Ray for this excellent tool…..
Great……
thanks again..
I do this manually. Booting from a Vista PE on my USB stick and copying the registry hives from the “_Restore” folder to the system32 folder.
very useful tip
Thank you Raymond
from Germany
THANKS A LOT RAY ! GREAT !
Hi,
I usually use the UBCD4WIN live system and select registry tools, and restore registry.
Not sure if this is better or worse than Microsoft tool as I did not try Microsoft tool.
You can also try to do a manual restore using live system that can look into the system restore snapshot folders, and copy the hives.
@(Vijay Nagarajan)
This is actually a Sysinternals tool that has been around for years now. Microsoft recently bought Sysinternals and now they are publishing the tools as their own. There are also many other very useful free tools.
Great Post !! This can really save your ass sometimes. Too bad its just a 30-day trial.
Damn, M$ make such tools as freeware …. Atleast until Win7 is officially released :)
extremely useful and essential information
Great relief. Thanks
Great post, we need more of such things !!
Thanks Ray !!!!
very great info raymond. i really need this tool as i always try new software on my pc.
Great tip mate, thanks a heap!
I have been useing ERD Commander for some time now it is a great program.
Enjoy :)
thanks ray i surely need this one :)
Thank you very much Ray!nice post!GOD bless!!!
its useful though~
Thanks ray!
TWO Thumbs UP Ray!!!
Great Great Great Great POST
Thanks a LOT