3 Ways to Install and Run Kaspersky Rescue Disk from USB Flash Drive
Of course, there are many good free antivirus packages around, but if somebody was to ask us which commercial antivirus or internet security package we would recommend to people, without a doubt, one of those at the top of the list would be Kaspersky. The detection rates are great and always among the best in A/V comparison tests, it’s loaded with features and doesn’t slow down your computer too much.
Something that has become popular in recent years are antivirus rescue CD’s that you can boot straight to without booting into Windows to help remove the most severe malware infections from your computer. Most of the major players in antivirus software have rescue CD’s available that you can use, the problem being some of the paid ones require you to actually have the full product to be able to download and use it. Kaspersky Rescue Disk 10 is different though, because you get all the great malware detection and removal abilities Kaspersky offers, and it’s completely free for anyone to use!
The Kaspersky Rescue Disk 10 comes as an ISO image which you can burn to an empty disc and boot up the computer with it. With USB flash drives becoming so common nowadays, and all newer generation motherboards supporting booting from USB (read this post if your BIOS doesn’t support USB booting), it makes sense to write the Kaspersky Rescue Disk onto a USB flash drive. Here’s a selection of ways do it.
First and foremost, you need to download the Kaspersky Rescue Disk 10 ISO file to your computer, file size is around 280MB.Download Kaspersky Rescue Disk 10
Then you need a tool to put the Kaspersky ISO onto USB flash drive.
1. Use the Official Kaspersky USB Rescue Disk
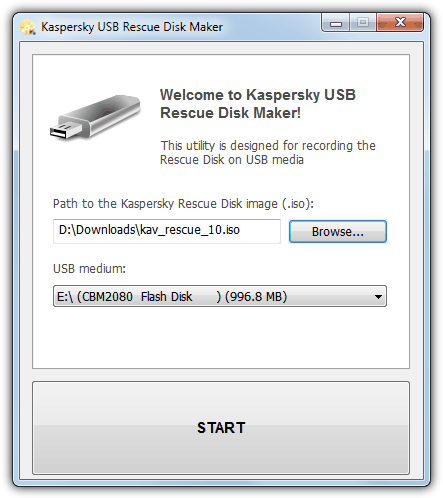
Like developers of other antivirus software, Kaspersky has realized many people want to take advantage of USB and install the rescue disk onto flash drive, so have provided their own USB maker tool.
1. Download the Kaspersky USB Rescue Disk Maker. Run rescue2usb.exe and click Install to extract the files to a folder of your choice. Kaspersky USB Rescue Disk Maker will automatically run.
2. Insert the USB flash drive into your computer and the program will detect it and the drive should appear in the the USB Medium drop down.

3. Click the Browse button and locate the Kaspersky Rescue Disk 10 ISO which you’ve downloaded previously.
4. Click Start and the tool will setup the USB drive with the rescue disk. If your flash drive isn’t already formatted with the FAT or FAT32 file systems, you will be prompted to let the tool format your USB flash drive as NTFS isn’t supported.
Although this tool will work in the majority of cases, if it doesn’t work for you or you’d like to use something different, here are some other tools that will do the job.
2. Install Kaspersky Rescue Disk with Universal USB Installer / YUMI
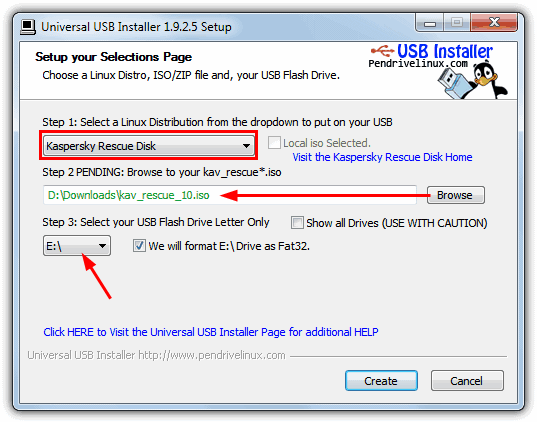
Universal USB Installer and YUMI both have a trick up their sleeve when it comes to installing the Kaspersky Rescue Disk because they can download the ISO for you. The only real difference between these 2 tools is YUMI allows you to setup a multiboot USB, they look and perform just about the same. The instructions below are for Universal USB Installer.
1. Download Universal USB Installer and then run the program. Alternatively, if you want to setup a multiboot USB, Download YUMI.
2. In Step 1, select Kaspersky Rescue Disk from the drop down menu. If you don’t have the ISO yet you can check the download box and it will automatically open your browser and begin the ISO download.

3. Press the Browse button and locate the ISO file which will then allow you to select the USB flash drive letter under step 3. An option is there to format the drive if it needs it (FAT or FAT32 is required).
4. Then simply Press the Create button and wait.
3. Use UNetbootin to Install the Kaspersky ISO to USB
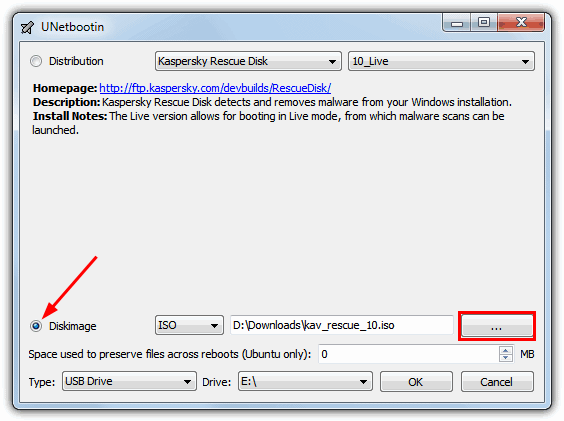
On the face of it, UNetbootin has a useful function to download the Kaspersky Rescue ISO directly from the website, but unfortunately it doesn’t work at this time so you need to get the file manually.
1. Download UNetbootin and run the program.
2. Insert the USB flash drive and make sure it’s formatted to FAT32 as UNbootin won’t warn you that an NTFS formatted drive won’t boot the rescue disk.

3. Click on the DiskImage button, then press the button to browse for the ISO file.
4. Make sure the Type is set to USB Drive, your USB flash drive letter is selected, then press OK to begin the write. UNbootin creates its own boot menu where you select either text mode or graphic mode but everything works the same.
Editor’s Note: There are plenty of other utilities to get the Kaspersky Rescue Disk onto USB, but these 3 methods are among the quickest and easiest ways to do it. XBoot and SARDU are a few other tools, although do be aware SARDU contains several adware options during install and needs to be setup with great care.


Hi All,
use Kaspersky’s portable updater utility 3.0 on a clean pc and set it for downloading updates for Kaspersky rescue disk. then run it ”manually/on schedule ” as desired , at least on the day of troubleshooting ! if you don’t remove updates from the download location ,it should probably just update the definitions already present each time and no massive downloads, only updates to the updates ! then copy updates to a removable media. boot the problematic pc with Kaspersky rescue disk and use the removable media with updates by attaching it to the problematic pc & update kaspersky rescue disk installation from it. here we are going to use two removable medias, one for kaspersky rescue disk installation and the second with updates. i don’t think it should matter if you prepare the media for kaspersky rescue disk with YUMI multiboot. i don’t know whether kaspersky rescue disk work for UEFI. but surely YUMI doesn’t , though YUMI UEFI Beta version is released ! Thanks & Regards.
*PLEASE* don’t follow any of the instructions in this article.
Ugh.
Do so will only cause a long lists of problems:
1. You’ll need to constantly download massive “definitions files”.
2. You’ll need to connect your heavily infected computer to your network…. thus infecting many other machines.
3. You’ll need to save the updates to *EVERY* computer you try to fix.
The correct way is to:
Use Easy2Boot.
1. You can download the definitions and save them directly to the USB flash drive.
2. You *NEVER* have to connect a badly infected computer to ANY network.
3. The definitions travel with you… so you can fix as many computers as you need WITHOUT constantly
downloading the definitions again and again and again.
I have been trying to get the rescue disk to boot off of the usb port on a surface pro running 8.1 for about 6 hours and it will not allow the disk to boot. None of the other Malware Company’s disks will boot either I might add. I don’t work with windows 8.1 much and apparently it just doesn’t like linux. Any suggestions would be greatly appreciated.
Thanks,
jimmyboy01
It’s probably related to the Secure Boot feature which prevents most Linux boot disks from working. I’m sorry I don’t know much about the Surface Pro but you could look in its BIOS if possible to see if Secure Boot can be disabled.
Good job!! Thx Raymond :)
Even if you use the Kaspersky Rescue Disk Maker, the updates are stored on the internal hard disk and not on the USB drive. This means when you boot from the USB drive on a different computer, you have to download the updates again (which are stored onto that computers internal HDD).
You can follow my blog post here to work around this (uses Easy2Boot which is a multiboot solution) so that the updates are stored on the USB drive:
rmprepusb.blogspot.co.uk/2014/04/adding-kaspersky-rescue-iso-to.html
Now we can use other software to make Bootable USB use KAV rescure disk ISO. One is Sardu. I installed it with KAV & it work well.
Thanks a lot raymond for this article. I have sandisk cruzer switch 16GB. I tried using rescue2usb but it always came up with a blank USB drive option (“please connect a USB drive” message). I have formatted the FD in FAT32 mode, and the OS already recognized it as a “healthy” FD (I also tried to write and read files with a successful result). I try using Universal USB Installer and whoala…. it works well. Thanks again.
I also advise not to use imgBurn to create the rescue USB, it installs SnapDo which hijacks all of your browsers, if you’re not careful. I used Ubootnetin, which worked great. However, I still wasn’t able to clear ransomware virus from Win XP machine using Kaspersky Rescue USB, got kernel panic errors. I was able to clear the virus by burning a Kaspersy Rescue CD. This was after trying MANY other options, including Hitman. Kaspersky rescue CD did the trick, then I was able to finish it off with Anti MalwareBytes. Thanks.
I just tried Avira, Emisoft, and Bitdefender on a computer that had the TDSS rootkit on it. None of them could get rid of it. I then used Kaspersky and it got rid if it. Good job Kaspersky!
This is very useful. Thank you.
Thanks very much ray.. :)
Thank You Very Much, Dear Friend Raymond for precious information and hint…
Thank you Raymond.
Thank you….Raymond!!!
This is great. Thanks Raymond.
Thanks Raymond. Just what I was looking for.
Bingo!! awesome article… keep it up…..
Nice post!!! I was actually looking for this one. I have the Kaspersky Rescue Disk but very problematic for netbooks…Thanks Ray
Thank you, Raymond, for this important information.
I’m going to prepare the USB rescue, hoping to never use it.
Hasson
thanks for sharing this Ray :)
Very useful! Thank you.
Thanks for this very useful information.
JF