How to Run Check Disk (ChkDsk) on Windows: GUI, CMD
3. Run Check Disk From Command Prompt and PowerShell
For the more advanced user, running Check Disk from the command line is a useful method that gives access to all the options and arguments the tool offers. The ChkDsk command can be used in batch scripts or directly from PowerShell/Command Prompt.
1. For Windows 10, right click on Start and select Command Prompt (Admin) or PowerShell (Admin). Windows 7 users press Start and type cmd into the search box, then press Ctrl+Shift+Enter to open Command Prompt with the required administrator privileges.
2. The basic Check Disk syntax is quite simple:
Chkdsk [drive:] [/f to fix or /r to fix and recover bad sectors] [/x force dismount of drive]
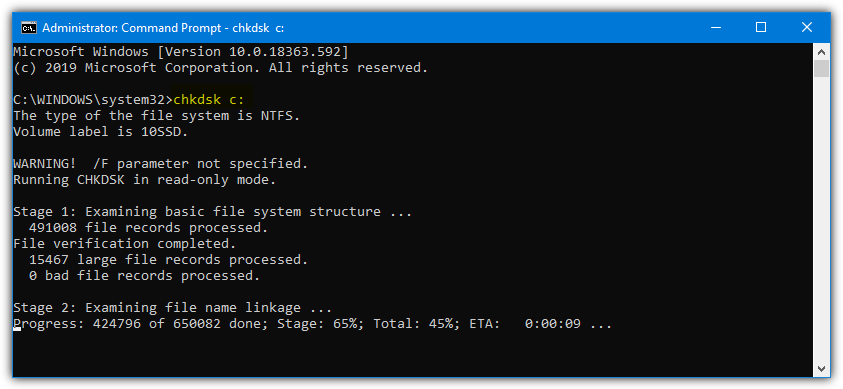
To run a simple scan for errors just supply the drive letter:
Chkdsk C:
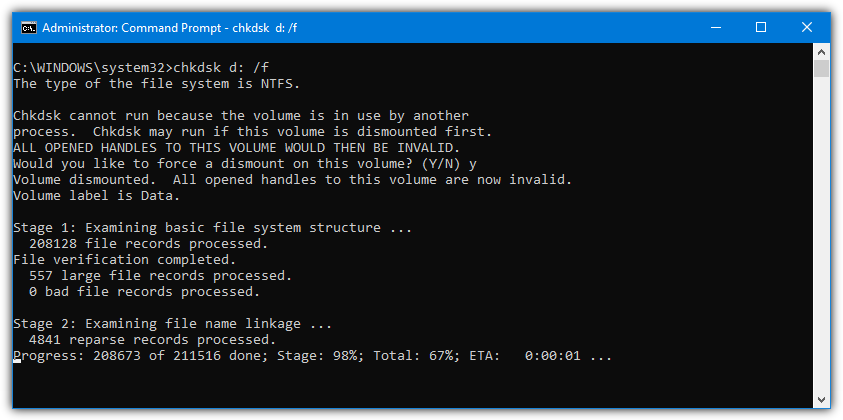
To scan and fix errors use /f or /r to scan for bad sectors and fix the errors. This second option will take a long time and could take several hours on a multiple Terabyte drive. All drive sectors will be scanned and those that are damaged will be repaired and any affected data will be hopefully recovered.
Chkdsk C: /f or Chkdsk C: /r
Note you can use either /f or /r but don’t need to use both. The /x option can be used to dismount a drive before repairing. Even without the /x argument, you will still be offered the chance to dismount the drive if it’s detected to be in use.
That won’t work on the system C drive and it will still need to be checked and repaired during the next boot.
4. Check a Drive From Windows Explorer
The obvious and easiest way to run a check on a drive is to do it through the standard user interface with Windows Explorer. It’s also the easiest thing to do for helping a less experienced user over the telephone or online chat as everything is point and click.
1. From the Desktop, Start Menu or the Explorer Taskbar icon, open Computer/This PC, right click on the drive to be scanned and click Properties. Go to the Tools tab and press the Check button in the “Error checking” section.

2. The type of popup window that gets displayed depends on your operating system.
a) For Windows 10, disk checking has been improved and disks are periodically scanned during scheduled maintenance, so most of the time they will not need manually scanning.
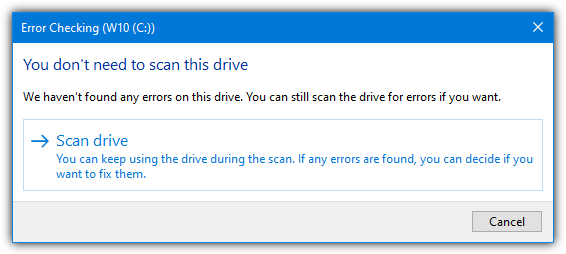
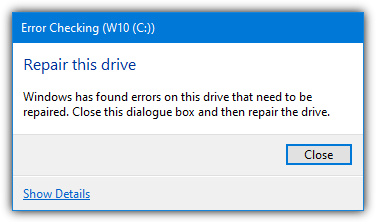
You can still run a scan even if it says you don’t need to, just press the Scan drive button. If errors are found it will then inform you there are errors that need to be fixed, a reboot will be required if the fixes to be performed are on the system C drive.
b) For Windows 7, a small box will appear and the option to “Automatically fix file system errors” will be pre ticked. The longer “Scan for and attempt recovery of bad sectors” is optional.
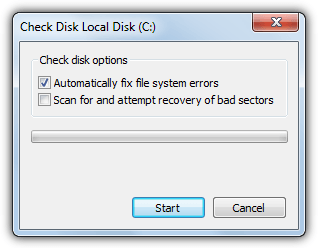
To let Check Disk scan and fix any errors it finds simply press Start. If you are scanning and fixing the C drive, Windows will need to do this on the next boot as it can’t fix errors while the drive is in use. Press the Schedule disk check button if the popup appears.
5. Run Check Disk from the Windows DVD
If your computer is having trouble booting and you want to run a Check Disk, things become slightly trickier as Windows obviously needs to be running to be able to use it. One solution in this event is booting to the Windows install DVD and running Chkdsk from Command Prompt.
1. Firstly, an install media is required for the operating system. If you don’t already have one, download a Windows 7, 8.1 or 10 ISO image direct from Microsoft and then burn it to DVD or write to USB flash drive.
2. Restart the computer with the optical disk or USB drive inserted and boot to it. Press any key when prompted to boot to the Windows media.
3. At the language and keyboard selection screen press Shift+F10 to open a Command Prompt. What is usually the system C drive may not be here because if there is a system reserved partition it will occupy C instead. To find out, type Dir C: and if it says “C is System Reserved” try Dir D: and so on until you find the drive with Program Files, Users, and Windows folders.
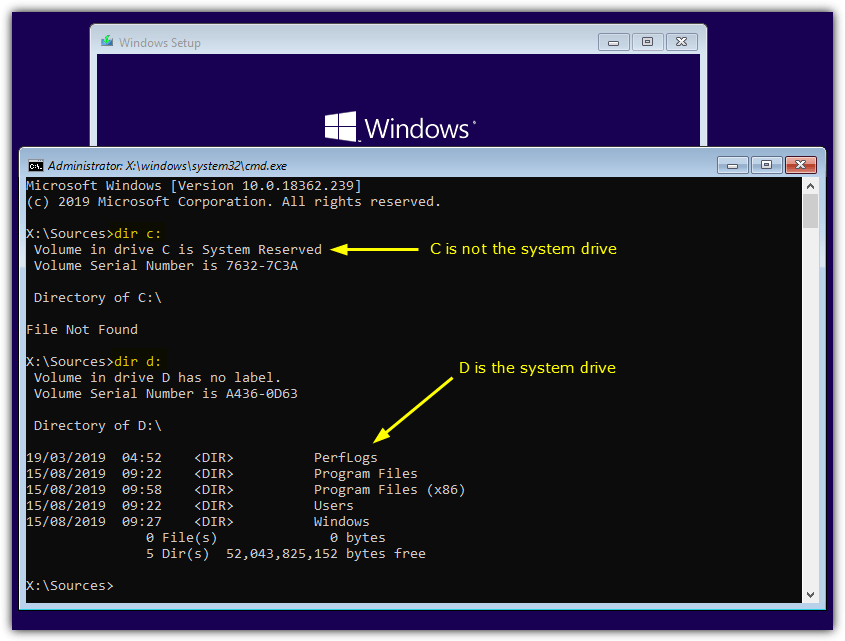
4. Now you know the assigned letter for the system drive you can run Check Disk the same way as from the Command Prompt within Windows, such as “chkdsk D: /f” or “chkdsk E: /r”.
Tip: If you don’t have a Windows install ISO image and don’t want to download 2GB+ of data to get one, create a system repair disk from within Windows which is only a few hundred Megabytes and still allows an offline Check Disk. Go to Control Panel > Backup and restore > Create a system repair disk and create a disk with the utility. The Shift+F10 option does not work from the repair disk and you will need to go through the keyboard select screen to reach the open Command Prompt option.
@HAL9000 is there any way to create a job in task scheduler that will start the gui version (the one in disk properties;”tools”;”error checking” tab) ? I know you can run chkdsk using cmd.exe but GUI mode would look nicer.
When GUI version runs I see an instance of vssvc.exe and svchost.exe (shadow service is activated) may start (if fix errors is NOT ticked) but no specific exe program is loading so no command line to copy.
I think that part of the ChkDsk GUI is integrated into Explorer so there is no separate executable or command to run.
The Gandalf discs are impossible to obtain. Links on the Windowsmatters site seem to just loop. There is no obvious download there.
Gandalf’s discs have become donation only with a minimum donation of $20 required to get download links.
That is not a good idea if it’s true as he’s basically charging for a proprietary version of Windows. If MS goes after him (which they could do), his whole site will get taken down within hours. Making these discs and distributing them for free is one thing, specifically charging for them is quite another.
I have found a slightly older version of one of his Windows 10 ISO images that is free to download (not from a warez/torrent site). Link is in the article.
this is very good process thanks a lot ….
The new Windows 10 built in check disk seems to be different from the original chkdsk command. The former didn’t repair my hard drive, whereas the original chkdsk through command prompt did.
Thanks for letting us know about all these options !
Yes indeed! A very useful tools
Very useful and interesting tool. Thanks!
Looks like a good tool, will be defo trying this one out…
Cheers ray :)
I’ve used this excellent program for several years.
It performs exactly as you would expect.