3 Ways to Test your RAM with Microsoft Windows Memory Diagnostic

Unfortunately knowing when you have RAM memory inside your PC that has developed problems isn’t as straightforward as you might think. It can manifest itself in many different ways and problems with your computer which don’t seem in the remotest bit connected with RAM, could in fact turn out to be just that.
A computer that fires into life and then sits at a black screen and doesn’t do anything else is a common symptom of a bad module which needs taking out or replacing. A Windows install that keeps failing while unpacking files from the disc could also be due to a memory error. Even problems relating to disk read errors which sound the furthest thing from memory issues as you could imagine, can be caused by errors coming from the memory.
Testing your RAM for errors is something you can easily do because there are a few free tools around that can help you out, and all that’s needed is for you to run the program and let it check all your internal memory. Here’s a few different ways you can test your RAM for errors.
1. Microsoft’s Windows Memory Diagnostic
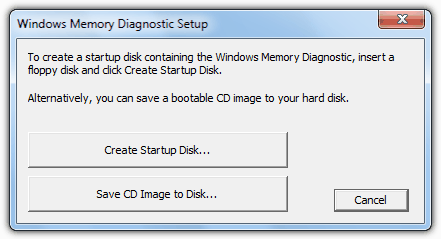
This Microsoft memory testing tool is a bit old coming from 2003 but because the method of testing memory is the same today as it was back then, it still works. While being quick and easy to use, the diagnostic includes a comprehensive set of memory tests and a number of advanced options for the more experienced users.
The tool downloads as an executable, and when you run it, you’re given the choice of creating a bootable floppy or an ISO image that you can then burn to a CD.
Simply boot from the created disc and the tests will begin automatically. This will take several minutes to complete and time depends on the amount and speed of the installed memory. Any errors that might appear mean there are potential problems reading the memory. Letting the tests complete 1 full cycle should be enough to determine if there are any problems.
Pressing “P” to pause the test and then “M” will show the advanced menu where you can change the tests performed, alter the cache settings, and also choose to show errors by memory module which will help identify the RAM module at fault if you have more than 1 installed.
There is one limitation to the Windows Memory Diagnostic utility which is it only scans the 1st 4GB of any installed memory and anything above that will be ignored.
Download Microsoft Windows Memory Diagnostic
2. Memtest86+
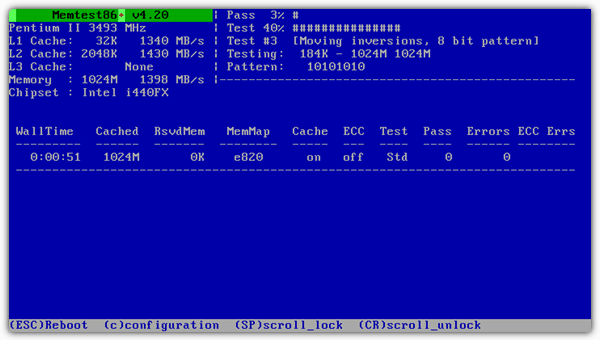
This open source memory diagnostic tool is a branch from the original Memtest86 and is probably the most used free memory testing program around today. There is support for most of the latest hardware and this tool is known to be one of the most accurate and robust at detecting memory errors.
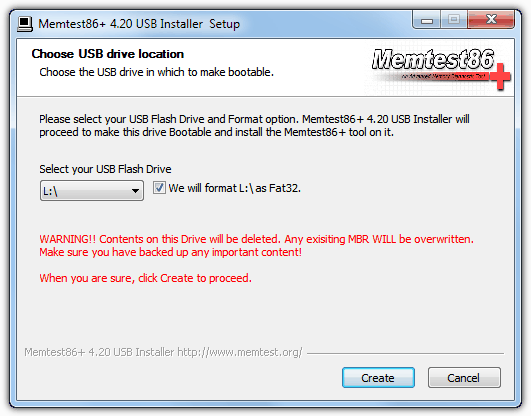
Memtest86+ can be run on your machine three different ways; from a bootable floppy disc, a bootable ISO image which you can burn to a CD, or perhaps the most useful option for today’s PC’s is an executable installer that writes Memetest86+ directly on to a USB stick.
Like the Microsoft memory diagnostic tool, the time Memtest86+ takes to complete the test depends on your hardware specification and usually 1 full pass will be sufficient to detect any issues. Pressing “C” brings up the configuration menu from which you can select specific tests, memory range, and an ECC memory mode,
For those who don’t want to waste a whole CD or use a USB stick just for Memtest86+ because it’s only a few hundred KB in size, you’ll be pleased to know it’s included in the popular Hiren’s BootCD.
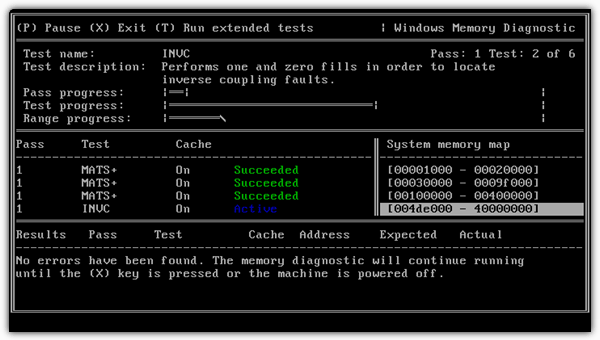
3. Windows Vista and 7 Built in Memory Diagnostic
This memory testing tool is not quite as comprehensive as something like Memtest86+, but is useful enough to get a fair idea if you have serious memory errors. It’s readily available in Windows Vista and 7 and users can invoke the tool in 1 of 3 different ways.
#1 If you’re already in Windows, go to Start or press the Win key and type mem into the search box. The Windows Memory Diagnostic Tool should show in the results, and you can then run it by pressing Enter. A window will pop up asking if you want to reboot now and run the tool or run the tool at the next reboot. Simply choose your preferred option and the next time windows boots it will run the diagnostic test.
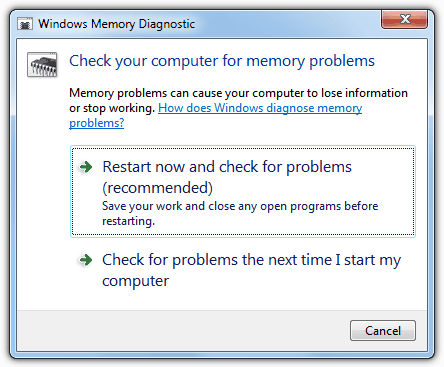
#2 If you’re not in Windows, the next time you boot press F8 after the BIOS screen to get to the Advanced Boot Options (Safe Mode selection) screen. Press Escape and then the Tab key to select “Windows Memory Diagnostic”, then press Enter to start the test.
#3 The Memory Diagnostic is also present on the Windows DVD and the System Recovery media disc. It’s available from the System recovery Options window and is the same tool accessed from in Windows that asks to reboot now and test, or test at next reboot.
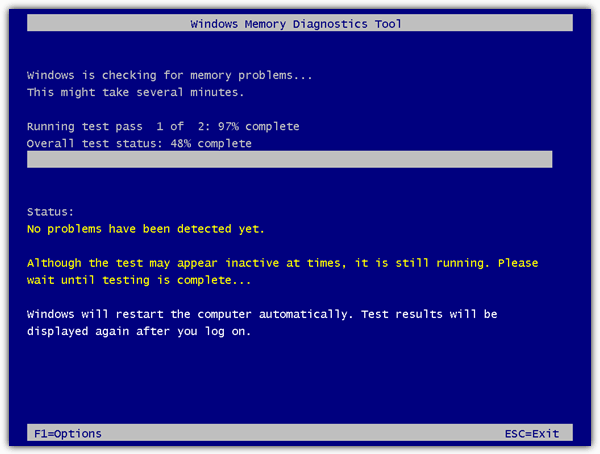
The diagnostic test is pretty quick and defaults to 2 passes, although F1 will take you to the options screen where you can run more basic or more advanced tests, or configure more test passes.

Improve this guide

User forum
0 messages