How to Copy Files to Remote Desktop: Step-by-Step
It’s quite easy to transfer files between computers on the network, all you have to do is select the folder to be shared and other users can find and connect to that folder and the files inside. If you use the Remote Desktop Connection feature in Windows you can even gain control of the remote computer, find your shared folder from it, and then transfer files between the two computers as required.
Windows Remote Desktop actually has a feature built in that allows you to share any of the local drives on the host computer with the remote computer without having to manually share specific folders or drives. This is far easier and can be more secure because folders are not being shared permanently but only for the life of the Remote Desktop session.
Here we show you how to setup your Remote Desktop session to share some or all of your local drives.
1. You can start the Remote Desktop Connection from Start > All Programs > Accessories > Remote Desktop Connection or run Mstsc.exe from the Run dialog or Search box. The window will show the current connection in the computer box or you can select a previous session from the drop down.2. Click the Show options button at the bottom left.
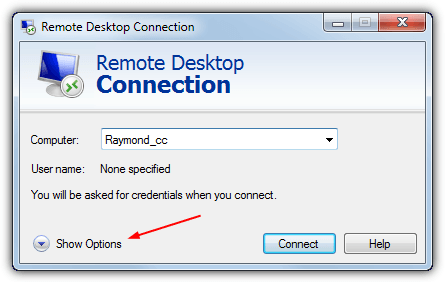
3. This will display the connection preferences, click on the Local Resources tab. Look near the bottom in the section “Local devices and resources” and click the More button.
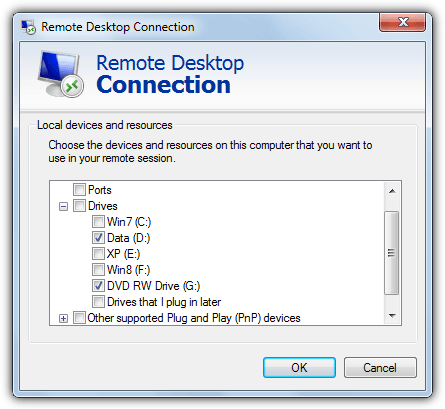
4. An entry called Drives will be in the list, if you tick that all drives will be mapped to the Remote Desktop and shared. If you only want to share specific drives which is safer, click the + to the left and expand the drives list, then you can specifically tick which drives that need to be shared, including ROM drives and USB flash drives the haven’t been inserted yet (Drives that I plug in later). Click OK when you’re done.
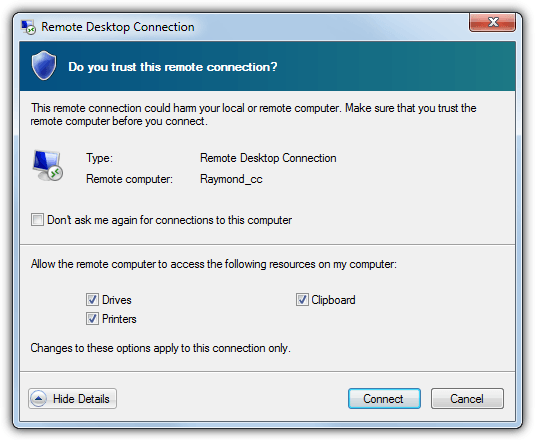
5. Upon trying to connect you will be asked if you trust the remote connection and clicking Show Details will show that it’s trying to share your drives. If you’re happy then tick the box to not be asked again and press Connect.
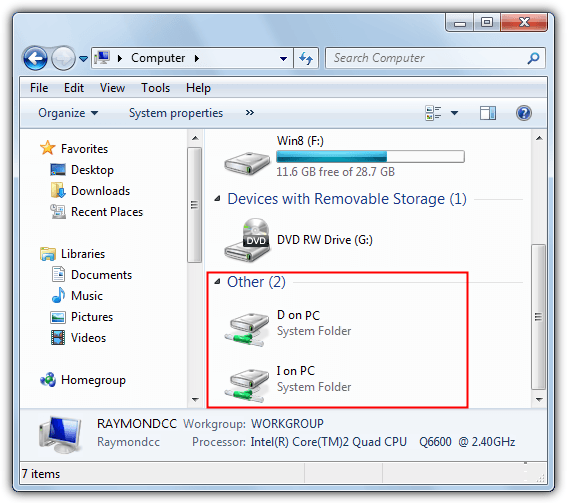
After a successful connection go to Computer or This PC on the remote computer and under Other you should see the shared drives. Now you can start transferring files to and from your remote computer
Another option for transferring files in the Remote Desktop session is by using the Windows Clipboard so you can right click and Copy the file on the host computer and then right click and select Paste inside the Remote Desktop. This works just the same as if you are copying and pasting inside your own computer and obviously also works on text.
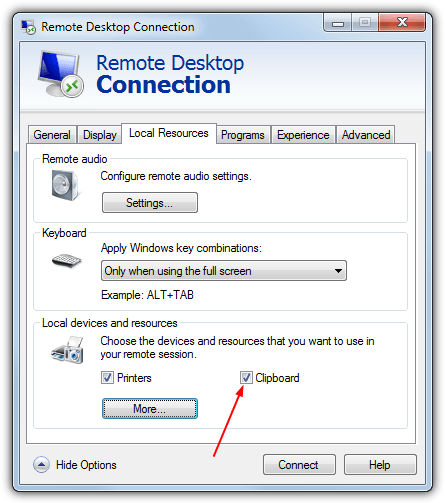
The option to use the Clipboard should be enabled by default but you can turn it off and on from the Local Resources tab in step 3.
Fastest Way to Transfer Files to a Remote Desktop Computer
As there is a copy and paste function from the host machine to the Remote Desktop and the option to use the mapped drives to transfer files, which one is the quickest? If you add a standard shared folder which may already be set up between the computers, there are three ways to get the files transferred over the network to the remote machine.
As a simple test we decided to see which copy method was fastest to copy a selection of files and folders from one computer to the other using the three methods above. Here’s what we copied:
Copy Test 1: An ISO image 1.36GB in size
Copy Test 2: 3,427 files and 371 folders totalling 1.46GB of data
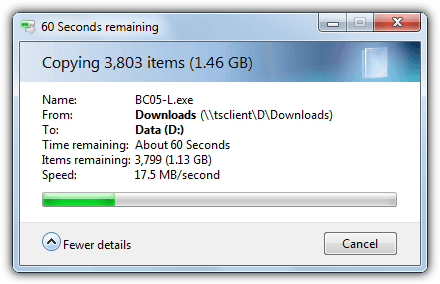
The test was run using a 10/100 network and both computers were running Windows 7.
Copy Test 1 (ISO Image) Min:sec
Copy and Paste (Host > RDC) 02:32
Mapped Drive From RDC 02:10
Standard Shared Folder 02:04
Copy Test 2 (Multiple Files) Min:sec
Copy and Paste (Host > RDC) 38:18
Mapped Drive From RDC 02:16
Standard Shared Folder 02:31
In test 1 you can see that the mapped drive and shared folder are quite close together, but copying from the host machine and then pasting into the Remote Desktop is around 20 seconds slower. It’s not much but would increase the larger the file used.
The results for test 2 aren’t a mistake as we ran it 2 or 3 times with the same outcome. To right click and copy from the host and paste into the Remote Desktop really did take nearly 40 minutes while the others completed in under 3. There is clearly a huge amount of overhead with copy and paste when using Remote Desktop and you should try not to use it for transferring more than a few files or a few dozen Megabytes at a time. Using one of the other methods will really help speed transfers up.

how to pick excel file one pc to another pc
Everyone’s favorite and well-known way of transferring data, but usually RDP is not available through multiple NATs – when you have no dedicated external IP. In such cases, you need to use software with remote file transfer features such as AnyDesk or Igiko. They also have remote access features like RDP. I use Igiko, as it works via web browser.
Thank you! This is really helpful.
I see you have many Thank Yous. Here’s one more: Thank you!
it is really a perfect information.
Thanx for your Support
I logins for two secure networks. (NHS), as I work across both.
I need to transfer some of my files from one to another.
now because I am logged on to network and also logged on to remote network (via citrix) I do not have name for a specific computer as it is asking me to provide computer name.
Can you help me in order to transfer files from one remote network to local network? as steps above are for the personal to personal instead of one secure network to another? unless my limited knowledge of this is stopping me going any further?
I cross checked and found that all above options in my local as well as remote machine are already set (e.g. clipboard copy and other all ).
What extra I need to do that in Remote machine, open task manager and then stop remote desktop process running against my user name (with which I logged in to Remote desktop machine). Then log out from remote machine and re login. It started copying.
Thank You a lot really helpful tip!
thankyouu very usefull!!
easy trick, helped a lot.. wasn’t able to find it so simple….. thanks…
Thank you so much,really amazing post,it helped me out lot.
thank you.
Thanks, it worked! Afterwards I realized though that you can just copy files on your local drive and paste them in the remote desktop…
hey, it’s very useful tips.
thank you, been searching for this info for quite a while, cheers
thank you.. it’s really useful for me..
Thanks Raymond, you have helped me out a lot.
Very useful tip! Thanks!
Thanks for this post man, really helped me out
Erick
Thanks for the help, it saved a lot of time :)
Nice and useful information – helped me as I was looking for exactly this feature. People like you are a great help! Cheers :-)
Thanks for the info….help me a lot!
Thanks to this article it helps me a lot… cheers!
Thank you Raymond :-)
Thanks for this Raymond. Pretty useful information.
I have been looking into this for family members when they get problems or need files from me.
as always..you gave me another idea…thanks
good one !
Exactly what am looking for. Thanks Ray. Your Blog is still my home page for about a year.
Very nice tip Ray, thanks.
Thanks Ray .. for this nice info…
keep posting… :)