9 Ways to Remove Unused, Old or Hidden Drivers
Almost every piece of hardware attached to your Windows computer will show up in Device Manager as an installed device. This includes Graphics cards, CPUs, USB devices, disk drives, network adapters, and just about anything else. When the device is first connected to the computer, Windows will detect it and either install the device driver automatically or you install it yourself from CD or the internet.
After that, it’s not a problem while the device remains connected but can potentially become a problem if you disconnect it. The driver that was installed when the new hardware was connected does not get uninstalled when the hardware is removed. Over time this can leave driver entries on the system for devices that have long since been removed. Some applications also don’t remove software drivers when you uninstall the software.
Even if the hardware or software is no longer available, Windows still looks for it on boot. This can lengthen boot time and potentially cause future driver conflicts so it makes sense to remove what is no longer required. As Windows hides these devices by default, we show you 8 ways to find and remove old and unused device drivers from your system. Make sure to run programs or Command Prompts as an administrator where possible.
DriverFix is a driver update program that monitors the computer hardware and all other relevant driver software. The application performs a full system scan and informs users about missing or corrupt drivers. Users can either download the application directly from the official website or get it together with other internet software. From the Update Center, the user can select which drivers to remove, and the uninstall process will begin. Before you begin the uninstallation process, you should back up and save all your drivers into a compressed zip file to avoid losing important data.

The application is able to remove corrupt or outdated display and audio drivers from Realtek, Nvidia, Intel, and Creative Soundblaster. DriverFix is compatible with both SSD and Hard Disk systems, and this makes it accessible to a wide range of users. The software has a simple, intuitive interface, making it a popular option among users who want to save time and energy.
2. Display Driver Uninstaller (DDU)
In recent years DDU has become a highly recommended tool for removing old or corrupt display drivers from the likes of AMD, Nvidia, and Intel. Along the way, DDU has also gained the ability to remove audio drivers from Realtek and Creative Soundblaster. A big difference between DDU and the other options here is it will remove files, folders, and registry entries belonging to the video/audio drivers. Therefore, DDU should be used with care with backups to hand where possible.
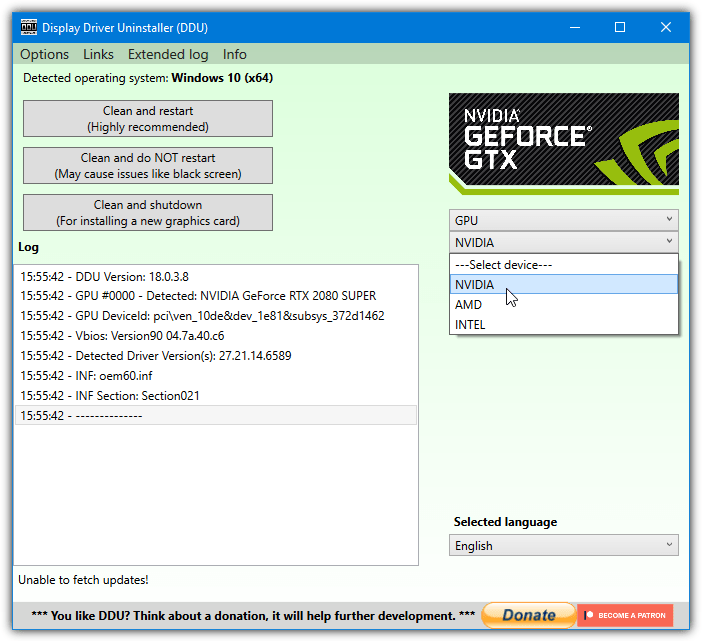
It is also highly recommended to run DDU from Safe Mode. If that’s not possible, run the program and clean, reboot, then repeat the process again (clean and reboot). During the first launch, the Options screen will appear where you can choose to remove graphics driver related software such as GeForce Experience, PhysX, 3DTV Play, or the AMD/Nvidia/Intel Control Panel.
There’s also options to remove monitor drivers, prevent Windows 10 from automatically installing new drivers, remove the Vulkan runtime, and create a restore point. On the main window select the device type (Audio or GPU) from the dropdown and then the hardware device itself. Press “Clean and restart” and let the process complete.
Download Display Driver Uninstaller (DDU)
3. GhostBuster
GhostBuster has been developed with the express intention of allowing for the detection and removal of drivers for old, unused, or hidden devices. Otherwise known as ghost devices. Both setup installer and portable versions are available which is useful as this is not a tool you use every day, so installation isn’t really necessary.
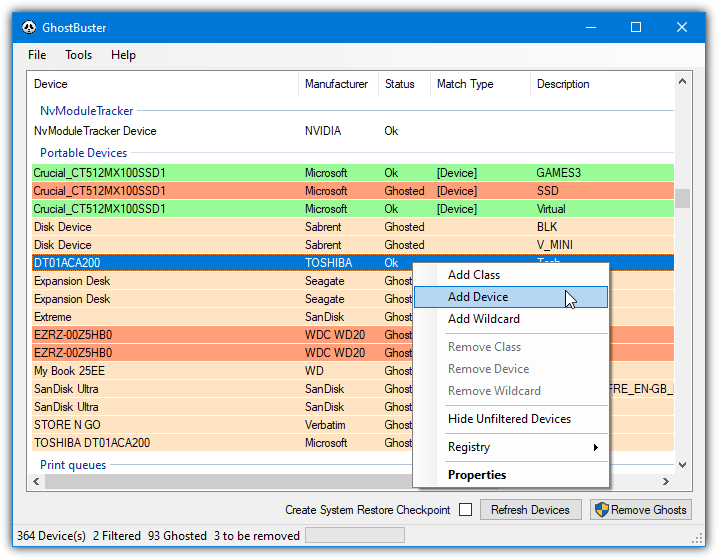
All unused devices are listed in a light orange color while any devices currently being used are shown in green. To add devices to the removal list and turn them dark orange, right click an entry and click the selected Add option. Note you cannot remove individual entries and can only remove by Device type (Generic USB Hub, Generic PnP Monitor, or USB Input Device, etc) or Class (all System devices or all Disk drives, etc).
When ready, optionally tick the to create a restore point box and then press the Remove Ghosts button. If, for example, you remove all unplugged USB drives, each will be redetected the next time it is inserted.
4. Nirsoft DevManView
DevManView is an alternative tool to the Windows Device Manager, but it displays a whole lot more useful information. Like all Nirsoft tools, DevManView is small, portable, and packs a lot into its small size. Before viewing and removing any devices it’s a good idea to first change a couple of settings so things are easier to see.
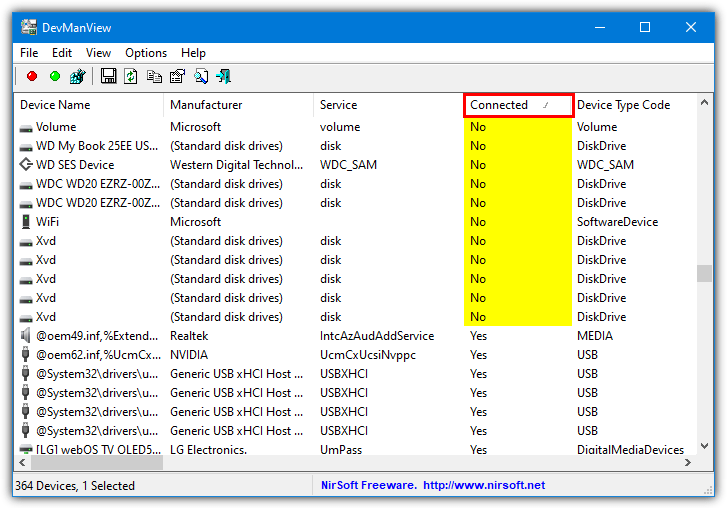
Go into the Options menu and enable Mark Connected Devices and Show Non Plug and Play Drivers, then click on the Connected column header to sort the list by which devices are connected and which aren’t. Then click, Shift+click or Ctrl+click to select the required devices and go to File > Uninstall Selected Devices. Alternatively, use the right click context menu Uninstall Selected Devices option on the device.
Devices can also be disabled instead of removed for troubleshooting purposes (press F6). Command line options are available, “/uninstall” and “/use_wildcard” being the most useful for the purpose of removing unused and hidden devices.
5. Device Remover
In terms of a third party device management application, Device Remover is probably the most advanced and feature rich free program available. For some reason, the program is no longer developed and the official website has disappeared. The last available version is from 2014 so is new enough to work fine for most people. Both portable and installer versions can be downloaded.
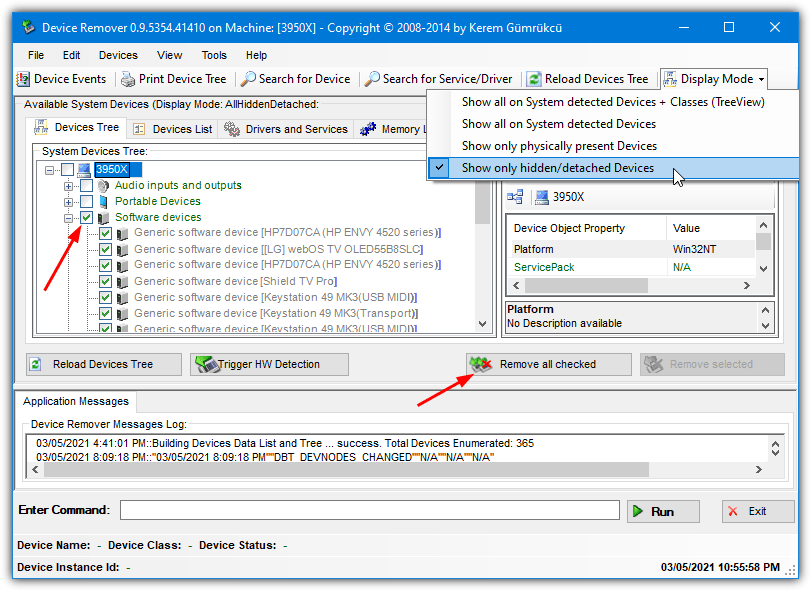
During the first run, you will be asked if you want to let the program run an optimize routine, allowing it should speed up the device detection and enumeration process. Once loaded, devices can be viewed in a tree or list style, selectable from the tabs. To switch to showing only hidden devices click Display Mode on the toolbar and select Show only hidden/detached devices.
From there, it’s a simple process of looking through the devices and checking the boxes of any to remove, then click Remove all checked when ready. A warning and confirmation window will appear to give you one last opportunity to back out. Click Remove all devices when you’re ready or Cancel to go back. Although the device removal procedure is quite simple, Device Remover is a powerful tool so other functions need to be handled with care.
Download Device Remover (Copy of original website served by the Internet Archive)
6. Device Cleanup Tool
The Device Cleanup Tool is a nice and simple program by Uwe Sieber that detects devices that are not currently in use and allows you to remove them. It does this by checking the device for the “Currently, this hardware device is not connected to the computer. (Code 45)” status code. Device Cleanup Tool is portable with separate 32-bit and 64-bit versions, make sure to use the right one.
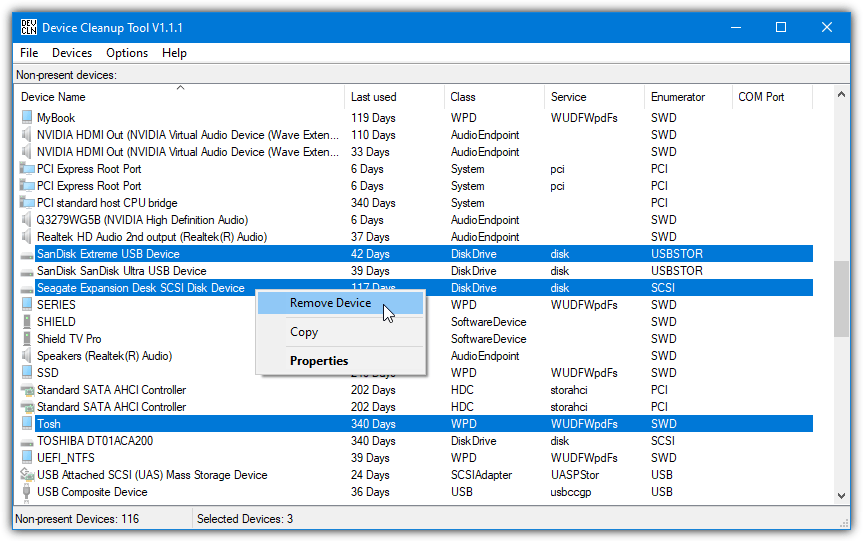
Deleting devices can be done on an individual basis by clicking each device, right clicking, and choosing Remove Device. Multiple devices can be selected with Shift+click or Ctrl+click. If you’re unsure about the device, either leave it or go to the File menu and create a restore point first. The Select all option is definitely not recommended unless you are totally sure all devices can be removed safely.
The last used column should display the last time the device was in use but sometimes just displays the last time it was enumerated on boot, so is not always accurate.
7. Device Cleanup Tool Command Line Version
This is the command line version of Device Cleanup Tool which will come in useful for advanced users deleting devices from batch files and scripts. It only allows you to delete plug and play devices that are listed as not connected.
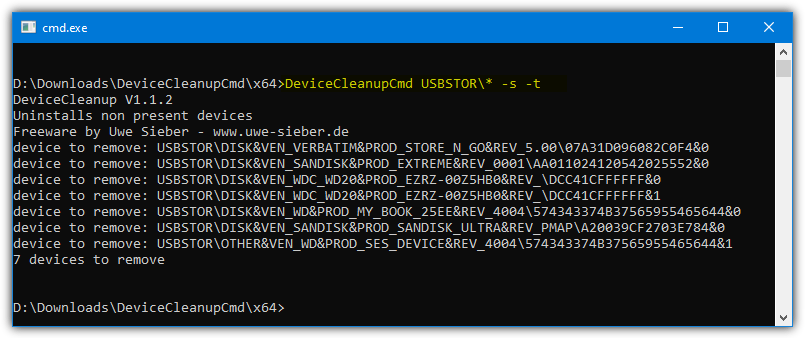
There are three main ways to remove devices using the command line Device Cleanup Tool. Mass deletion of all devices at once, delete devices that haven’t been used for xx number of days/months/years, or delete by hardware device ID ( * wildcard pattern accepted). A few examples are:
DeviceCleanupCmd * (Remove all devices, advanced users only!)
DeviceCleanupCmd * -m:3m (Remove all devices unused for more than 3 months)
DeviceCleanupCmd HID\vid_* (Remove unused HID devices, usually keyboards, mice, joysticks etc)
DeviceCleanupCmd USBSTOR\* (Remove USB storage devices that are not connected)
A couple of optional arguments are -s to bypass creating a restore point, and -t to test the command only. Hardware IDs are found in the Details tab in the Properties window for the device in Device Manager. Make sure to use the correct 32-bit or 64-bit version for your system.
Download Device Cleanup Tool Command Line
8. DriveCleanup
This is the third tool in our list by Uwe Sieber and unlike above, it’s not a general command line remover for non present devices. Instead, DriveCleanup specifically removes unused USB Hubs, Mass Storage Devices, Disks, CDROMs, Floppies, Storage Volumes, and Windows Portable Devices. It also cleans the registry and removes entries related to those devices.
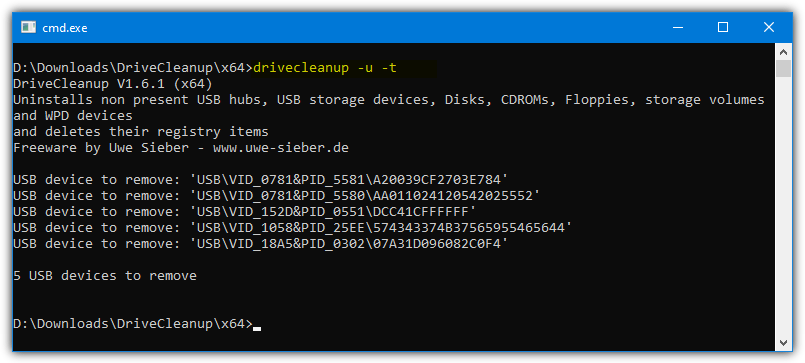
The tool will automatically run the delete and clean when you double click on its icon, so be careful if that’s not what you want. Running from the command line you can supply the -t argument to run a test only.
A number of switches are available if you want to remove specific device types. For example, -f and -c will remove only floppy and CDROM devices, -u will only remove USB mass storage devices. Check the included readme file for the other arguments. Like the other two tools here by Uwe Sieber, run the 32-bit or 64-bit version that matches your system.
9. Remove Hidden Devices With Windows Device Manager
The built in Windows driver and device management tool, Device Manager, is also able to show and remove hidden devices from the system. It has an added ability the other tools don’t (apart from DDU) which is an option in some cases to delete old or redundant files related to the driver you are removing. The main problem with using Device Manager for this task is it’s not easy to delete multiple devices at once.
Before viewing and editing hidden devices in Device Manager, your system needs to be told to show them. This doesn’t happen by default and a new environment variable needs to be added to Windows first.
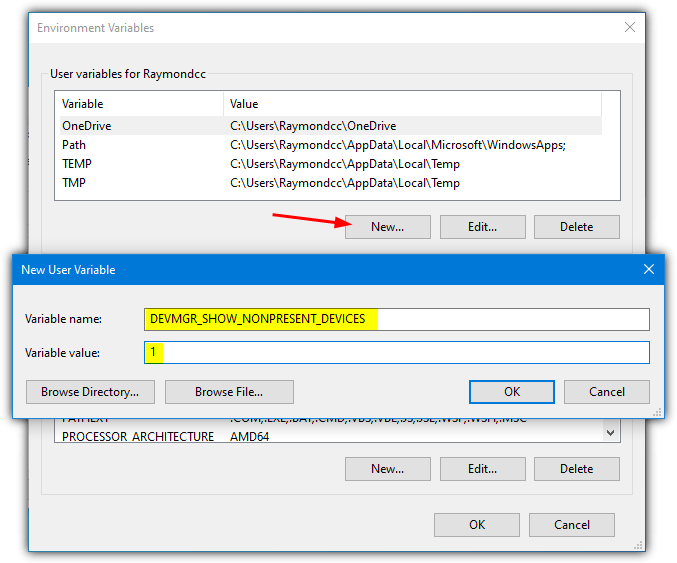
1. Right click on the Computer/This PC desktop icon > Properties > Advanced system settings, click the Environment Variables button. Alternatively, press Win/Start, type env into search, and press Enter.
2. Press the upper New button. Enter DEVMGR_SHOW_NONPRESENT_DEVICES as the variable name and 1 as the variable value. Press OK twice.
3. Now start Device Manager by right clicking Computer/This PC > Properties > Device Manager. Or type devmgmt.msc into Start or the Run dialog. For convenience, we have created a small batch file that will add the environment variable to the system and run Device Manager automatically. Simply download Set DEVMGR SHOW NONPRESENT DEVICES.bat and double click it.
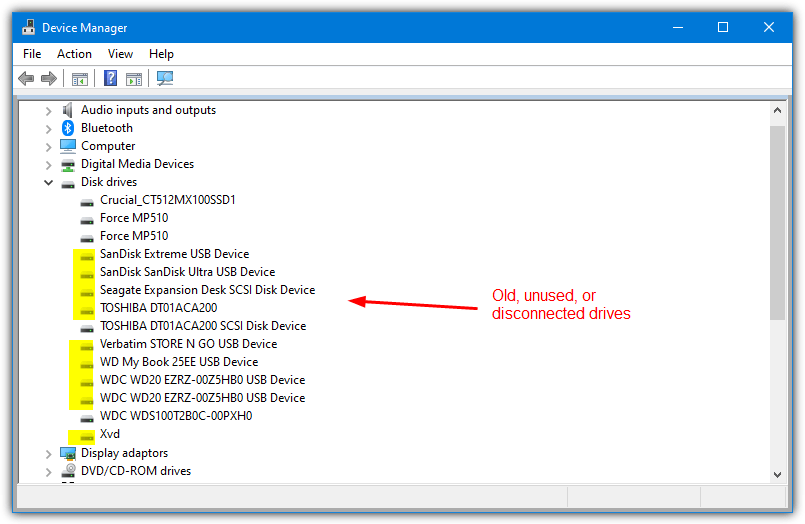
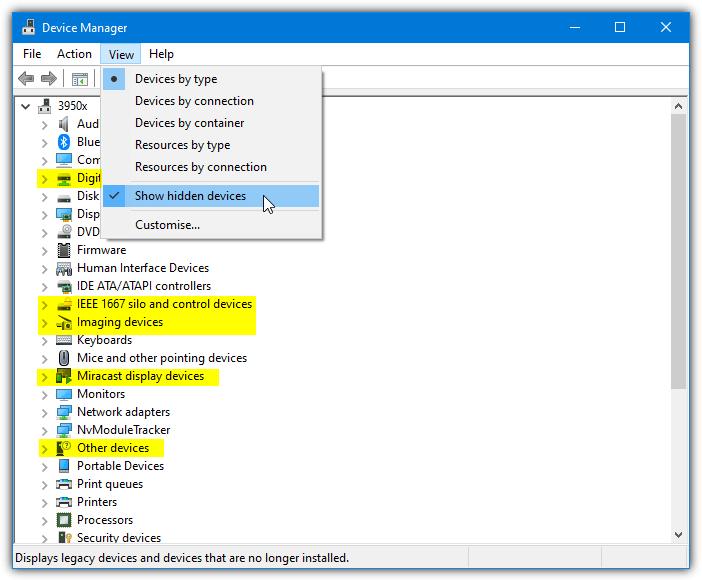
4. In Device Manager go to the View menu and select Show hidden devices. This will repopulate the main window with a number of extra categories like Digital Media Devices, Non plug and play drivers, Other devices, and storage volume shadow copies.
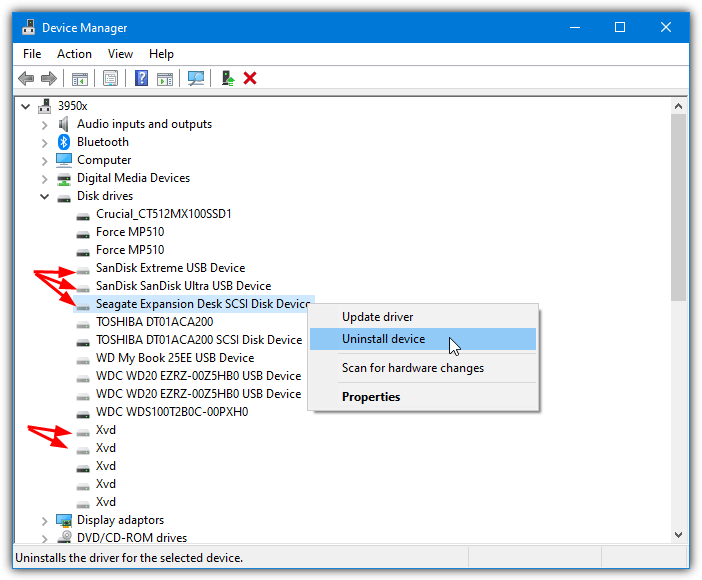
5. Now all hidden devices are visible you can go through the categories and look for devices you don’t want. The devices that are not in use will have dimmed icons, simply right click on one and select Uninstall to remove the entry.
Some third party devices such as graphics cards, sound cards, printers, etc, might have an extra option in the uninstall confirmation box. This is a “Delete the driver software for this device” check box. Using it will remove driver files connected with the device in addition to the registry entry.
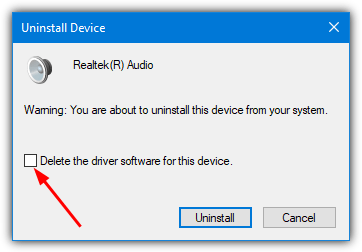
If ever you reconnect the device you will likely have to manually reinstall the driver for it. This is a handy option if you want to clean install a different driver later on or you want to uninstall a driver for troubleshooting.
Editor’s Note: Some devices are hidden by Windows and are meant to be hidden. A number of examples are usually in Network connections, Sound devices, System, and Non plug and play. It is recommended you DO NOT automatically select all hidden devices for deletion in any of the above programs. If you are not experienced or sure, only delete the blatantly obvious entries like an old USB storage device or game controllers.
I need to display WHOLE STRUCTURES of the DISCONNECTED devices, e.g.:
An [USB removable] = USB Storage Device + Portable Device + Disk, VOLUMES and their shadow copies (like non-USB HDDs plugged to IDE/SATA)!
Select unsued DISKS (drives), but delete their “parents” and theirs structures!
An [USB Composite Device] = USB Input Device + some HID-compliant (*controller*) devices + HID-compliant Mouse + Keyboard, etc.
Select an unused mouse — delete its parent and all its structure (including keyboard, HID-compliant etc.)
Windows® Device Manager displays structure only for connected (plugged-in) devices: View – Devices by connection :(
Use PnPUtil in an elevated command prompt. It will save you loads of time, money and frustration. I don’t know why this isn’t common knowledge.
See more here ==>docs.microsoft.com/en-us/windows-hardware/drivers/devtest/pnputil-command-syntax
Best advice I have seen in 40 years with regard to checking driver information and usage. Thank you OmniCacciatore!
8 ways? It’s only 1 way. Buy/download 8 different programs… they all just do the same things.
Of course they all do the same things, it’s an article about removing device drivers.
And no, you don’t “buy” any of these programs.
There are 7 third party tools and a built-in option through Windows, so we called it 8 ways, nothing wrong with that, there’s only so many characters to use in a title…
she’s right though. 1 way using 3rd party tools and 1 way using native tools.
I think you’re both entitled to your opinions but they are just that, opinions. There is no definitive “wrong” or “right” way, and I will continue to do it this way when I think it’s needed.
Like I said, there are only so many characters to put in a title, and doing it similar to your way would add another 40+ characters, not wise when a title should be using no more than 60-70 in total anyway.
Solved
Big thank you guys “7. Remove Hidden Devices With Windows Device Manager”
is worked for me
Aren’t there some registry entries that have to be cleaned off the registry? I think so, but I don’t see any discussion about that part of the cleaning process.
It’s mentioned a couple of times about removing registry entries, but yes, they all remove registry entries as that’s how you get rid of the leftovers.
I’m a big fan of #5. I use it in my shop as part of my automated setup and have it remove any devices the system hasn’t seen in over 60 days.
Extremely efficient and effective powerful utilitiy – it is intutitive and was able to remove 4 years of flotsam & jetsam and as noted above if by chance you do remove something relevant Windows will reinstall. I liked the process of considering each item to remove not to remove. Congrats for a great utility!
USBDeview is more to my liking. I had over a hundred ghosts and It was a pain to select all the ghosts (except a few which i will be using later on) for removal. But yes it does a little extra by showing us the ghosted services too. But It isn’t my cup of tea.
Thanks Ray! Appreciate your work, as always!.
My Computer (Win7U) shows my C drive and my F drive, an external HDD and my DVD drive, all which are connected… but also shows THREE Removeable Devices and a CD Drive that are NOT connected and when clicked on, ask that a disk be inserted…. these, I suppose, are “ghost” devices left over in My Computer after removing the devices, (USB drives and external CD Drive connected from time to time)… So then can Ghostbuster remove those entries from My Computer if/when I run Ghostbuster? Thanks for all of your significant work.
@ olamoree: It won’t do any harm if you run Ghostbuster and have a look under ‘DVD/CD-Rom Drives’ and ‘Portable Devices’ to see what entries are listed there. The portable devices section will probably have quite a few entries with phones, mp3 players etc. If you recognize the device or drive letter it uses, add that device only, make sure nothing else is selected for removal and try it. The worst that can happen is the device will be re-detected when you reboot.
hal9000, thanks for the work you have put in thus far . . . much appreciated.
TR
This will be very useful with Windows 8 has Device Manager no longer shows Non-Plug and Play Drivers or hidden devices. The “Devmgr_Show_NonPresent_Devices=1′ environment variable has no effect.
“An option that would be useful is being able to select entries individually or by description. As an example, I have 94 ghost devices (yes 94) listed in ‘Disk Drives’. Many of these are redundant and will never be used again, but a lot will so I don’t want to remove those. Currently adding by class will enable all of them as will adding by device or wildcard.”
I’ve used shift and/or Ctrl to select a group or individual devices after highlighting the first one with a left-click, as is common in other programs and then “added” them all with the right-click menu and removed. Is this what you mean? Don’t seem to be able to do this in device manager, which is really useful for disposing of a whole raft of stuff put there by MS Security Essentials, which I removed from one machine, after having trouble with it after an update. Also (as I have suggested on their site) it would be nice to be able to order the devices by clicking on the top of the columns, thereby putting the ghosted devices together, rather than have to scroll down to find them.
@ Dave: I think my point sort of falls inbetween your request to the developer of sorting by column or being able to right click and add by description. Ctrl+click will select individually but it’s a bit of a pain doing it to nearly 100 devices as they can not be sorted to be able to use Shift+click effectively. You cannot ‘Add’ the selection using right click, only class or device, unless you are using a different version???
On a side note, tried this out on my 4.5 year old highly abused XP partition, and after cutting the total devices from ~600 down to ~250 the difference in boot and general performance was actually quite noticeable!
I liked the use of Ghostbuster, but more, elaborative do’s don’t is required.
After use I may write more confidently, it’s pre-download, comment, Thanks.
USBDeview by NirSoft does a similar job and they have several other good freeware tools
nirsoft.net/utils/usb_devices_view.html