8 Ways to Write Protect USB Drive: Quick Guide
USB storage devices have been one of the best technology inventions in recent years. These days, it is possible to carry around a flash drive or memory card with hundreds of Gigabytes of capacity in your pocket. Unfortunately, the rise in portable USB drives has made it easier for malicious files to spread from computer to computer. That is why a lot of people resort to USB monitoring software. Before opening a USB drive with unverified content, it’s always wise to scan it first for malware to be safe.
Windows has a few hidden away settings that allow a bit more control over access and writing to USB storage devices. For instance, a drive can be write protected meaning no data can be written to it. Normally you would need a small switch on the device itself to do that. You can also deny access to USB drives completely so they don’t show in Windows at all. This could be a useful security measure if you have careless users that constantly insert drives with malicious files.
The related settings are mostly stored in the registry so you have to either use Regedit or a third party utility that can do it for you. Here we show you some ways to write protect or deny access to your USB storage devices.
Note: These settings only affect the local system. While your computer might have the write protect option set, other systems will still have full read and write access. Apart from one solution below, all USB storage devices will be affected with the same setting so you cannot selectively choose which drives have write access and which don’t.
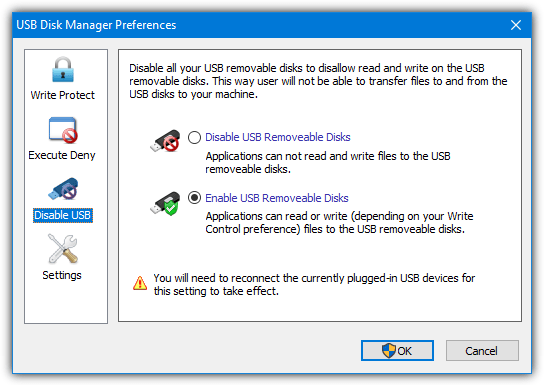
1. USB Disk Manager
USB Disk Manager is a simple multi purpose tool that has three main functions for your USB storage devices. The first is a standard write protect which makes all devices you insert read only. Inserting any drive after this change makes the cut, copy, delete and rename options disappear in the Explorer right click context menu. Also, the Del or Ctrl+X shortcut keys won’t work.
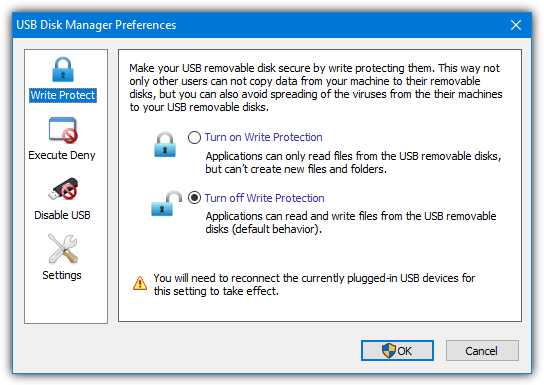
The Execute Deny option is a useful security measure as it stops any executables running from the drive. That’s handy if you have received the drive and are not sure if the contents are safe. The third option disables USB storage devices totally. This means they don’t appear in Windows Explorer and cannot be read from or written to.
The disable autorun in settings might be useful for older systems while applying the settings only for the logged on user means other users can have different USB device configurations. The option to autorun the program from a USB drive is outdated now as operating systems like Windows 7, 8, and 10 have USB autorun fully disabled. USB Disk Manager is portable and only consumes about 1MB of memory running in the background.
2. USB Write Protect
USB Write Protect is very easy to use, portable, and informative enough for users to know what it’s doing. There are three main options but the top option is probably the most useful because it enables write protection on storage devices so they can’t be written to. USB Device Lock will disable the Windows USB storage driver so storage devices are not even recognized by the system,
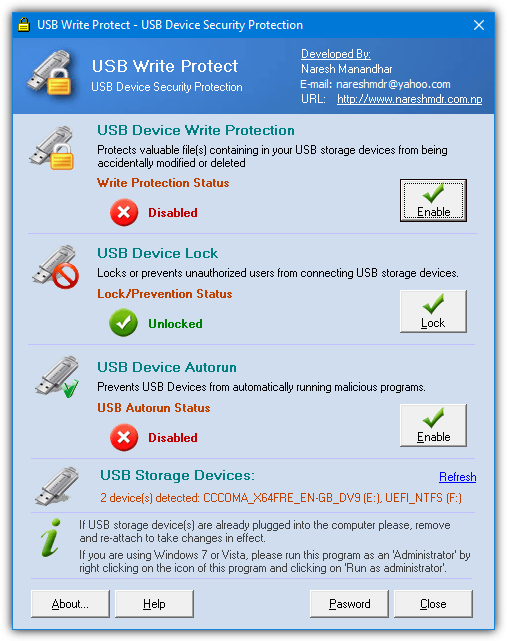
The last option stops autorun from launching on USB drives although autorun is disabled on Windows 7 and newer systems anyway. At the bottom, you can create a password which is required when opening the user interface to change any settings. This isn’t very secure as the password is stored as plain text in the registry or you can simply use another method here to bypass it.
Note that anyone with User Account Control (UAC) enabled will need to run USB Write Protect as administrator or the options won’t work. Right click the executable > Properties > Compatibility tab > check “Run this program as administrator” and click OK. This will make sure it runs with the correct privileges each time.
3. Phrozen Safe USB
Phrozen Safe USB is quite a basic tool that does the plain and simple task of altering the write protect status of USB storage devices you connect to the system. From the default of full access, you can change the setting to read only which prevents writing to devices. The other option is to disable devices that prevents access to USB storage devices by disabling the USB storage driver.
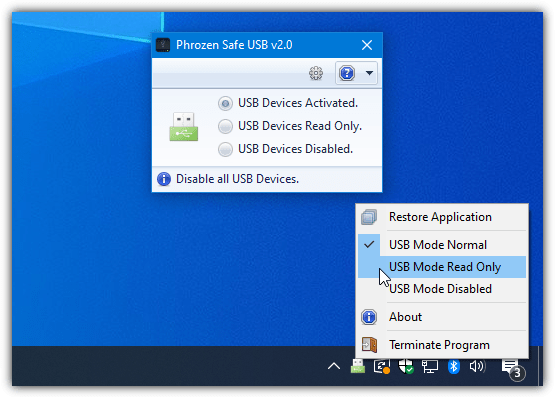
Select the required option and insert or reinsert a USB drive for the change to take effect. Phrozen Safe USB has a tray icon context menu to quickly switch between the modes if you want to leave it running in the background. There are additional options to disable the USB autoplay dialog, start the tool with Windows, and set up a password when opening the window or changing the access mode. Phrozen Safe USB is also a portable program.
4. URC Access Modes
URC Access Modes is a powerful tool that allows you to enable or disable a number of system settings. Once configured, it is then locked with a password which should be effective against tampering by average users. The tool changes security permissions in the system registry for each setting so you cannot use the other methods here, run .REG files, or edit the registry without knowledge of resetting the permissions.

The two options that we’re interested in are USB Access Mode and the Lock mode for inserted devices. Access Mode is the standard option of allowing USB drives the default full read and write access, making them read only, or making USB drives unavailable to the system. The lock option is like a complete disable, the main difference is after a reboot the devices can be recognized by the system but not opened or accessed.
There’s also options to enable/disable ROM drives, Registry Editor, Group Policy Editor, Task Manager, Command Prompt, and file/folder options. URC Access Modes is a standalone portable executable but make sure you have an archiving program handy as it’s distributed in a RAR archive. The .NET Framework 3.5 is required for Windows 10 users.
There are four more methods to write protect or deny access to USB drives on the next page.
5. Wenovo USB Disks Access Manager
USB Disks Access Manager is the simplest tool here to use with a single window and three options to choose from. By default the system will have both read and write access, this can be changed to read only preventing any data from being written. Or you can select disable to stop the device from showing up in Explorer by disabling the USB storage driver.
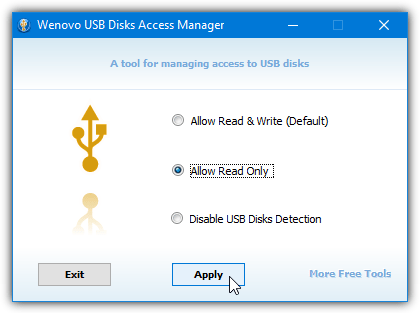
After the selection has been made press Apply and (re)insert any USB storage devices for the changes to take effect. Even though the program downloads with the word “setup” in its filename, it is actually a portable executable.
Download Wenovo USB Disks Access Manager
6. USB Flash Drives Control
This small piece of software is from developer Binisoft, which is now owned by security company Malwarebytes. The idea of USB Flash Drives Control is to be a more permanent solution that is always running because it installs as a system service and is controlled entirely from its tray icon context menu.
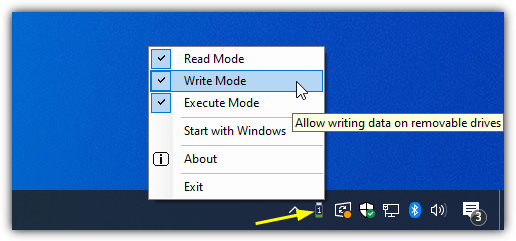
After install, you have three main options from the tray icon menu that are basically the same as the tools above. The first is Read Mode, disable it and USB drives will be unavailable on the system. Uncheck the Write Mode option to make all inserted USB drives read only. Turning off Execute Mode will stop any executable files from being launch on removable drives. As usual, changes take effect the next time the drive is inserted.
During uninstall, USB Flash Drives Control offers to reset the settings in the registry back to the system defaults. This is useful if you have been using any of these options here and just want to put the system back to the default settings.
Download USB Flash Drives Control
7. Disable USB Access Or Write Protect Drives By Editing The Registry
For the most part, the tools above disable or enable USB device write access through the system registry and one simple value change. Complete denial of access to the USB device is also another change to a different value.
We won’t cover manually editing the registry to write protect a USB drive here as it’s covered in another article. If you would like to know how to do it, read the article and the section on editing the registry yourself to enable write protection. Alternatively, download the ready made .REG files from below.
We’ve also covered how to disable removable storage devices such as USB drives by editing the registry elsewhere. Remember, attached USB storage devices will have to be reinserted for the changes to be applied. Download the .REG files from below.
Download DisableUSBMassStorage.reg
Download EnableUSBMassStorage.reg
Just download the file you want and double click it to import the data into your registry. Obviously, these are more manual options to a more friendly user interface but they do the same job in the background.
8. Write Protect A Single USB Device
The disadvantage the methods above have is the changes affect all devices attached to the system. All USB flash drives, memory cards, or hard drives will be write protected until the setting is changed to full access. This solution write protects only those drives you want on the local system, other systems will still have full access.
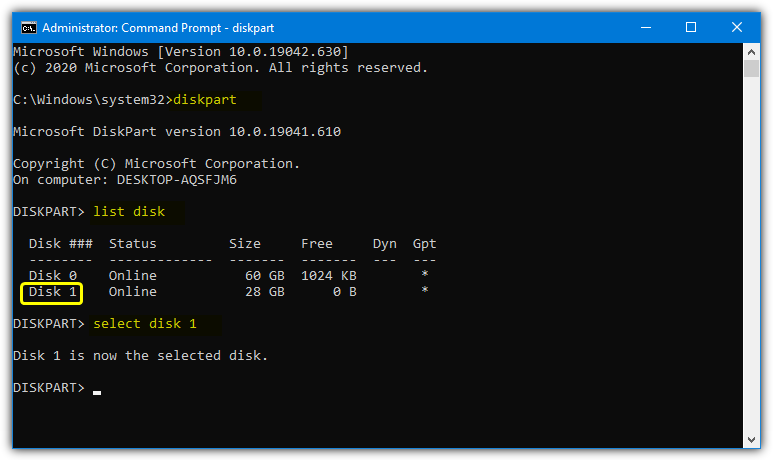
1. Open an admin Command Prompt (press Ctrl+Shift+Enter after typing cmd into Start) and type Diskpart.
2. Type List Disk to see the list of attached disks. Find the number corresponding to the USB storage device you want to write protect and enter Select Disk #.
3. Type Attributes disk set readonly, to confirm read only has been set you can optionally type attributes disk. If Read-only says Yes then it was successful and your drive is write protected on next insert.
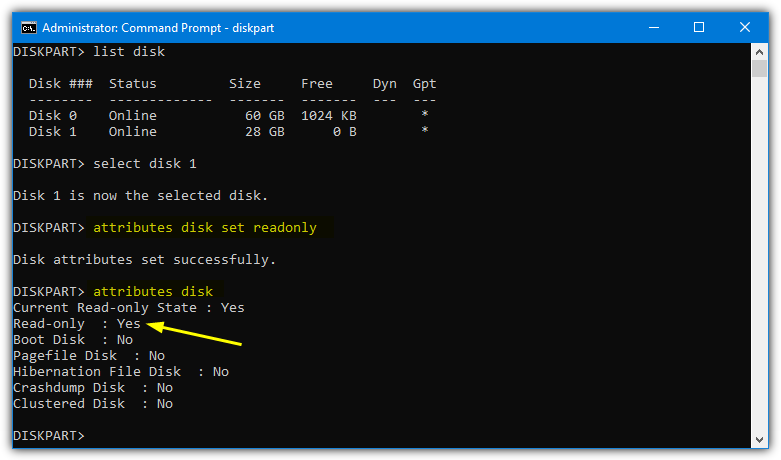
4. Type Exit and close the Command Prompt. To disable write protect for that drive enter Attributes disk clear readonly at step 3 instead.
This method is not a secure solution because the ID given to the device in the registry differs depending on which USB port it’s plugged into. Use another port and a new ID with a new write protect value will be created allowing full access. An obvious but inefficient workaround is attaching the drive to all available USB ports in turn and setting the write protect flag for each.
Tip: It’s possible to write protect a specific drive without using Diskpart and optionally create a .REG file to quickly turn the setting on or off. You do need to know the hardware name for the drive but it should be easy enough to work out from the list of USB devices. Go to the following registry key:
HKEY_LOCAL_MACHINE\SYSTEM\CurrentControlSet\Enum\USBSTOR
Find the drive name in question from the list and expand it to reveal a key with a unique ID, expand that also. Then go to Device Parameters > Partmgr. Changing the Attributes Value from 0 to 2 will make the drive read only on that specific USB port.
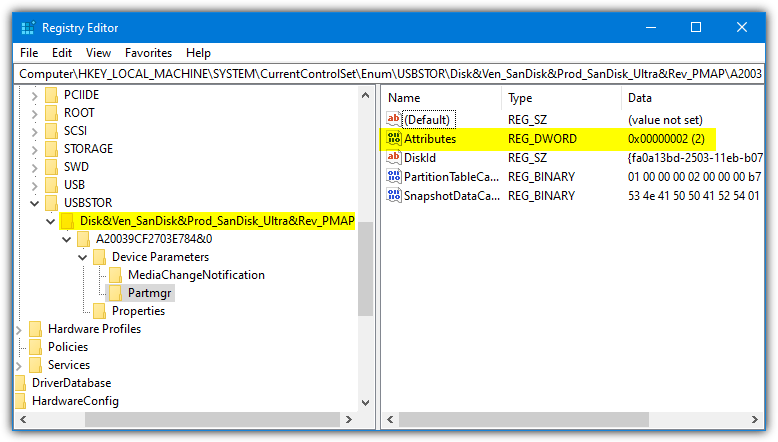
Right click on Partmgr and export the key with the Attributes value set to 0 and then 2. That will allow you to quickly click on either to change the status of the drive. Multiple unique IDs inside the device name key means it has been inserted into multiple USB ports and each one represents a different port. Change the Attributes value for each to protect the device in all used ports.

I guess I’ll be getting a drive with a hardware write protect switch then… There’s literally NO point whatsoever in making YOUR drive *read only on ONLY your own system. The point of making a drive READ ONLY would be so that when you’re using your drive on other PCs, it doesn’t “catch something”… You know, for when you come back home and ultimately plug it back into your own PC…
So if there is no way to physically lock the drive down, so that it’s READ ONLY on ANY and EVERY PC you connect it to,,, it’s futile…! Guess I’ll have to get one that has a hardware lock…!
Unless, there IS a way to lock a drive so that it is READ ONLY on ANY device you plug it in to… That’s what I NEED… Prime example is, I am about to take a “thumb drive” over to fed-ex kinkos to print something… While there my USB drive may “contract” a “virus”! Only to bring it home to MY own PC… So yes, it would be most needed to learn and know how to lock USB drives down from ANY device (PC) they’re inserted in to…
This article is quite clearly about locking USB drive access on your own system, and essentially the opposite of what you want to do. If you bring home a USB drive with a virus on it, the system can’t be infected.
There are various ways to “try” and lock down a drive using things like read-only files and filling up the free space so nothing else can get on the drive.
Failing that, you simply can’t write protect a drive on every machine and USB port you plug it into through software alone.
Is there any way to protect files from accidently being moved or deleted but still be able
to be opied to other folders? I’m talking specifically about ancestral photos. I want to keep a master folder of the photo files but fear accidently clicking on “cut” instead of “copy” when choosing a photo to add to a photo album. Thanks!
This is very nice thanks for the update it’s very informative.
I am looking for a means of adding a hardware switch to an existing USB external drive to be able to select write protect.
raymondcc (lower case)
The article is well written and illustrated. It pretty much explains what should and shouldn’t be attempted by someone based upon their level of experience and skill. My thought is: Use a second computer – to experiment on and learn. Not the computer you already have data, files, and documents secured on. That’s the mistake I made.
Normally when I plug in a sketchy USB drive I use virtual mode in Returnil.
nice..
thanks, i will try it..